I have to admit that beyond rudimentary application, I have not really explored the Controller Bar.
My cursory gander at the way I might achieve my desired result hasn’t really got me there.
What I would like to do is have the buttons respond to MIDI controller input so that I can verify the status of latched controllers. For example, I used a latched controller to address the number of voices on the Cherry GX-80. Is it possible to have the text and color of a button respond to MIDI input?
Thanks, as ever, for the pearls of wisdom I anticipate.

Hi Adrian,
The color of the button is fixed at present but requests are in for the ability to change it with MIDI input. The text however can be changed based on conditional evaluation of the MIDI input and you can also use of Emoticons graphics to set up what you had in mind.
You use script statements in the text fields where you customize the buttons like this to do it.
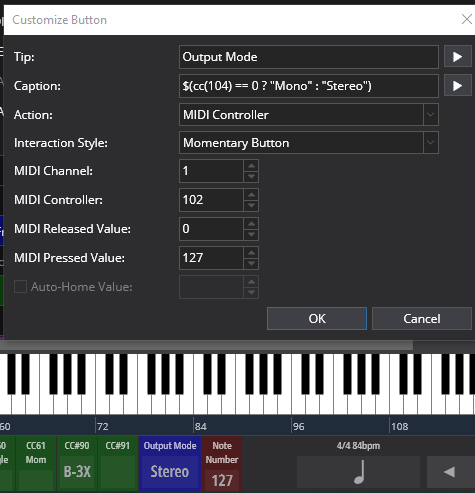
This is for my stereo / mono status from my master rack to the Main Speakers out. I used CC 104 as the input that determines whether to display the “Stereo” text or the “Mono” text.


Let us know what you needs are and I’m sure we can get something going.
Cheers,
Dave
1 Like
I have gotten around the current inability to dynamically set the color of buttons by using special geometric shape characters in the Unicode set that have color. Here is a roster I put together of many (but probably not all) of the useful colorized geometric shapes:
🟥 U+1F7E5 Large Red Square
🔴 U+1F534 Large Red Circle
🔺 U+1F53A Up-Pointing Red Triangle
   U+1F53B Down-Pointing Red Triangle
   U+1F53C Up-Pointing Small Red Triangle
   U+1F53D Down-Pointing Small Red Triangle

🟢 U+1F7E2 Large Green Circle
🟩 U+1F7E9 Large Green Square

🔵 U+1F535 Large Blue Circle
🔷 U+1F537 Large Blue Diamond
🔹 U+1F539 Small Blue Diamond
🟦 U+1F7E6 Large Blue Square

🔸 U+1F538 Small Orange Diamond
   U+1F536 Large Orange Diamond
   U+1F7E0 Large Orange Circle
   U+1F7E7 Large Orange Square

   U+1F7E1 Large Yellow Circle
   U+1F7E8 Large Yellow Square

   U+1F7E3 Large Purple Circle
   U+1F7EA Large Purple Square

   U+1F7E4 Large Brown Circle
   U+1F7EB Large Brown Square

   U+25AF  White Vertical Rectangle
   U+25FB  White Medium Square
   U+25B3  White Up-pointing Triangle
   U+25B7  White Right-pointing Triangle
   U+25BD  White Down-pointing Triangle
   U+25C1  White Left-pointing Triangle
   U+2B1C  White Large Square
   U+2B1E  White Very Small Square
   U+2B20  White Pentagon
   U+2B21  White Hexagon
   U+2B26  White Medium Diamond
   U+2B28  White Medium Lozenge (narrow diamond)
   U+2B2B  White Small Lozenge (narrow diamond)

   U+2B1B  Black Large Square
   U+2B22  Black Hexagon
   U+2B23  Horizontal Black Hexagon
   U+2B24  Black Large Circle
   U+2B25  Black Medium Diamond
   U+2B29  Black Small Diamond
   U+2B27  Black Medium Lozenge (narrow diamond)
   U+2B2A  Black Small Lozenge (narrow diamond)
To get the character, you can use:
- the Windows Character Map tool,
- Adam West’s BabelMap application, freely available http://www.Babelstone.co.uk/ (similar in intent to Windows Character Map, but has vastly more functionality, features, and support),
- the Keyman program (https://Keyman.com/ from SIL International)
You can also convert from the U+#### notation to an actual character in Microsoft Word by typing in the #### followed by Alt+X … Word will convert the Unicode “Code Point” to the character.
One thing I have found is that the font fallback scheme works quite well in Cantabile. If the font you are using (Kurinto Sans Mono Narrow, in Dave’s example above, from this post: Controller Bar Fonts), then Cantabile / Windows will go find the nearest matching font that does contain that character.
1 Like
Hey @dave_dore 
I have one gaping hole in my understanding which is probably going to be a DOH moment when it’s pointed out to me, but while I can see the pressing of Controller Bar buttons creates a result, I cannot work out where to address those buttons via MIDI. I’m not seeing a binding destination. What’s the trick?
And once that is achieved, how would one approach apply a specific CC value to the button? In this case, I’m latching CC94 at these values: 11,22,33,44.
Every press advances and I would like the button text to produce a specific display: 2,4,8,16 in response.
Every push of the hardware button should sync the Controller Bar button accordingly. If I can get my head around the basic approach, I hope I’ll be off and running. Thanks, as ever!
Hi Adrian,
the Controller Bar buttons are, in a sense, “part of the Onscreen keyboard”. In order to make MIDI messages arrive to the button, you have to direct them to the Onscreen Keyboard.
Once you have done that, you can use the value of the CC as shown above by @dave_dore, to produce a caption (even using some logic statement to produce the desired output). See also this thread
Cheers,
Gabriel
2 Likes
Guys, I’ve got this going except for the syntax required to step through the values.
Can you suggest what might be required to have the button text reflect all 4 options?
Hi Adrian,
Can you post the bindings used to send the MIDI messages to the Controller Bar? I’m not sure what you are sending but an example of the syntax would be like below.
$(cc(104) == 0 ? "ONE" : cc(104) == 42 ? "TWO": cc(104) == 83 ? "Three" : cc(104) == 127 ? "Four":"")
This syntax assumes you are sending exact values for each increment of 128 / 3 rounded to the nearest one. You will probably need to fiddle with the TWO and THREE values but this way should work.
Also you don’t need the pop up slider for it to work. If you don’t need it set the button action to No Action.
Dave
Hi Dave,
This is where the latch is established, at the keyboard input 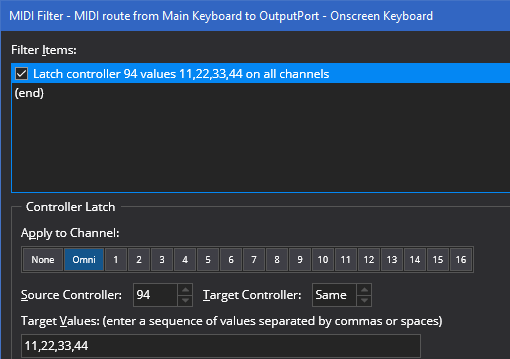
That is then applied to 4 bindings each of which wraps around the general area of each latch value.
As the first value issued is 11, the first binding is limited from 10-12. The second is limited from 21-23 etc.
I’m not sure why hitting the required value on the nose doesn’t work, but I had to do it this way to get a result at the GX-80

All I’m sending to the Controller Bar is the CC94 latched output. It sees CC94 @11,22,33,44
That works! Great! I can now adapt that to other latched switches.
Just out of interest, where are these codes found in documentation?
Thanks, as ever!
1 Like
Glad you worked it out Adrian! Here are the main areas of interest regarding the codes and syntax.
Cheers,
Dave
4 Likes
Dave, I did see that info on my previous trawls.
I was thrown by this:
Ternary (aka conditional) operator
<, <=, >, >=, ==, !=
Now I see a familiar code in there, ==, but not specificity as to what it does. That lot is all lumped together. What should I make of it?

Hi Adrian,
The == and != are called equality operators.
== means “equality” or “equal to”, != is “inequality” or “not equal to”.
<, >, <=, and >= are called relational operators.
< means “less than”, <= means “less than or equal to”, >= means “greater than or equal to”, > means “greater than”.
Dave
2 Likes
And this:
![]()
is greater than or less than equal to the greatest of the lessor:
![]()
1 Like
Ah yes, the I forgot to include an explanation for the smooth operator … ![]()
 – Official – 1984")
I had to fully hijack the thread before Corky did, sorry …
2 Likes

2 Likes
Thanks again!
Some standard fare in there - but some new learnin’. 
On a practical note, it seems that all the coding is placed into that one field. I used Word to put together the longer strings. Would that be a reasonable way to go about construction?
If one is introducing emoji codes and the like, is there a protocol for order of events?
Cheers m’dears.
Yes, I use a text editor
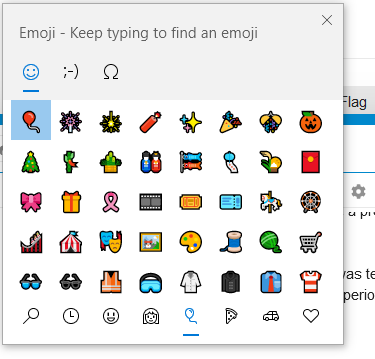
no, just paste the emoji in between the quotes like it was text or mix them in with the text. to open the emojis for Windows hit the Windows key + period key and the selection window will pop up.
1 Like
I’ve been authoring and maintaining my Controller Bar formulas in a simple text file, edited with Notepad. Here’s an example of one of my Controller Bar buttons:
Mus1
Color:		Green
Tip: 		Mus1
Caption:	$(cc(4,16)<1 ? "🟥" : cc(98,16)<63?"L":cc(98,16)>64?"R":"🟢")$(cc(4,16)<1 ? "" : cc(98,16)==0 ? "f" : cc(98,16)==127 ? "t" : cc(98,16)<63 ? formatNumber((63-cc(98,16))*1.5873, "N0") :cc(98,16)>64? formatNumber((cc(98,16)-64)*1.5873, "N0") :"")$("\n")$(cc(5,16)>=104 ? "+": "‒")$(formatNumber(abs(cc(5,16) > 80.5698924731 ? (cc(5,16)*0.25845298751) - 26.8235294118 : (cc(5,16) * cc(5,16) * -0.00588098683) + (cc(5,16) * 1.20611394147) - 65),cc(5,16)<70?"N0":"N1"))$(cc(19,16)<1 ? "\n🟥" : cc(22,16)<1 ? "\n🔷" : "\n🟢")
Action: 				MIDI Note
Interaction Style: 		Momentary Button
MIDI Ch / Note: 		5 / 2
MIDI Rel / Press Vel.:	0 / 127
Note that the Caption: line is long … and I’ve set Notepad to wrap the lines at 120 characters wide.
This is perhaps the worst way to implement programming - the entire expression crammed together on a single line, with no formatting, indentation, or comments. Unfortunately, if I put the Caption expression on multiple lines, cut-and-paste from Notepad into Cantabile will truncate everything after the first newline.
Improving the interface for Tip and Caption might be a good feature request, but I’m not sure how many folks get really fancy with these fields …
1 Like
Hi Clint,
Well, having dipped my toe in the water, I can immediately see the value of being able to employ text formatting and have Cantabile deal with it usefully.
It’s quite difficult to keep your eyes from crossing once there’s more than a simple instruction.