Sounds a bit too complicated for my taste 
Just 4 extra wires and less code. (plus it was stuff I had laying around, and I’d do the panel mount USB port regardless)
I feel your pain with that pedal. When I bought it I was convinced it was small enough to sneak past the wife, yet large enough to be foot friendly. Unfortunately only the latter was true. ![]()
![]()
1 Like
One question, about Arduino and Teensy.
What happens in Arduino when Teensy is installed? Example: What happens to the Arduino board if I do a Teensy download and vice versa?
More specifically: when I have to do the Flash on Arduino (exchange of the HEX file), if I have installed Teensy, the flash fails.
To do the Flash, I have to totally uninstall Arduino and reinstall it without Teensy.
Because?
Teensyduino is an extension to the Arduino IDE. It doesn’t do anything to the “Arduino board”; it just allows you to use the Arduino IDE to program Teensy microcontrollers.
The download itself also doesn’t affect your Arduino installation - but I guess you mean “what happens when I install the Teensy extension to the Arduino IDE”…
The Teensy extension is only compatible with a certain range of Arduino environment versions - that is shown on the first page of the Teensyduino installer:
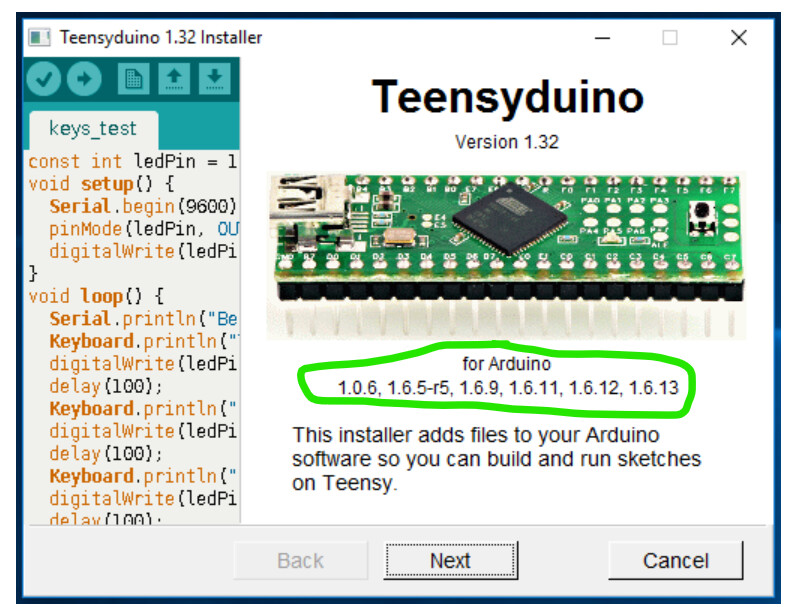
As long as your Arduino IDE installation is one of the versions mentioned here, your installation should be OK. The current Teensyduino supports Arduino IDE versions 1.8.5 and 1.8.9 and 1.8.12 and 1.8.13 and 1.8.15 and 1.8.16. But it does NOT currently fully support the latest Arduino IDE (1.8.18). This could be the cause of your issues - please check the version of your Arduino IDE to make sure it is compatible with the Teensyduino libraries.
All this is described in detail on the Teensyduino download page - please be sure to read what the fine folks of PJRC publish there…
Cheers,
Torsten
Torsten, the version of Arduino I have, is compatible. I had read on the site that my version of Arduino was compatible with the Teensyduino and then I downloaded it.
But the fact remains that the result does not change. Surely there will be another reason that I don’t know at the moment.
I am very sure that you are telling the truth, you are the expert, I am much less, but I try to be careful if and where possible.
The reason for the malfunction in question I will evaluate it calmly and when I find the reason for this disservice I will let you know for a possible usefulness for everyone.
Currently the board works, the flash runs and then I can use the Arduino Uno for what I set out to do, which is that my EC5 now functions as a pedal controller.
Having learned to deal with Arduino was certainly interesting and long in learning time (I still have a long way to go …).
For this I have to thank a friend who supported and endured me in this.
See you soon Torsten.
Sergio
Torsten, I’d like to be more specific.
I noticed this inconvenience when I only had Arduino and I wanted to load Teensyduino too, thinking about an IDE expansion of Arduino.
But at the time of flashing for the other mode, the thing was not successful.
So I thought about taking Teensy off and to do that I uninstalled Arduino and reinstalled it without Teensyduino and everything worked.
Sergio
I know Teensy doesn’t need Flash mode, it’s midi ready
Sergio
Hmm, then I’m afraid I can’t help you here - I have moved completely to Teensy, so no more Arduino boards to experiment with…
Hi Torsten, a couple of things.
The first.
I think I have identified the abnormality I referred to yesterday. At least, that’s my guess !!
For my needs I had purchased 2 Arduino Uno boards, one to recover my EC5 Korg (pedal board with simple buttons) and make it work with Cantabile and the other was my intention to use it as a utility (timer) for my irrigation system (which is not it is certainly a MIDI system …).
It is very likely that I have damaged something on one of my cards myself. Maybe, while I was experimenting, I would test first one and then the other card, only one of which worked. I may have inadvertently touched something with the test leads to reset (as per video posted on the Forum).
My fault, no doubt.
I had actually concentrated on one of the two, I had not realized that one of the two was working badly and therefore, by pure chance, I set the good one completely, which works very well as a controller for my EC5 with C3.
This morning, to remove the doubt, I did some tests with the second. In fact, this board has an anomalous functioning and I cannot reset it (by means of Flash, to reinsert the original Arduino Uno HEX file).
So this may have been the problem. It wasn’t Teensyduino, but likely a malfunctioning board problem. Mind you: I put forward this explanation as a hypothesis !!
The second thing.
By now my modification for my pedal board has gone well.
The Arduino Uno board, as set up, I no longer intend to remove it from the box I built, making changes to the program for the buttons would be very complicated and not worth starting over!
So I wanted to ask you for help, a link where I can see some examples of how the Teensy card works.
I’ve seen something, but a lot on the generic, however I’d like to see something more specifically like something on buttons and knobs, much like I did with IDE Arduino.
I noticed that you no longer experiment with Arduino boards, but are completely Teensy oriented.
From what I read from your posts and others here in the Forum it would be easier to use Teensy.
So I would like to try to do something with the Teensy too, maybe from the versions above 2.0 that you often refer to. Version 2.0 is not found, but from what I read from the PJRC site the later versions have been greatly improved.
From what I read, then, there are differences about the libraries used by Teensy that differ from those of Arduino.
Do you have to suggest me some links where I can find something for the above?
Hey @Sergio
the PJRC page has a number of good tutorials and examples to get you started.
- First take a look at the tutorials
- Then I’d recommend the code library section, especially on using Teensy as a USB MIDI device and using it as a keyboard
- also useful when using push buttons: the Bounce library - but there is an updated one available that I recommend - Bounce2
You install libraries like Bounce2 using the Library Manager in the Arduino IDE.
Finally, here are two “real life” examples you could study to find out more how things work:
First, a simple device that simply allows you to use any push putton to press “Space” on the keyboard - you need to configure the Teensy as a keyboard for this:
#include <Bounce2.h>
#include <HID.h>
#include <Keyboard.h>


// defines

// pins
const int SWITCH1 = 3;

// global vars
Bounce button = Bounce();

void setup() {
  // put your setup code here, to run once:

  // !! uncomment this for debugging via Serial !!
//  Serial.begin(9600);

  pinMode(SWITCH1, INPUT_PULLUP);
  button.attach(SWITCH1);
  button.interval(5);

}


void loop() {
  // put your main code here, to run repeatedly:
  if (button.update()) {
    if (button.fell()) {
      Keyboard.press(' ');
    } else {
      Keyboard.release(' ');
    }
  }
}
You simply connect the button between the data pin and ground - the data pin is configured with the internal pull-up resistor - that’s a Teensy specialty, so you don’t need to add an external resistor. So when you connect that pin to ground, it will recognize this as a “fell” signal, when you release the button and disconnect from ground, you will get a “rose” signal.
Here’s a more complex example:
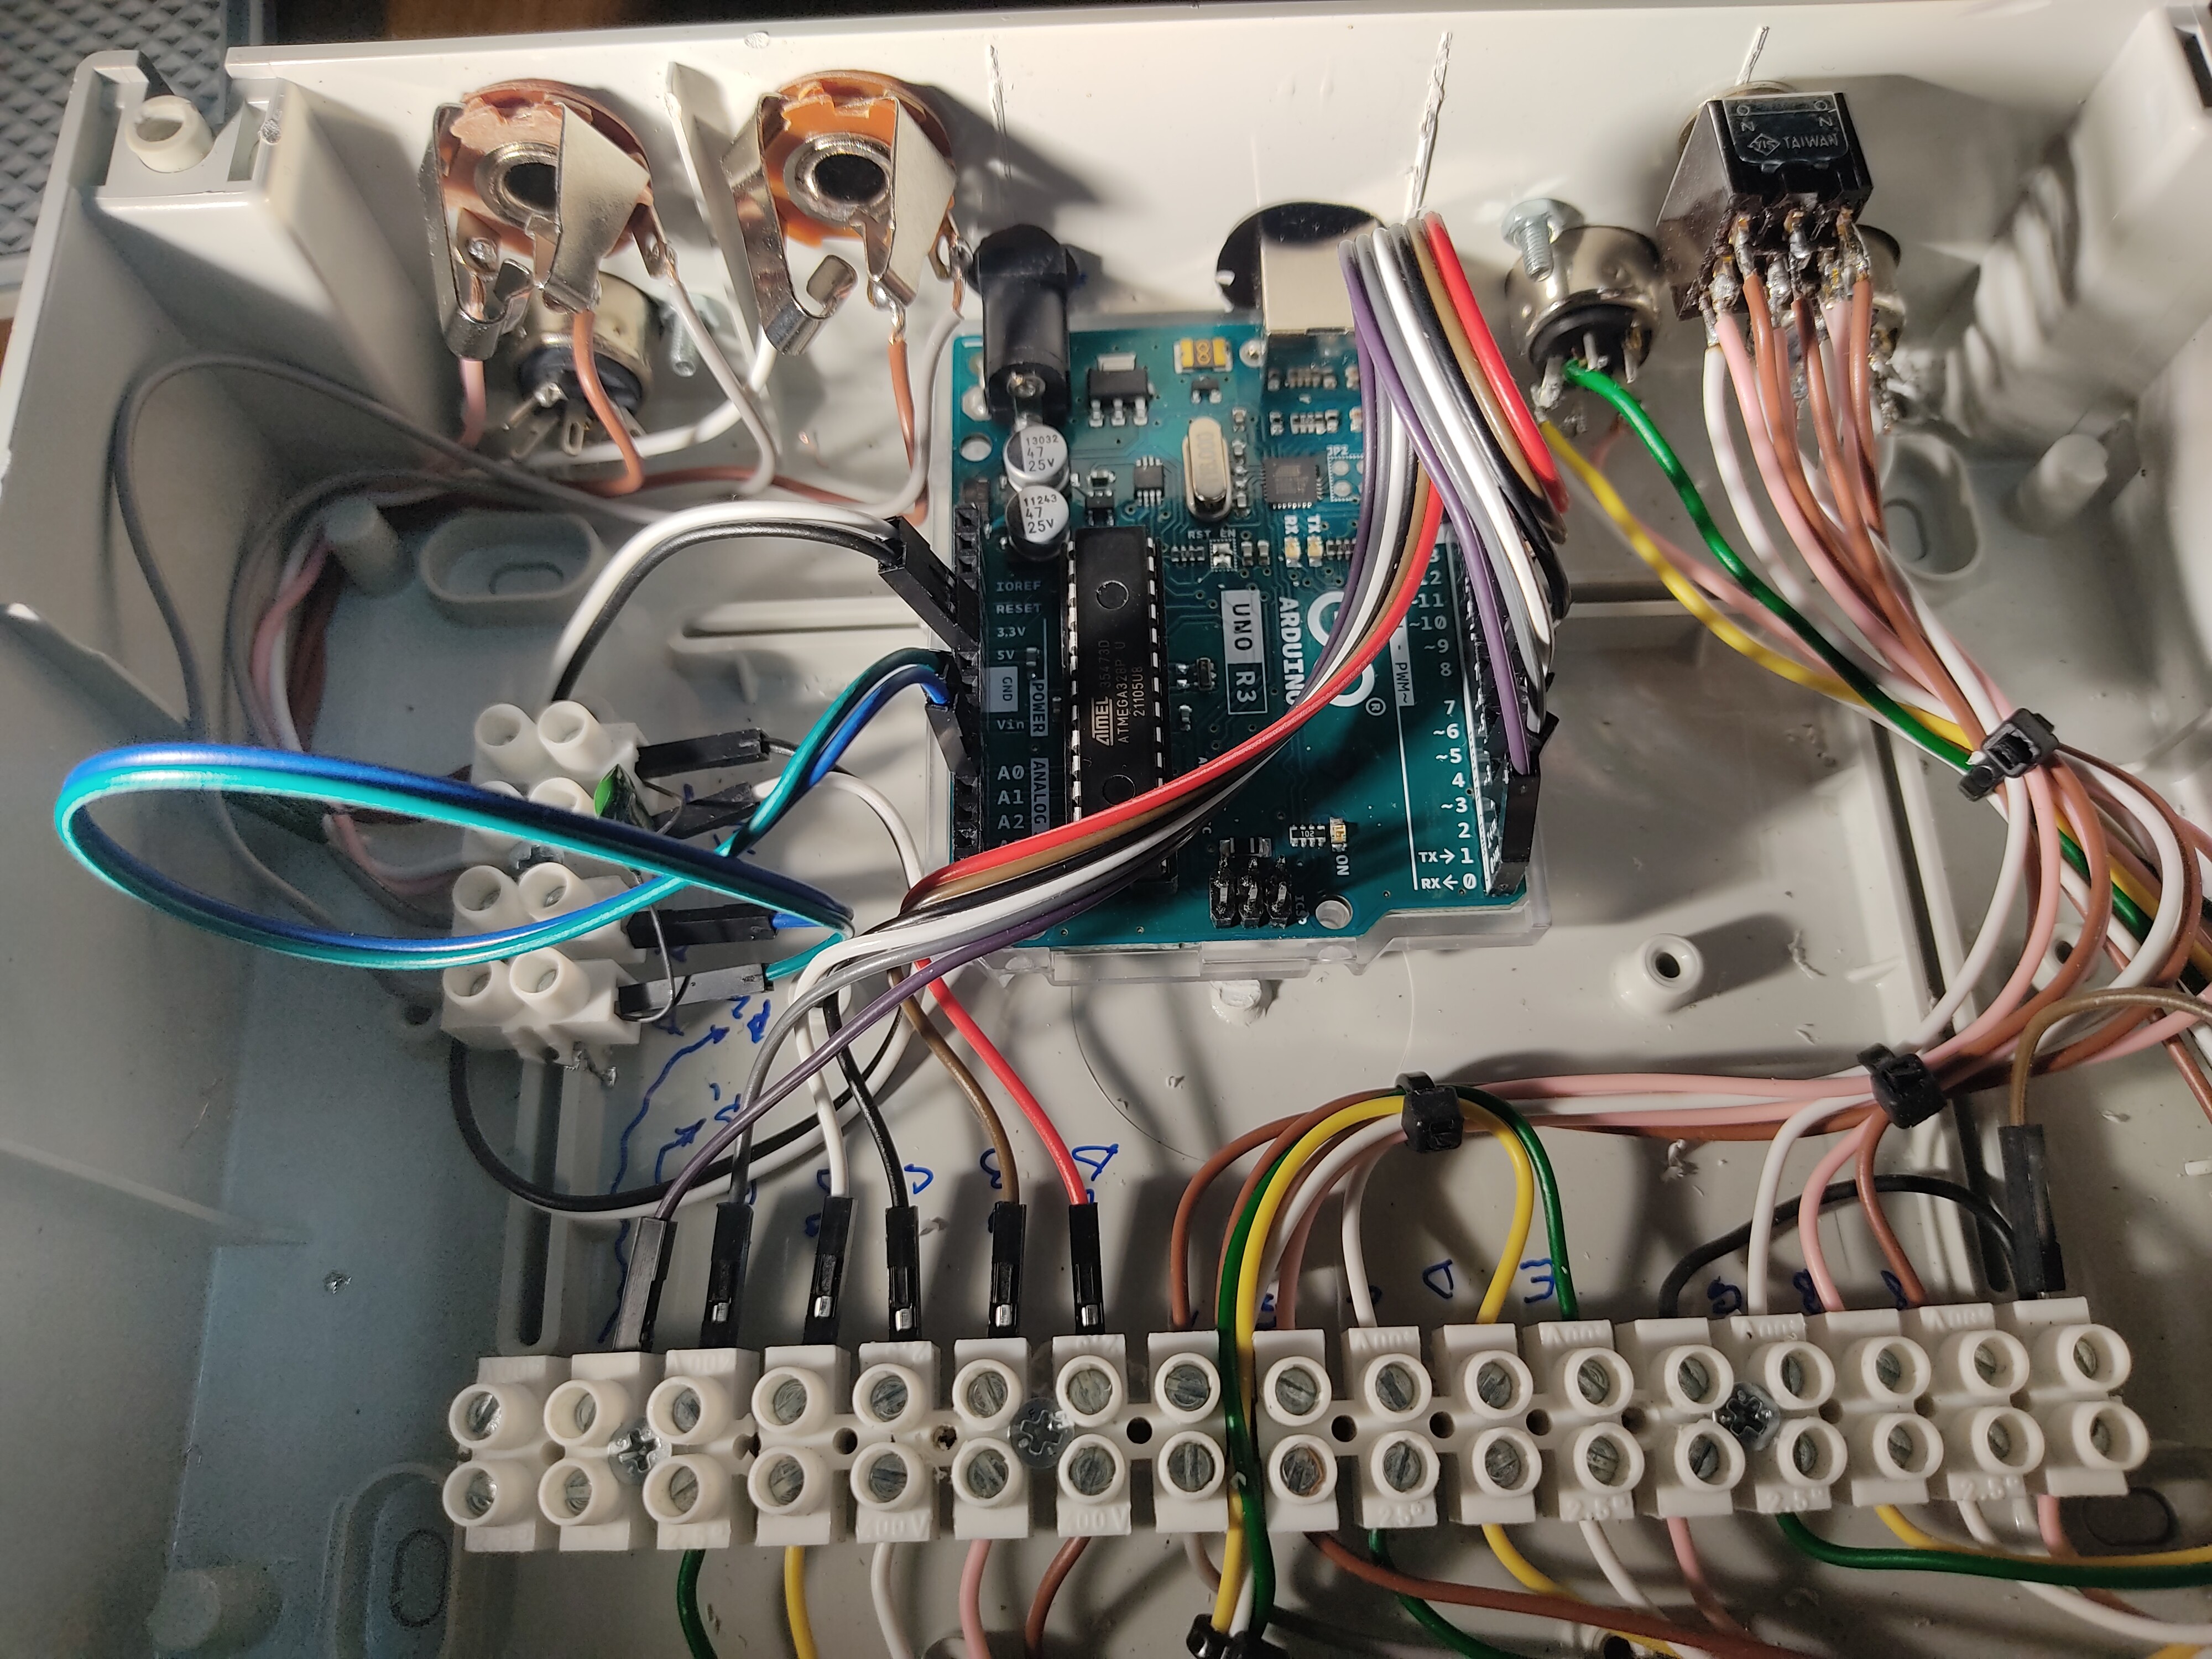
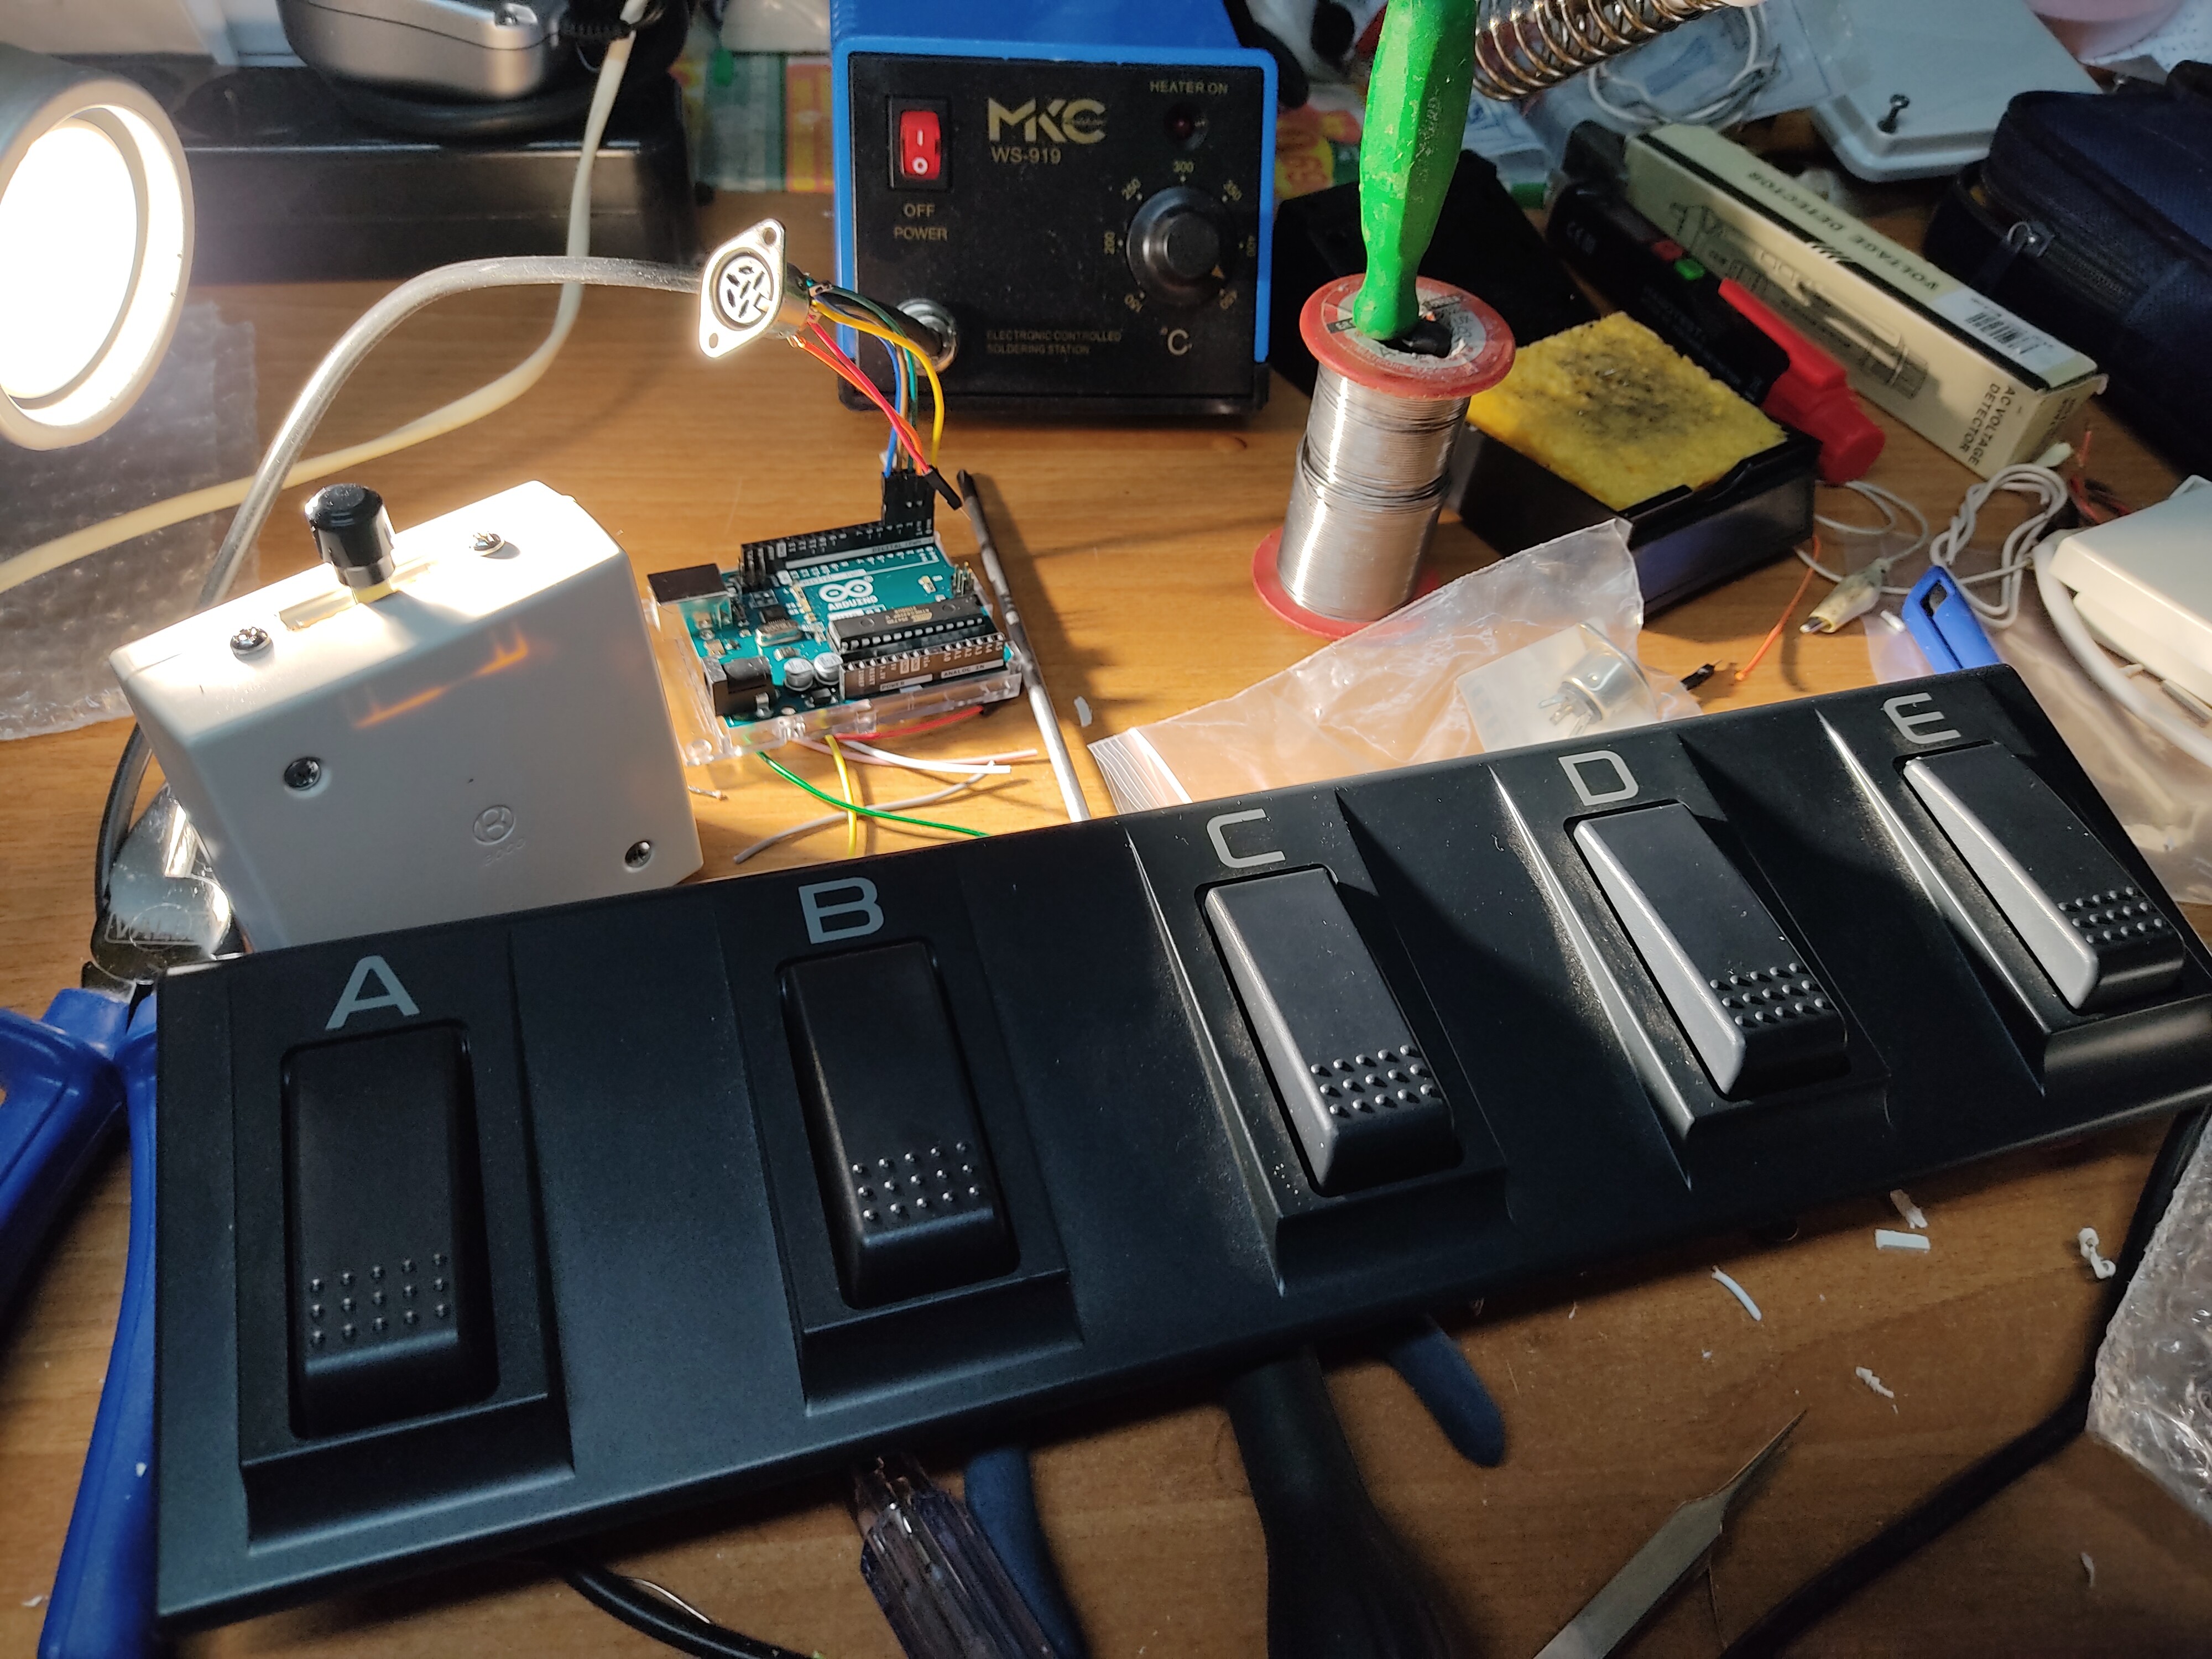
I built a box with two buttons, four switch pedals, some LEDs and an expression pedal to sit between a PC and an AxeFX to switch patches and control volume or wah-wah. It is configured as a MIDI device, and it also uses a serial port output as a “classical” MIDI output (DIN plug). This is what it looks like:
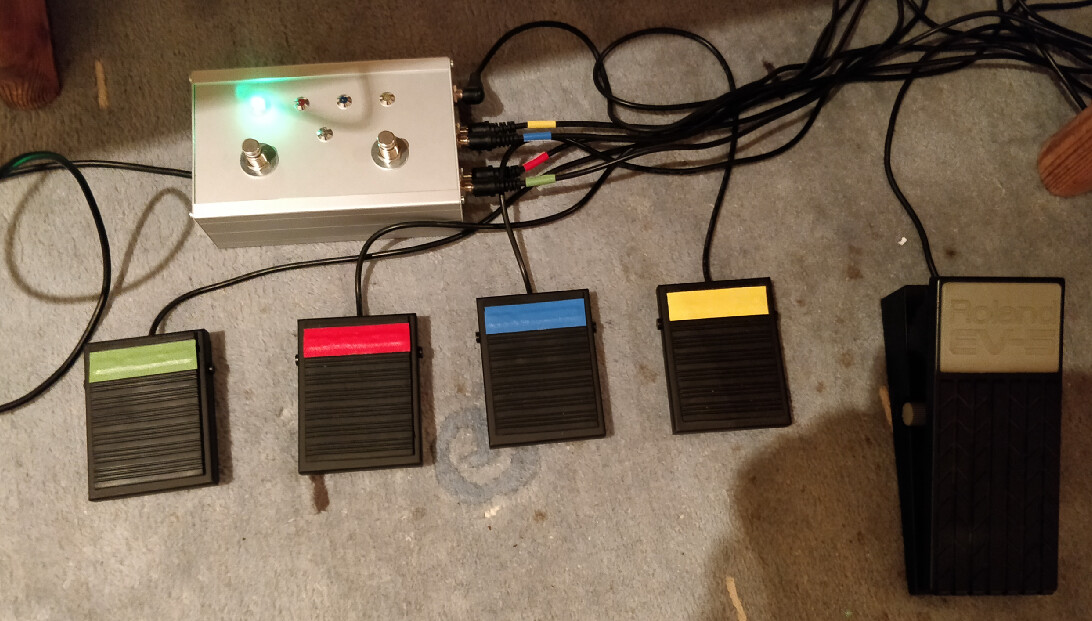
It receives MIDI from the PC via USB; if that is on channel 1, it forwards it to the “classical” MIDI port (sends program changes to the AxeFX), if on channel 16, it uses the input to switch LEDs on or off.
When it receives input from the buttons, pedals or the expression pedal, it sends MIDI CCs to the PC via USB.
This is the code behind it - relatively simple (a bit sloppy, but it works ![]() ).
).
#include <MIDI.h>
#include <Bounce2.h>

MIDI_CREATE_INSTANCE(HardwareSerial, Serial1, MIDI);

// defines

// Expression pedal tuning
const int EXP_THRESHOLD = 5;
const int EXP_MAX = 1010;
const int EXP_MIN = 100;
// pins
const int EXP_PEDAL = A0;
const int SWITCH1 = 17;
const int SWITCH2 = 18;
const int SWITCH3 = 19;
const int SWITCH4 = 20;
const int SWITCHUP = 0;
const int SWITCHDOWN = 1;
const int LED1 = 2;
const int LED2 = 3;
const int LED3 = 4;
const int LED4 = 5;
const int LED_WAH = 6;

// global vars
int expression = 0;
int prevExpression = 0;
int expReadPrev = 0;
int expRead = 0;

Bounce button[6] = {Bounce(), Bounce(), Bounce(), Bounce(), Bounce(), Bounce()};
int switchPins[6] = {SWITCH1, SWITCH2, SWITCH3, SWITCH4, SWITCHUP, SWITCHDOWN};
int LEDs[5] = {LED1, LED2, LED3, LED4, LED_WAH};
byte controllers[7] = {81,82,83,84,85,86,90};
byte led_controllers[5] = {81,82,83,84,90};


void setup() {
  // put your setup code here, to run once:

  // !! uncomment this for debugging via Serial !!
//  Serial.begin(9600);


  for (int i=0; i < 6; ++i) {
    pinMode(switchPins[i], INPUT_PULLUP);
    button[i].attach(switchPins[i]);
    button[i].interval(5);
  }

  MIDI.begin();
  for (int i = 0; i<5; ++i) {
    pinMode(LEDs[i],OUTPUT);
    digitalWrite(LEDs[i],HIGH);
    delay(200);
    digitalWrite(LEDs[i],LOW);
  }
}


void loop() {
  // put your main code here, to run repeatedly:
  // buttons first
  getButtons();

  // now expression
  expRead = analogRead(EXP_PEDAL);
//  Serial.print("EXP: ");
//  Serial.print(expRead);
//  Serial.print(" - ");
    if (expRead > EXP_MAX) {
      expRead = EXP_MAX;
    } else if (expRead < EXP_MIN) {
      expRead = EXP_MIN;
    }
//  Serial.println(expRead);
  if (abs(expRead - expReadPrev) >= EXP_THRESHOLD) { // avoid pedal jitter
    expReadPrev = expRead;
    int expTemp = map(expRead,EXP_MIN,EXP_MAX,0,128);
    if (expTemp > 127)
      expTemp = 127;
    if (expTemp != expression && expTemp != prevExpression) { // controller value changed and no jitter
      prevExpression = expression;
      expression = expTemp;
      SendCtrl(1,controllers[6],expression);
    }
  } // expression read

  // now check for incoming MIDI via USB
  while (usbMIDI.read()) { //on incoming MIDI message via USB
    byte type = usbMIDI.getType();
    byte channel = usbMIDI.getChannel();
    byte data1 = usbMIDI.getData1();
    byte data2 = usbMIDI.getData2();
    if (type != usbMIDI.SystemExclusive) {
      // we have a short message
      if (channel == 1) {
        // forward to serial MIDI
        midi::MidiType mtype = (midi::MidiType)type;
        MIDI.send(mtype, data1, data2, channel);
      } else if (channel == 16) {
        // check for LEDs
        for (int i=0; i <5; ++i) {
          if (type == usbMIDI.ControlChange && data1 == led_controllers[i]) {
            if (data2 > 0) {
              digitalWrite(LEDs[i],HIGH);
            } else {
              digitalWrite(LEDs[i],LOW);
            } // on or off
          } // correct message for LED i
        } // repeat across all LEDs
      } // if channel...
    }  // if not SysEx
  } // while usbMIDI read

}

void getButtons() {
  // read all buttons; if pressed or released, send MIDI value
  for (int i = 0; i<6; ++i) {
    if (button[i].update()) {
      byte outValue = ((button[i].rose())? 0 : 127) ;
      SendCtrl(1,controllers[i],outValue);
    } // if button updated
  } // loop thru buttons
}

void SendCtrl(byte channel,byte controller, byte value) {
  usbMIDI.sendControlChange(controller, value,channel);

  // !! uncomment this for serial debugging!!
//  Serial.print("Channel ");
//  Serial.print(channel);
//  Serial.print(", Controller ");
//  Serial.print(controller);
//  Serial.print(": ");
//  Serial.println(value);
}
The insides are also pretty simple and clean: just the Teensy, a few resistors for the LEDs and for the serial MIDI output, and a bit of wiring, that’s it.
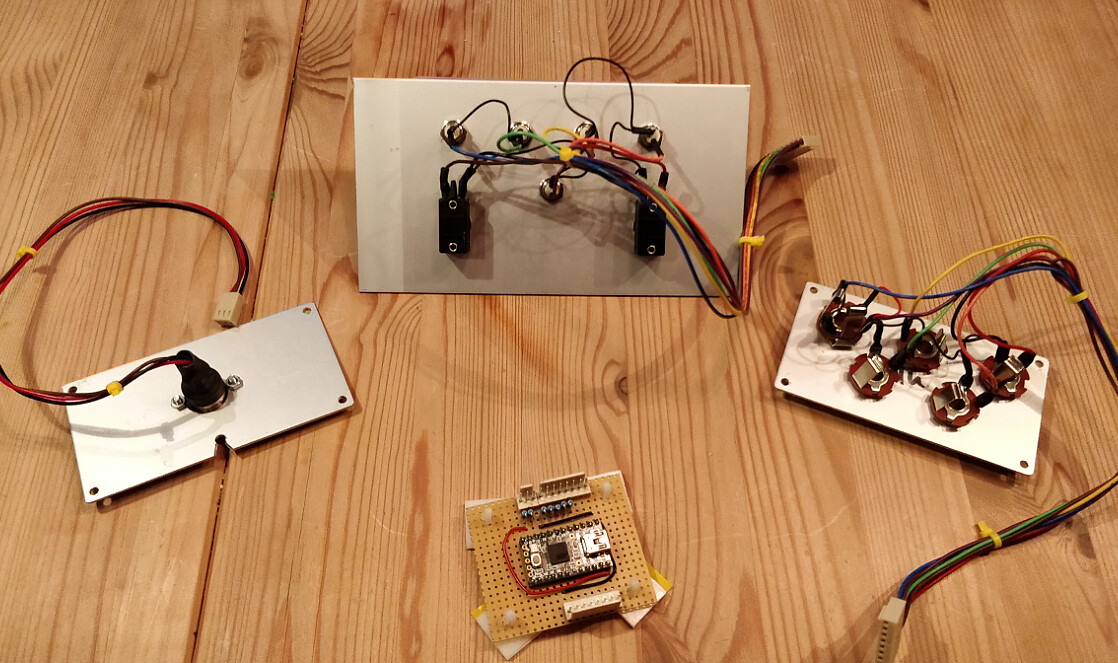
So give the code a read - should all be pretty self-explanatory. There’s just a bit of fiddling around the expression pedal to avoid too much data noise; the rest is straightforward.
Cheers,
Torsten
1 Like
Thank you for your help, Torsten. From tomorrow I will begin to see the things you have suggested to me. Happy Sunday.
Cheers.
Sergio
Hi everyone.
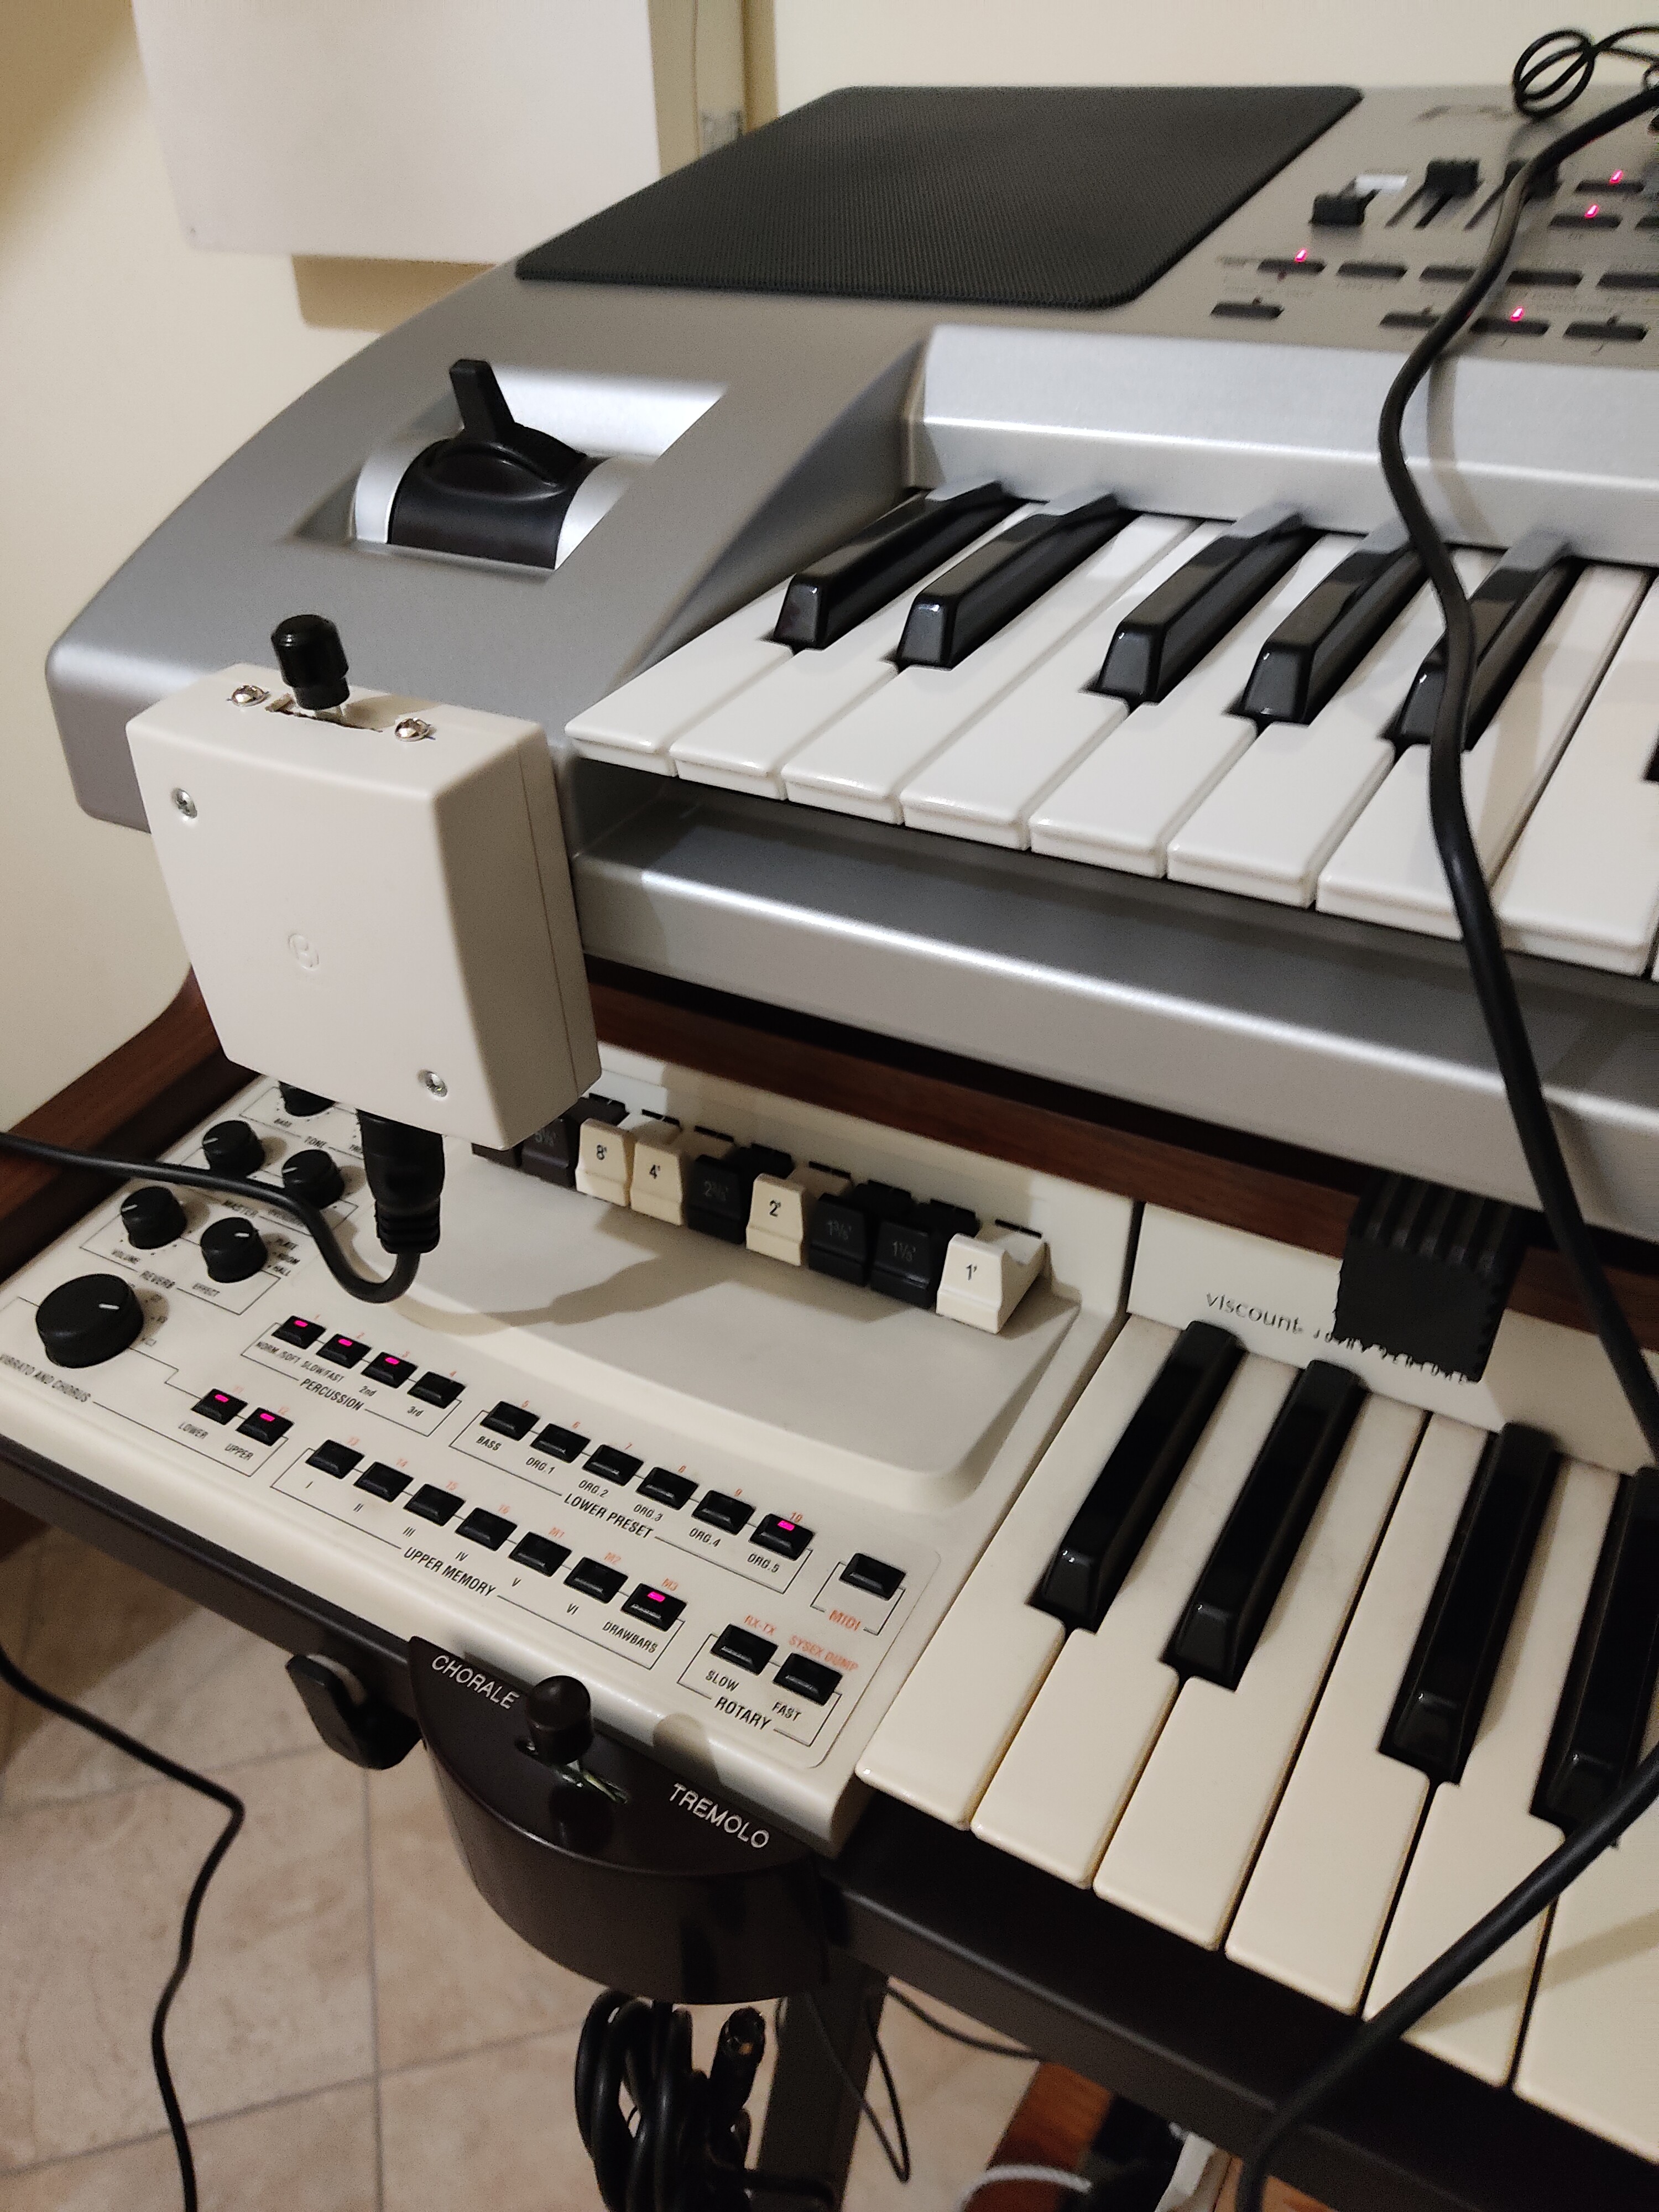
I have completed my midi interface box to use my Korg EC5 pedal board. It took me a while to make it, but in the end my pedal board became a Midi controller !!
Then, since the appetite comes with eating, I made a kind of Half Moon that I called Square Moon because of its strange shape …
To achieve all this I have to thank all those who answered my request, each one gave me invaluable insights and advice on things I did not know. Everyone contributed to help me. And for this I am truly grateful!
In particular I have to thank John Toth, he helped me a lot with those many tips and advice that allowed me to understand how to do my thing, that is, “resurrect” my old pedal board. In the photos below is the first prototype, my Square Moon and the EC5. I later built a second box (I have not yet taken a photo to want to view my complete station), because I added 3 additional pedals in the context, for volume, expression and wha and two additional buttons for up-down for the states by Cantabile.
Next time I would like to try my hand at Teensy cards.
Torsten had given me a start (I researched according to his suggestions), I would like to explore this other possibility too, which, among other things, could be simpler.
Indeed, I take this opportunity to ask Torsten if he can give me some information regarding the 4.1 Teensy from the point of view of electrical connections. I think the program he posted is also applicable to this version and not just to 2.0. Since it is new for me it would be useful to take a look at the wiring diagram, which pins are connected, etc …
Thanks.
Sergio
2 Likes
Hey Sergio,
pretty much all the programs I’ve provided should also work nicely on the Teensy 4.1, provided you use an up-to-date version of the libraries. The key difference between the Teensy 2 and the 4 series is that the digital ports operate at 3.3 V on the new Teensies, as opposed to 5 V on the Teensy 2. Just something you need to consider when sizing resistors for LEDs and when you use its serial interface capabilities to build an old-school DIN MIDI port.
The 4.1 has a gazillion of connectors that can be directed to work in a variety of ways:
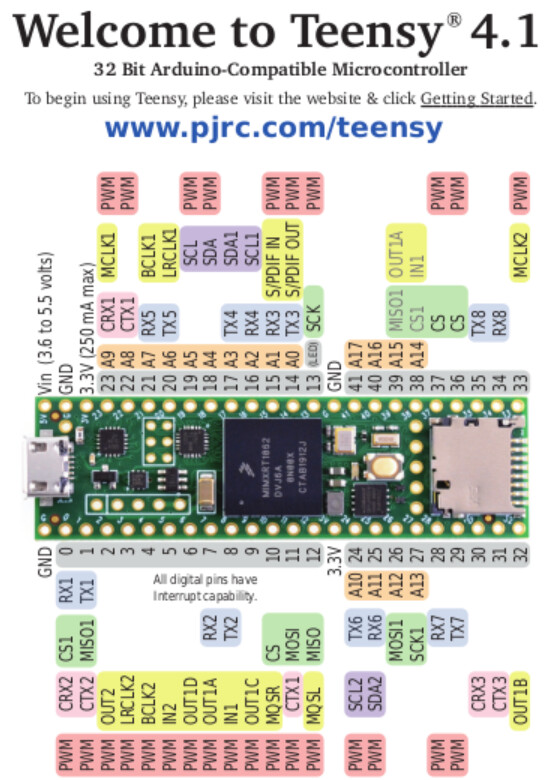
I currently just use their digital input/output capabilities (switches, LEDs), analog input (knobs, sliders, pedals) and Rx/Tx (MIDI); the rest I don’t really need in my projects. That’s why for all my projects so far, the Teensy LC is enough. And I definitely don’t need the processing power of a 4.1 for the simple switching applications I make…
I just built a simple “Talkback button MIDI control” for my RME Fireface using the Teensy LC - works nicely…
Cheers,
Torsten
1 Like
Thanks, Torsten.
I’m not going to use LEDs, just switches / buttons and potentiometers.
I bought the 4.1 and, according to what you tell me, you recommend the LC (I understand that the 4.1 is exaggerated …). See if it’s worth getting a Teensy LC.
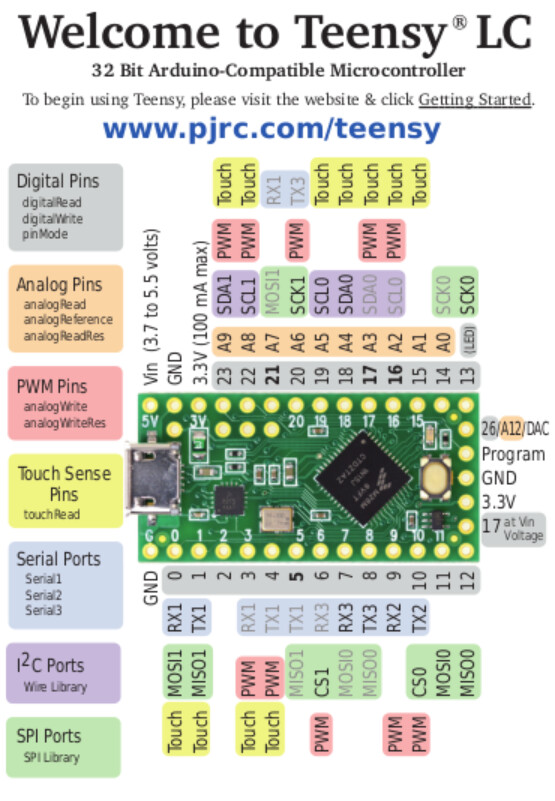
More than anything else I would like to understand the pins to which I have to refer, the ones I see would be the pins in gray on the left side for the buttons and those in pink on the right for the potentiometers. Right?
Another thing: do you use a 5 DIN connector and not a USB cable that acts as a power supply as well as in / out midi messages?
Finally, a wiring diagram for connecting the connector 5 DIN to Teensy LC would be useful.
regards
Sergio
Really depends what you are doing - the LC is just the cheapest and least space-consuming way to get simple things (like managing switches and pedals) done. I’d get the 4.1 for more complex automation tasks where you need more inputs / outputs or more processing capability. If you want to drive large LED matrices, that would probably be the beast to go for. I think I’ve also seen some audio processing applications of the 4.1, so the processor seems pretty decent.
Starting from the basics here: the pins on a Teensy have the capability to be a lot of things - you need to decide what you want to use them for. So Pin 0 on a Teensy LC can be a simple digital I/O (grey) or be the Rx pin for serial port #1, or be used for a touch sensor. But Pin 0 can’t be used for a potentiometer, since it does not have the Analog Pin capability. For that, you’d have to use pins 14-23, which have the orange “A0” to “A9” label
To use a pin as a digital in/out, you need to tell it what it is supposed to be via the pinMode command. To use it as analog input, you simply use AnalogRead with the respective pin number. I usually use the labels instead of the pin number, so I’d use AnalogRead(A0) instead of AnalogRead(14).
No, so far I haven’t powered my Teensies via MIDI - I usually have a USB cable with a standard phone power supply attached to provide power for those projects that aren’t attached to a PC. Using the “+” part of a MIDI connection to power your device could work, since one of the pins carries +5V, but there is no real standard to that in terms of accepted load. Also, there are newer MIDI devices in circulation that use the 3.3 V standard, so that complicates things (you need 3.7 to 5 V to power the Teensy). So I personally wouldn’t try that.
Again, the Teensy web site is your friend:
https://www.pjrc.com/teensy/td_libs_MIDI.html
Just be sure that you use the newer version of the schematic - you need to use 47 Ohm resistors, not the traditional 220 Ohm ones for the 5 V technology. Also, you need to use an opto coupler for the input side of things.
Good luck!
Cheers,
Torsten
2 Likes
Hi Torsten.
Thanks for your clarifications.
I think I’ll go in search of a couple of Teensy 2.0 (one I will stress for sure …), because from what I read and for the rather limited use that I would like to make of them, this version is fine (if I find them … ).
I think I understand quite well what you explained, I opened the link and it seems perfect for what I was looking for, a great approach.
When I find the material, I will probably ask you for some details if I have any doubts. But one thing is certain, compared to a couple of months ago I am able to get into certain topics better, little by little, but “I’m working hard”.
Thanks
Regards
Sergio
Why not get the LC? It costs even less than the 2.0 (LC = “low cost”), and it is more broadly available. I was mostly using the 2.0 because I had previously bought a bunch of them - and I didn’t want to change my serial MIDI circuit design to the 3.3 V standard. I will be using LCs for most of my projects going forward…
Ok. I’ll take some LCs. I will take 2 LC
When they arrive I’ll let you know, maybe I’ll draw a circuit and show it to you before building it, for any advice and / or corrections during the race.
Thanks, Torsten
Sergio