Midi/USB Foot Controller. DIY or not?

I’m in Florida, US

To create a custom hex file for your controller to be a universal MIDI device go here, enter the name you want to use (FS-101, Footswitch, etc), the manufacturer is you (what ever you want it to be)
https://moco-lufa-web-client.herokuapp.com/#/

Next
You will need this software from Microchip
https://www.microchip.com/en-us/development-tool/flip
Once you have modified the code and uploaded it to the Arduino you then run Flip.

This video shows how to install the proper driver and use Flip (around the 4:00 mark)

Glad to help

I’m from Rome, Italy, too far away …
I took a look at the Arduino site, there is a video explaining how to program, it’s in Italian (easier for me).
If I don’t find it difficult to understand the programming, I try to do it. I saw on Amazon Arduino Uno, it doesn’t cost much.
But first I want to understand if I can proceed with the programming and then, eventually, take it.
I will also see the videos you proposed and then I will make a summary of everything.

I can’t help but thank you for your help. Thanks John, I’ll let you know.
Sergio

You could also try a Teensy 4.1 board.

They are very small and also easy to program. I’m working on box right now with a couple of switches, a volume knob, and hopefully a breath controller (waiting on parts…)

Rick

Hi Rick.
Today is a day of surprises !!! Since I wanted to give up completely, now I find myself more than intrigued by so much abundance!
As soon as you have new news, let me know.
Then you will explain to me what the price of the card can be and if the programming can be simple.
Sergio

Hi John.
I think I also understood how Arduino Uno is programmed, I downloaded the program and ordered a couple of boards.
I wanted to ask you for a little help: Could you help me write the script for 5 buttons and 2 knobs (for Volume and Expression)? As I understand from the instructions it is possible to insert in the context both digital and analog formats (buttons - potentiometers).
I have read your program for 4 buttons, and maybe you could help me, highlighting the new program lines in red, so I learn how to do it.
My EC5 does not have much space inside it, but I can provide it in another way, with an external box.
I would like to take advantage of building an external box because I would like to build a Half Moon (for this I was also asking you for programming for potentiometers, but I see this after I have learned to program well !!)
In this way I can resurrect my legendary Korg EC5 pedalboard !!
regards
Sergio

Here is the code I wrote for a hand controller with 6 buttons and two pots.
Copy and paste it into the Arduino IDE
In the first section labeled // BUTTONS
Change N_BUTTONS = to the number of buttons you want to use.
Change BUTTON_ARDUINO_PIN to the list of digital pins you connected each button to.
In the next section labeled // POTENTIOMETERS
Change N_POTS = to the number of pots
Change POT_ARDUINO_PIN to the list of analog pins you connected the pots to
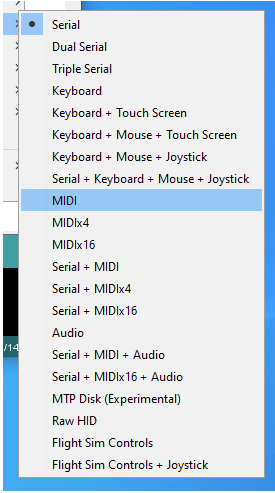
Upload it to the Arduino, flash the bios and you are done.

(Copy from the next line and paste into the IDE)

// – Defines the MIDI library – //
// if using with ATmega328 - Uno, Mega, Nano…
#include <MIDI.h>

MIDI_CREATE_DEFAULT_INSTANCE();

/////////////////////////////////////////////
// BUTTONS
const int N_BUTTONS = 6; //* total numbers of buttons

const int BUTTON_ARDUINO_PIN[N_BUTTONS] = {0, 2, 4, 6, 8 ,10}; //* pins of each button connected straight to the Arduino

int buttonCState[N_BUTTONS] = {}; // stores the button current value
int buttonPState[N_BUTTONS] = {}; // stores the button previous value

//#define pin13 1 //* uncomment if you are using pin 13 (pin with led), or comment the line if not using
byte pin13index = 12; //* put the index of the pin 13 of the buttonPin[] array if you are using, if not, comment

// debounce
unsigned long lastDebounceTime[N_BUTTONS] = {0}; // the last time the output pin was toggled
unsigned long debounceDelay = 10; //* the debounce time; increase if the output flickers

/////////////////////////////////////////////
// POTENTIOMETERS
const int N_POTS = 2; //* total numbers of pots (slide & rotary)
const int POT_ARDUINO_PIN[N_POTS] = {A1, A3}; //* pins of each pot connected straight to the Arduino

int potCState[N_POTS] = {0}; // Current state of the pot
int potPState[N_POTS] = {0}; // Previous state of the pot
int potVar = 0; // Difference between the current and previous state of the pot

int midiCState[N_POTS] = {0}; // Current state of the midi value
int midiPState[N_POTS] = {0}; // Previous state of the midi value

const int varThreshold = 4; //* Threshold for the potentiometer signal variation

/////////////////////////////////////////////
// MIDI
byte midiCh = 1; //* MIDI channel to be used
byte cc = 105; //* Lowest MIDI CC to be used
byte ccp = 103; //* Lowest MIDI CC to be used

/////////////////////////////////////////////
// SETUP
void setup() {

// Baud Rate
// use if using with ATmega328 (uno, mega, nano…)
Serial.begin(31250); //*

// Buttons
// Initialize buttons with pull up resistors
for (int i = 0; i < N_BUTTONS; i++) {
pinMode(BUTTON_ARDUINO_PIN[i], INPUT_PULLUP);
}

// Pots
for (int i = 0; i < N_POTS; i++)
{

// Initialise the analogue value with a read to the input pin.
potCState[i] = analogRead(POT_ARDUINO_PIN[i]);

}

#ifdef pin13 // inicializa o pino 13 como uma entrada
pinMode(BUTTON_ARDUINO_PIN[pin13index], INPUT);
#endif

}

/////////////////////////////////////////////
// LOOP
void loop() {

buttons();
potentiometers();
}
/////////////////////////////////////////////
// BUTTONS
void buttons() {

for (int i = 0; i < N_BUTTONS; i++) {

buttonCState[i] = digitalRead(BUTTON_ARDUINO_PIN[i]);  // read pins from arduino

#ifdef pin13
if (i == pin13index) {
buttonCState[i] = !buttonCState[i]; // inverts the pin 13 because it has a pull down resistor instead of a pull up
}
#endif

if ((millis() - lastDebounceTime[i]) > debounceDelay) {

  if (buttonPState[i] != buttonCState[i]) {
    lastDebounceTime[i] = millis();

    if (buttonCState[i] == LOW) {

// use if using with ATmega328 (uno, mega, nano…)
MIDI.sendControlChange(cc + i, 127, 1); // cc number, cc value, midi channel

    }
    }
    buttonPState[i] = buttonCState[i];
  }
}

}

/////////////////////////////////////////////
// POTENTIOMETERS
void potentiometers() {

for (int i = 0; i < N_POTS; i++) { // Loops through all the potentiometers
potCState[i] = analogRead(POT_ARDUINO_PIN[i]); // reads the pins from arduino
midiCState[i] = map(potCState[i], 0, 1023, 0, 127); // Maps the reading of the potCState to a value usable in midi
potVar = abs(potCState[i] - potPState[i]);
if (potVar > varThreshold) { // Opens the gate if the potentiometer variation is greater than the threshold

  if (midiCState[i] != midiPState[i]) {
      MIDI.sendControlChange(ccp + i, midiCState[i], midiCh);
      potPState[i] = potCState[i]; // Stores the current reading of the potentiometer to compare with the next
      midiPState[i] = midiCState[i];
  }
}

}
}

One more thing.
In the following section, I define what cc numbers to use
cc is the starting number for the buttons
ccp is the starting number for the pots
you can change these to any Control Change values you want.
They will be incremented.
Since there were two pots in mine, the pots will send 103 and 104
the buttons will send 105 through 110

// MIDI
byte midiCh = 1; //* MIDI channel to be used
byte cc = 105; //* Lowest MIDI CC to be used
byte ccp = 103; //* Lowest MIDI CC to be used

Hey @Sergio,

just a word of advice: don’t make the same mistake with this project as with your start into Cantabile - don’t try to ask others to do your work for you. If you’re serious about getting into the world of microcontroller projects (building and programming), you need to learn that stuff starting with the basics. Get a first Teensy and a breadboard (if you don’t know what that is, then definitely find out), a couple of buttons and LEDs - do a lot of reading on the 'net and get your feet wet!

There are no easy shortcuts when it comes to electronics and programming - learn your stuff step by step, do a lot of googling to find how others have cracked their problems, and become reasonably proficient. Then - and only then - come back for advice when you get stuck. Getting into microcontroller projects is not something you do for an afternoon - learning to program and designing and building your projects is something that requires studying, determination and a lot of patience. If you’re serious about this, then I wish you all the best - it’s a lot of fun!

But don’t start out on this if it’s just for solving this one problem - there are easier ways to address this - like the AudioFront MIDI Expression that @ClintGoss mentioned above.

Or get someone who knows their way around an Arduino to build you a little box that does what you want - but please DO pay or otherwise compensate them for their effort. Programming is a valuable skill - you shouldn’t expect everything for free…

I am getting the impression that you are on another spontaneous wild goose chase here, and you seem to expect others to solve things for you - but that’s not how this community works.

Apologies if I sound like an old school headmaster - must be in my genes :wink:

Cheers,

Torsten

2 Likes

Sergio,
Regardless of your past “spontaneous wild goose chases”, I am happy to help you get this working. You shouldn’t bang your head to figure out what someone else has already accomplished.
Some people learn best by asking for help, others may go it alone and teach themselves.
Wire your device, copy and paste my code, make the needed changes, upload it, and flash the bios. Enjoy your new controller.

John, Arduino Uno will arrive next Tuesday or Wednesday. In the meantime, I will copy what you have proposed to me. For this I thank you. I’ll be answering your help post in more detail shortly. I have to go away for an urgency, see you soon.
Sergio

I’m going to agree with Torsten on this! Get a breadboard. Don’t just start soldering things together until you have a design worked out, tested, and are sure it’s going to work for you.

You are going to save a lot of headaches taking that route.

And the internet can really be your friend here:


Rick

1 Like

My understanding of Sergio’s OP was, he has a spare foot pedal that was unused. He wanted to know if there was a way to use it with Cantabile. I gave him a solution that worked very well for me. And offered my help if he wanted to attempt it. No where did I see he wanted to enter the world of microcontroller projects. Nor did I see him “expecting someone else to do his work”. I went through the weeks of research and study to build my controllers. There is no need for Sergio to waste all that time if he only wants to replicate what I already did.
Now, if he truly wants to enter the world of microcontroller design and programing your advice is worthwhile. Once he builds this one, he may want to go further and should do as you suggest. Then again maybe he doesn’t.

I’m not used to bragging, I have great respect for everyone and above all I don’t feel superior to anyone. Indeed, if I can help others, I am always available. I’m retired now, had my band years ago and still enjoy keyboards even though I’m not a pro like many of you on the forum. In my job I was a designer of electrical and electronic systems. I worked at the Italian Railways on the technological systems for High Speed ​​in particular, and I started as a simple worker, until I became what I am now, which allowed me to respect and have absolute respect for everything and everyone. When I ask, if you want to help me, I’m happy, otherwise it’s the same thing. I have gone into many of the things I ask and if I ask it is to learn even more. Arduino. Do you know what I’m going to create with the programming notions you are helping me? Many applications involving many utilities. For example, a pushed home automation for civil systems comes to mind. But not only. I appreciate Torsten’s zeal, and don’t think I’m not grateful for his advice. It is a mistake to think this way because it would not be constructive. It is enough, however, never to exaggerate, on both sides. Returning to music and programming, I can say that by downloading videos I found good sensations, it is not as complex as I thought a few days ago. I made a small comparison with the language used to create macros in Excel to facilitate complex technical calculations where there are often an infinite number of conditions. So, having never had Arduino on my hands, I knew absolutely nothing about how it was programmed. But you came to meet me to help me and not to exploit yourselves to do my job for me. Mine is not a selfish gain, I am not such a narrow-minded and shameless person. I’m sorry my behavior has been misunderstood. Mine is just a desire to learn and help when I can. And if at times it seems like I am running, keep in mind that I am not as young as many of you and so … I hope I have clarified and I apologize if in some way I may have been intrusive.
Sergio

1 Like

Hey John

I respect what you are doing very much - and I’ve been on both ends of this a lot of times over the years. There has been some history here in terms of jumping into the details of pretty advanced topics, asking tons of half-understood questions here in the community without having made the effort of learning the basics. That’s what is behind my advice to @Sergio.

You may not have followed some previous discussions here, so by all means, if you want to help…

One technical suggestion: as @RickRepsher suggested, I’d go for a Teensy board instead of an Arduino Uno. The advantage of these boards is that you can simply configure them in the Arduino IDE to be class-compliant MIDI devices - no need to re-flash the BIOS. The libraries that come with the Teensy make progamming MIDI very easy. Instead of the Teensy 4.1, I generally use the Teensy 2.0 for my simple switching projects - you can get them very cheap, they are small, and they still run on 5V for their input / output ports, which makes it easier to drive a “classic” MIDI port (DIN) from it. The old 8-bit technology is definitely good enough for simple MIDI switching duties…

Cheers,

Torsten

Haven’t looked at the Teensy. Can you name your device, or does it always show up as Teensy-xxxx? I’ve done several Uno controllers and it’s nice to be able to name them.

In a normal build, it does show up as “Teensy 2.0”, but you can change that by editing a file in the Teensyduino library before building. Unfortunately not something you can embed in your project-specific files, so you need to make the edit to the system library before building.

I’m usually pretty happy with my generic Teensy name, but if I had to use multiple home-brew devices on one system, I’d definitely make these unique.

My most recent builds are all just HID devices (also easy to do with the Teensy) - they act as USB keyboards and convert buttons to keystrokes. Great way to build pedals for LivePrompter…

Cheers

Torsten

I thought this might be good place to comment on my recently purchased FCB1010. I was surprised it didn’t have a USB connector - I had to dig out my MidiSport Uno. Secondly the FCB is much bigger than it looked in photos. I bought it for studio use - if I was using it for gigs I would find something smaller.

A quick update on this - for all newer Teensy models (3.1 and newer, including LC), there’s no more need to “hack” the system library - you simply add an additional .c file to your build that includes your custom name - all done!

https://www.pjrc.com/teensy/td_midi.html

BTW: the Teensy can be a lot more than a USB MIDI device:

grafik

Another approach is to use a $2 Tiny85 and do the serial midi and button customization code with it and then buy one of the $6 midi/USB adapter cables off EBay and gut it for the board to use it for the midi over USB part. Most pedal boards have plenty of room in them so usually not a problem putting two small boards in. Then get a $3 panel mount full size USB connector for durability. I did a pedal this way and it works great, plus the USB recognizes as Windows Generic, so zero driver issues. Latency is low. I didn’t do a proper measurement, but since I also did an expression pedal port and a Glissando port I’d notice that if they were laggy when testing them with MidiOx and playing… I even panel mounted the LEDs for the midi over USB board so I can see power, TX, RX on the top of the pedal board.

Capture :green_heart: