Hi Corky,
before I do any damage, are there any problems with the B5v3 if I install the new version of Uvi Workstation as is?
The doubt came to me because this new version is not an upgrade. What do you think?
Sergio
No…upgrading Workstation, or iLok changes nothing in B5. It seems iLok and UVI has an upgrade about every 6 months, so this is not a problem. Just know this happens every once in a while.
I bought an Oxygen 61 and Oxygen 49 last year when upgrading my rig during the pandemic lull . I have “several” controllers and Workstation Keyboards, but the amount of gigging I was doing prior was taking a toll on my equipment, and my aging back. I needed to “lighten” my load at the time. I am not crazy about the keybeds, but there are settings in the M-Audio, and Cantabile, that makes playing piano bearable. Playing organ is good on these. As I noted in a response way above this one, the E-MU XBoards are great for organ, BUT, they are out of production, and only available, used on ebay. @dsteinschneider bought one, and he likes it. Understand though, trusting ebay can be iffy.
I purchased the Oxygens from the “used” section in Guitar Center. The 49 key came from California, and had never been opened…the box was factory sealed, and all documents and packing were intact. I got it very cheap…roughly $200 for both. If they get damaged, it is not a big loss. So far, they are holding up better than expected.
The 61 key came from Oregon, in the original box, and had one scrape on the casing. I always look for the best condition ones. I have a local Guitar Center 5 miles away, and didn’t have to pay shipping when picking it up locally.
I miss my 88 keys and keybeds, but due to stage space, and wear and tear on them, and my back, I only break them out on “special” gigs or studio work.
Hi guys.
I need help: I’m having a hard time making a binding.
I would like to make sure to associate two midi buttons such as leslie slow and leslie fast.
I know that for you, doing these steps is quite simple, while for me it is a little less!
In the meantime I understood how to create states (I have prepared 4 with different instruments and different effects) and I would like to complete the work, these states of mine, by associating the buttons when in two of the states created there are the sounds B5.
Could you help me by explaining the various steps step-by-step with some jpg?
Thank you
Sergio
Sergio
Below is how to use “learn” function to create a binding. It is the easiest way to make your binding.
This is from Brad’s Cantabile Users Guide in the “Support” section of the website. It is explained much better than I ever could.
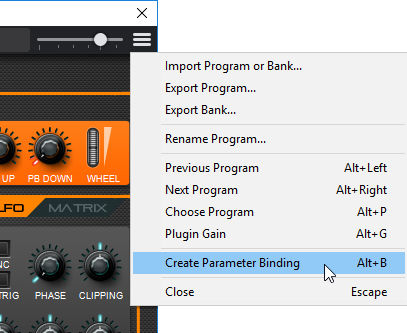
To create a learn a binding to plugin parameter, open the plugin’s editor and choose Create Parameter Binding:
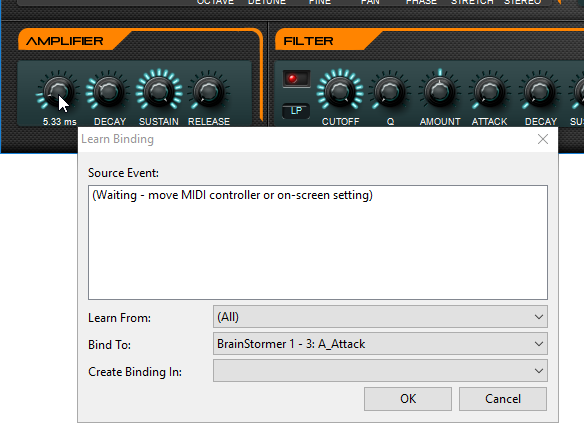
While the Learn Binding window is open you can move any setting in the plugin editor and the associated parameter will be selected in the Bind To drop down. Here the Amplifier Attack knob was turned resulting in the “A_Attack” parameter being selected:
## Binding Settings
Depending on the kind of binding (MIDI -> Setting, Setting -> MIDI, MIDI -> MIDI etc…) different columns in the bindings editor may or may not be applicable.
Here is a random selection of bindings that demonstrate some of the different ways bindings might appear.
The following describes each column:
State
The LED indicator lights up when the binding is active - ie: when its responding to changes from the source.
The check mark can be used to enable/disable the binding
The “play” button can be used to invoke simple command based bindings (not available on all bindings)
Source
The source of binding event. This could be an external MIDI device or an internal object such as the “Master Levels”
Source Channel/Property
The second part of the source column is used to select MIDI Channel number for MIDI sources, or the source property or trigger event for object sources.
Event Kind
The MIDI event kind to monitor (see below for more)
Event Controller
Depending on the event kind, there might be an additional controller number setting. (eg: for MIDI CC events, this would be the CC number). Some trigger events support a delay setting here. eg: the song “On Load” trigger supports a delay before invoking the target of the binding.
Target
The object to be controlled by the binding
Target Channel/Property
The second part of the target column is used to select the MIDI Channel for MIDI targets, or the target property for object targets.
Action
For MIDI targets, the MIDI event to send (CC, Pitch Change, Note etc…)
Value
Depending on the type of source and target objects this might be a value to value mapping, or other options that control how the binding works.
## Jump Prevention and Rotary Encoder (Relative CC) Support
See Binding Jump Prevention and Relative (Rotary) Encoder Support
## Routing Modes
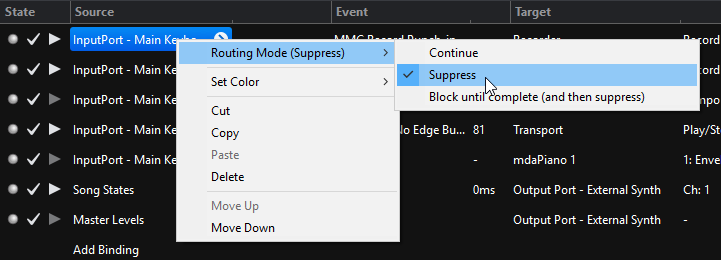
Bindings have a routing mode that determines how processing proceeds after the binding has been matched to an incoming event:
Continue
The original event continues to be routed as if the binding didn’t exist.
Suppress
The original event is suppressed. Subsequent bindings and other MIDI targets won’t receive the event. This mode is useful when binding specific notes to action (eg: binding the lowest key on your keyboard to move to the next song)
Block Until Complete
The target of the event is invoked, and all incoming MIDI on the same MIDI port is queued for processing until target action has completed. This mode is useful when binding to slow actions where you want to make sure the action has completed before sending subsequent events. (eg: loading a song and then sending configuration events).
To set the routing mode of a binding right click on the binding and choose the routing mode from the menu.
Note: some binding targets support immediate and delayed versions of the same action. eg: “Set List -> Load Next Song (Delayed)” and “Set List -> Load Next Song (Instant)”. The blocked routing mode doesn’t work on the delayed versions of these actions as incoming MIDI will only be blocked and queued until the delayed load has been initiated, not completed.
Regards
Corky
Corky,
I, let’s hope that I manage …
It’s a little complicated, but I try.
I named my 3 and 4 buttons Leslie slow and Leslie fast.
In the presence of B5, by pressing button 3 I would like to have the leslie in slow. Then, by pressing the 4, leslie fast. Then again, pressing 3 returns to leslie slow.
I would like to do this so as not to enter the B5 screen and search for Leslie slow / fast: it takes too long !!
Can these associations, as I imagine them, be created?
Sergio
Yes you can create it, but you only have to enter the B5 screen long enough to create the binding, then save it, and it will be there forever, no need to open and close B5 but that one time. How much longer would it take than the time you’ve already spent?
That’s just part of setting up your rig. We ALL spend a lot of time making our rigs do what we want.
It’s just part of the process in creating live music. It is called “being prepared”.
I don’t know what you are using as a midi controller but most keyboard controllers have a mod wheel, which is standard in B5 as Leslie speed controls. Why not use that, and forget about button controllers? That is what I use. In the time you take reading this, you could have used the learn function and set it all up.
If you are in such a big hurry, just use the mod wheel, if you have one. It is setup and ready to use. If not, I will need to know what controller you are using, and what CC your buttons transmit. That means you will have to go a little deeper into Cantabile.
Corky
That’s actually one of the easier tasks: you don’t even need to go to the plugin GUI to create them, since with B5, you can use the mod wheel (cc 1) to control the Leslie speed. So set one button to send CC1 with value 0 (Leslie slow) and another to send value 127 (Leslie fast) - done!
Here’s an example: I used controllers 93 and 94 for the buttons, but of course you can use whatever controller your buttons send.
Cheers,
Torsten
As already said, I am evaluating the Oxygen 61. I currently use the Korg Pa 80 as a controller. True, it has the wheel, but it is a spring that does not allow the passage from slow to fast to remain as fast, and vice versa. I have buttons in the Pa80 that I could use instead of the wheel. I should know how to make this kind of association, which I really don’t know. However, I saw that I could use Cantabile’s buttons and to begin to understand these mechanisms I wanted to see how the various steps for the bindings are created, since these buttons can still make bindings that are not necessarily the Leslie.
Sergio
I have an Oxygen 61. The wheel with the “spring” is the pitch wheel. The other wheel is the “mod” wheel…the one closest to the keys, so you don’t have the Oxygen? You said you are evaluating it.
I just read Torsten’s tip. Tomorrow I study the suggestions of both. However, I would like to say thank you for your patience. To make a comparison I could say that it is as if I am still analog and you are already digital …
Totally understand!! ![]()
I am still at the analog stage.
I Thought you had the Oxygen already. My bad.
That Korg has A LOT of buttons!
Sorry Corky, I am considering whether to buy it…
Sorry I misunderstood. Just use @Torsten advice. It is easier, but still need to delve a little farther into Cantabile. Believe me…it is painless! 
As soon as possible I will tell you what progress I can make.
Talk to you soon.
Sergio
Or …. (providing you have a sustain pedal), you could “right” click the Slow/Fast “switch” on the B5 GUI and choose CC64. Press your pedal for Fast, release for Slow.
Doug
Doug, could you explain yourself better?
Sergio
Doug is referring to using a sustain pedal as a switch for the Leslie speed. Just as I remarked above…go into B5 window, right click the the picture of the Leslie speed switch, and assign your sustain pedal to the switch. Quick and easy. You could do the same with your button. Much easier than manually scripting a binding, but that’s your choice.
Corky
Sergio,
Corky finished his coffee before I did. ![]()
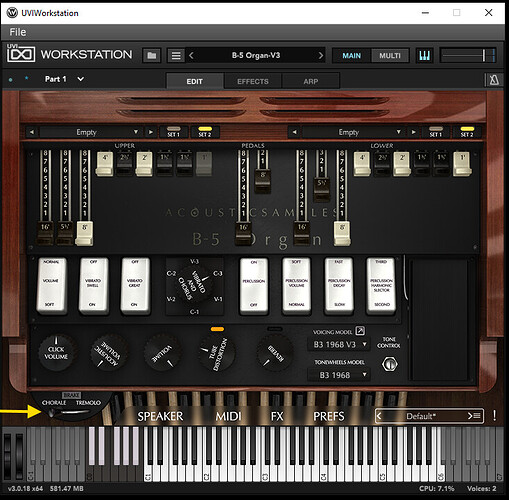
“Right” Click the Speaker Speed Control Switch (Chorale/Tremolo) on the Gui
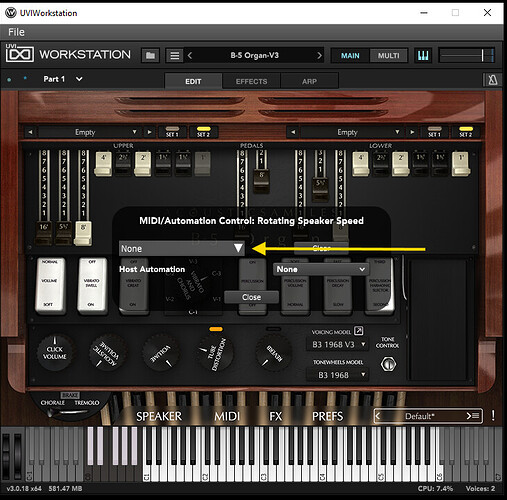
Select the “NONE” Button (to Select CC Assignment)
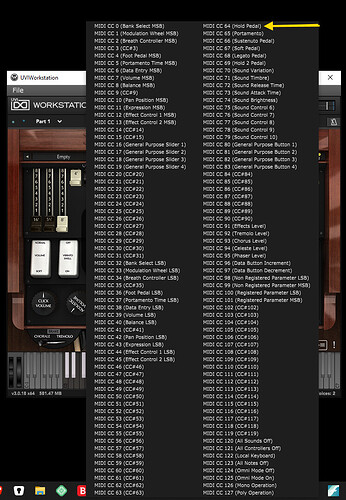
Select CC64 (Hold Pedal)
Close the MIDI/Automation Control Window.
That will assign control of the Fast/Slow speeds to your Sustain Pedal.
Doug
You are correct! I’m on my 2nd cup, but my eyes are still somewhat closed. ![]()
Good presentation Doug!
…Corky, Doug, Torsten, Paolo: if you pass by Rome I will offer you ten beers each … You are legendary, thank you

