Workflow examples? Setup guidelines? Good practices?

I wonder if a template with a basic setup having some useful bindings already that one could “Replace plugin” with to make a working typical setup would be handy? Both a dummy VST and a rack could perhaps be made. You would need a universally available VST for this to work without throwing the “missing” error, though - but that’s OK perhaps as a prompt to do something about that.

It is hard what with so many controllers out there, but mostly all share notes, pitch wheel, at least one knob, switch and/or slider, a sustain pedal, many with aftertouch and expression pedals, so a dummy “Advanced” rack could be supplied (“Torstenized” :slight_smile: ) that just needs to be adjusted in the bindings section to work.

These things would act as examples, at least, introducing folks to what is possible and pulling them in to look at the bindings section. Seeing it all just BLANK is what is most intimidating (like the blank white page when writing)!

I will knock together an example of what I mean later today and zip it up to share here.

Terry

The friendly names are coming next - just wanted to start with a generic setup. You are correct that directing them all to the same controller would be handy - I was going to do all my redirection in the bindings section, and just set them up pointing to their original values as a spreadsheet-like reminder in this base take of the idea. I also kept them “original” so I could use MIDI Learn in VST’s without worrying about duplicates. All these suggestions, however, are excellent! Racks are free, and I can duplicate this one to act as a base for making several iterations and versions now, which is what I wanted.

At last I have received the recognition I have long deserved!!! :crazy_face:

Terry

1 Like

BTW - one nice thing to keep in mind is that Cantabile Racks are just text files that can be altered using any decent text editor. (I use Notepad++ and EditPlus, which I’ve owned for years, the most.)

You can use “Replace All” to change all the source or destination channels in one sweep, for instance. Or change destination.

		"sourceBindingPointName": "omni",
		"targetBindingPointName": "Ch1",
                "sourceObject": "InputPortProvider.InputPort.midiSource.MPK249-1",
		"targetObject": "OutputPortProvider.OutputPort.midiTarget.Rack: Button 3C",

Just replace the entire line with the altered version.

When you see the file open, you’ll start to get the idea!

Terry

1 Like

One issue I ran into was that, whereas Bindings could be updated/changed using a State (as long as both “Enabled” and “Target” are checked), Filters did not seem to be state-aware. Is there something I’m missing there?

Terry

Correct, filters can’t change by state. Usually, I don’t need to change filters by state; when I do, I create a quick embedded rack that simply uses a binding and rack states to do the job. Embedded racks are cheap when there’s no plugin inside them…

Cheers,

Torsten

1 Like

I have done some more experimenting with this approach, using the MIDI Outputs customized to the rack and the rack’s bindings to send data to them. In so doing, I’ve discovered a couple cool things.

So, let’s imagine a synth keyboard that has notes (duh), a sustain pedal, mod wheel, aftertouch and pitch bend. Let’s also imagine it has two knobs, one called “User 1” and the other called “User 2”. (My Kawai K5000s has such named knobs!) We might want to separate out the sustain pedal (and perhaps expression pedal) later into its own rack, but for now it will sit here also.

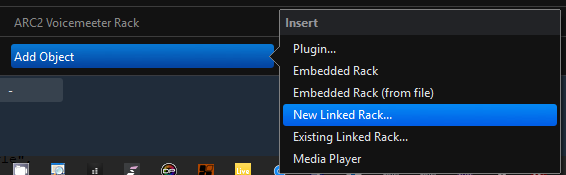
So, I’ll make a new rack and call it “My MIDI Controller”.

Cantabile Embed Post 1

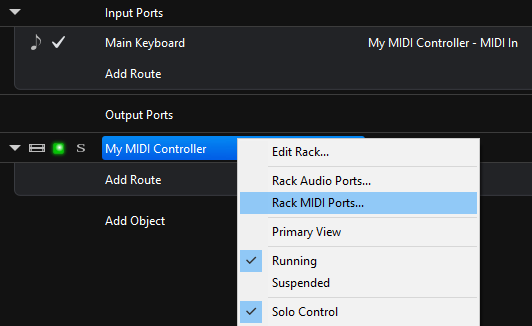
I right click upon the name (you may have to click a second time to select only the rack name) and select "Rack MIDI Ports…

Cantabile Embed Post 2

In that dialog one sees the defaults, in:MIDI In and in:MIDI Out. So, we click on the “Add” button and add a port we’ll call “Notes”, another we’ll call “Mod Wheel”, etc. until we have a port for each output we want to isolate.

Cantabile Embed Post 3

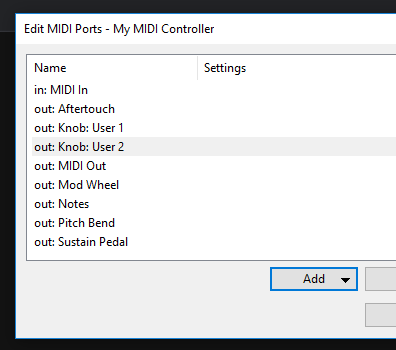
So, now we have separate ports, but nothing goes to any of these yet. (We CAN filter the input to these ports while adding them, but I’m keeping it simple for now, and will use Bindings to do all the filtering for this example.)

So, here I open up the rack by double clicking it, and go to the Bindings section right away. I add connectors for each one of these items I’ve made output ports for.

(When adding the Notes connection, don’t forget to include adding one for “Notes Off”)

If you will want to use States (and we do), you will need to check “Enable” and “Target” for each of these bindings in the States tab as you add them to the bindings list, or they will not change.

Cantabile Embed Post 4

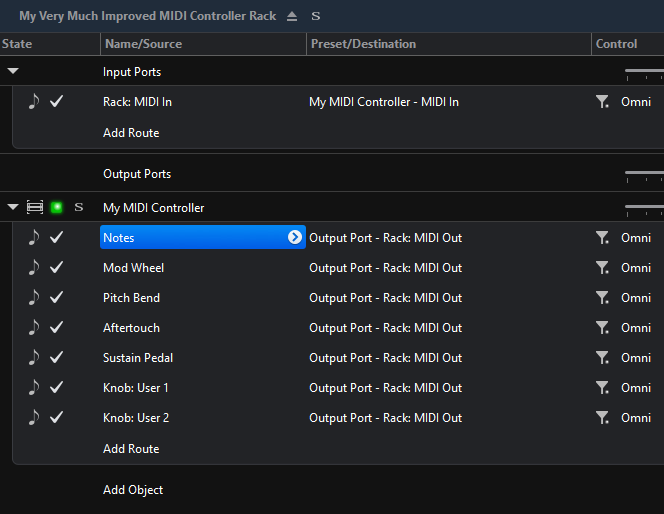
Just assign each item to its associated Rack MIDI output.

Cantabile Embed Post 5

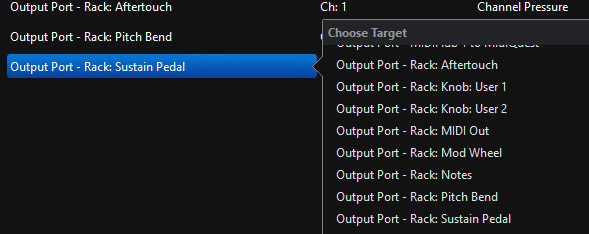
So, here is my completed bindings - click to enlarge:

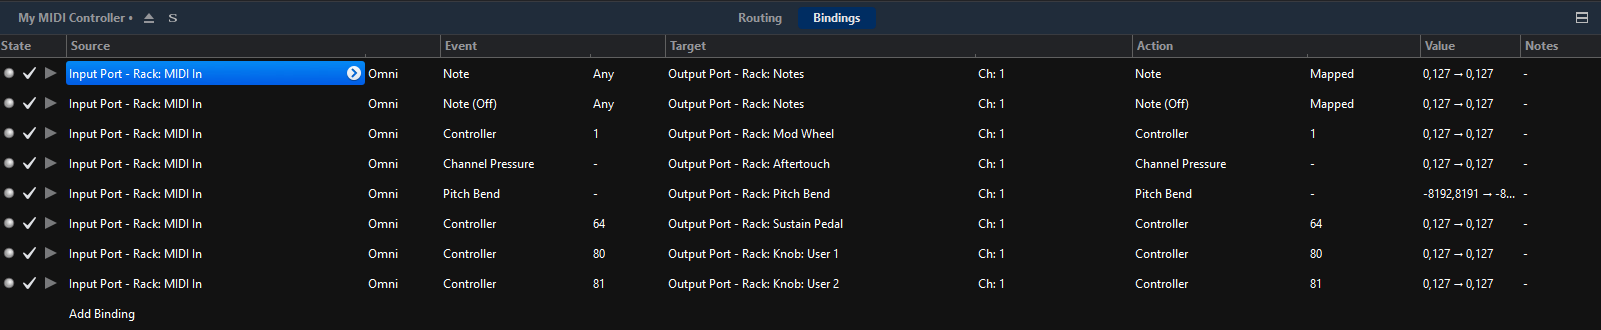
You’ll notice I have not added anything to the Routings page. That is because, in this example, I used the “Rack:Midi In” as my source for all of these connections in the Bindings. That was not a requirement - I could have dedicated this my hardware device in the Routings, and then used that. This example keeps things “Generic” for the purpose of this demonstration only. It actually also becomes handy later on.

Ok, here is the nitty-gritty part where I’ll demonstrate a stumbling point you will encounter doing things this way. So far, this has all been setup, and nothing has actually been SENT to anything yet! I’ll send to my Kawai K5000s so you see how this step might be accomplished (but don’t do it yet… you’ll see why in a moment).

Save your rack so far and exit it, and then add the Rack outputs:
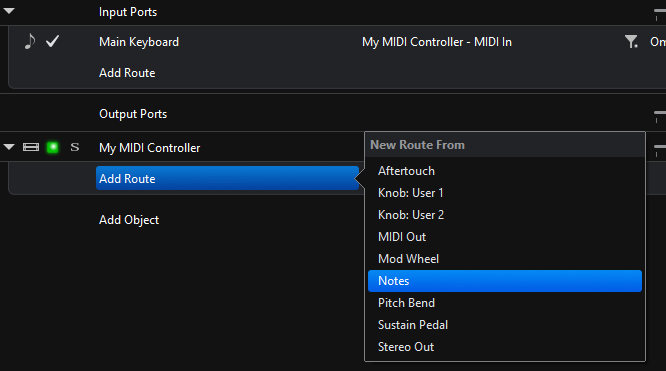
Cantabile Embed Post 8

Here’s the result:

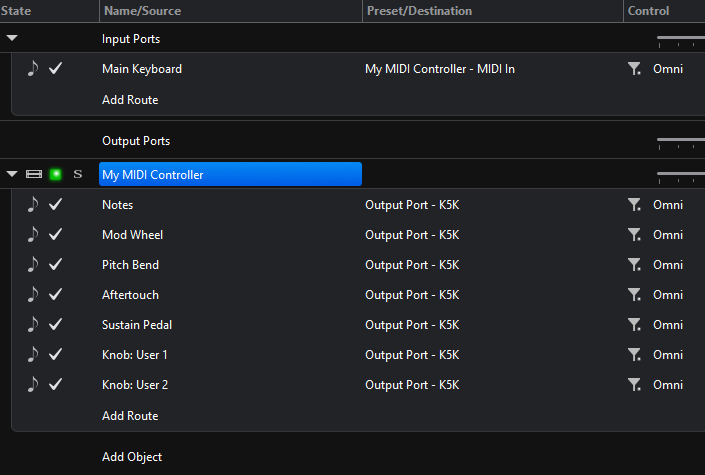
Now, save your song - mission accomplished! Well, sort of…

Make a new song and add this same “My MIDI Controller” rack to it. Like so:

/Cantabile Embed Post 10

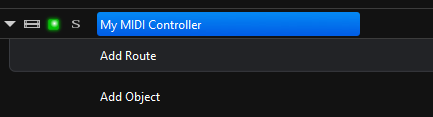
WHERE DID MY OUTPUTS GO??? As you can see, there are no routes in the newly added rack – you’ll have to add them back all over again. MAJOR BUMMER if you have a lot of assignments already!

Here my clever workaround for that - Torsten pointed out that Embedded Racks “were cheap”, and I listened.

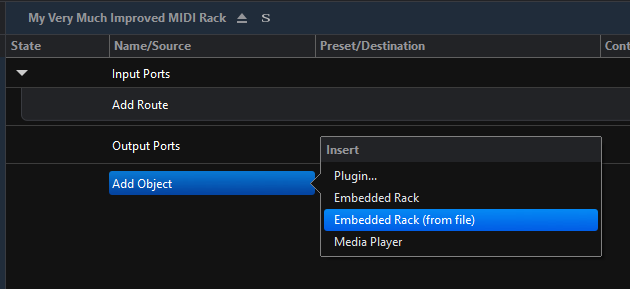
Make a new rack, called “My Very Much Improved MIDI Controller Rack” (well, you don’t have to call it that…)

Now do little to nothing else yet, and simply open that rack and click on “Add Object” and you’ll see fewer options now - the one we want is “Embedded Rack (from file)”. Add the “My MIDI Controller” rack now as an embedded file. Keep in mind - any changes you perform on this rack now that it is embedded will only affect THIS instance that you have embedded in your “My Very Much Improved MIDI Controller Rack” - it will not alter the version of the rack saved in your racks folder.

Cantabile Embed Post 11

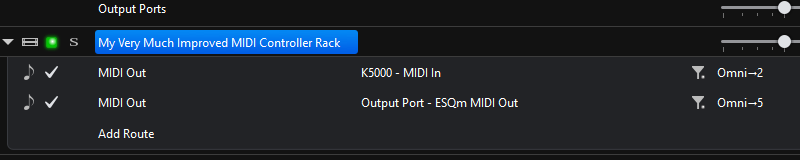
Now, with that present, with this new “My Very Much Improved MIDI Controller Rack” rack open, click on the “Add Route” button beneath the embedded “My MIDI Controller” rack several times and add those routes back again that you’d lost a minute ago.

Notice how we use the Rack:MIDI Out destinations throughout.

Now, anytime you add the “My Very Much Improved MIDI Controller Rack” (or any other set up similar to this one) you will have all of your routes intact all shunted out of the MIDI out of the top rack. So, make sure that MIDI Out exists, and is sent to the desired device. If you want to send to multiple devices on different channels, have a couple there. (You can redirect to different ports using the embedded rack’s “Rack Outputs”)

I can change the controller of my User 1 + 2 from 80 + 81 to 21 +22 in the bindings, and that can be done either in the original file (by loading the first rack we made later embedded) so it will affect all future embeds of that rack, or in the embedded version – the changes applying to the “very much improved etc.” rack that is its parent. If you want changes you made to your base rack “My MIDI Controller” applied to an existing embedded rack, you need to delete that one and insert it again from the file.

That is how I’ve come to understand these workings thus far. Feel free to point out how much I’ve simultaneously misunderstood these same workings below. :wink:

Terry

6 Likes

Oh, yes - and states can be made for instant switching between setups in the original “My MIDI Controller” rack - very handy!

Terry

1 Like

Very nice explanation Terry. That took a lot of work…whew! I am going to wrap my head around this and try it out.

Regards

Corky

1 Like

Pls ignore this post.

1 Like

I can’t unsee it now though. It will haunt my dreams.

1 Like

Here are the two example files from the post above zipped together - “My MIDI Controller” to embed and the parent “My Very Much Improved MIDI Controller Rack”. Place them both in your racks folder and load the parent to see the entire setup with the embedded version of the “My MIDI Controller” rack, and load and alter “My MIDI Controller” to make one to embed in new parent racks.

My MIDI Controller and Very Much Etc.zip (3.4 KB)

The settings are generic enough that you could use these as a starting point to create your own setups. Should work for MPK225 with some pruning and with MPK249 and MPK261 as-is.

Terry

2 Likes

Great thread!

I only face one thing that I don’t how to do yet.
To switch sounds/vst in a current song I made up a button that does two things at the same time, mute and unmute two racks. So far was flawless, but in a new song I have to maintain the sounds of previous vst while the second one is starting (that is two seconds) but the problem is that the sounds are muted so the change is so abrupt.

How do you make sounds change to avoid that?

Instead of muting/unmuting racks, try disabling and enabling the MIDI routes going into the racks, and keep the racks enabled (and the audio routes out of the racks).

That will allow you to hold notes across changes and the notes will keep playing until you let go.

Neil

1 Like

Rather than a hard mute to the output, make a new state that leaves the two active and their outputs intact but turns off the input to one?

Just tested it and it works here. The note-off still gets sent when you lift your fingers from the keys even though you’ve turned off the input to the instrument.

Terry

2 Likes

I’ll do it when I arrive home, thanks!

I didn’t think in that. I’ll check it out when I get home. Thank you!

1 Like

I can recommend DaVinci Resolve for videoediting. There is a free version available (see homepage)

1 Like

This looks interesting. What I have done is to separate my intrument sections at the MIDI input level. For instance, my “Lower Keyboard” input is attached to my MOXF8, but filters out all expression pedal events. I then have an “Expression Pedal” MIDI input attached to the same keyboard that filters everything BUT the expression pedal.

My MPK261 is set up so the controls (knobs, faders, switches and transport) output to MIDI channel 1, the pad banks output to channels 2-5, and all note data (keys, mod wheel, pitch bend) output to channel 6. I then have separate MIDI inputs that only read 1 channel, and remap everything to channel 1. Same result, but done at the input level so I don’t have to add and route a rack for every song.

What would I gain by moving to the Thorsten method?

One major gain for me was that the bindings method is “state aware”, so my bindings-style filters can change automatically with the state. (As long as “Enabled” and “Target” are checked for each binding item you want this for.) Regular filters are not state-aware.

It also permits on-the-fly and state-driven reassignments that are easy to read, since the ports are named and one only needs to assign the different output without remembering which is which on the inputs side.

The state-awareness is the most important part though, I am thinking.

I take it you downloaded my zip for the MPK series keyboards?

Terry

Great stuff @terrybritton !!
Just goes to show how Cantabile can pretty much work out of the box for simple setups - and in situations which are likely to grow into monster rigs, preparing the ground work can add a magnitude of control and power to the whole thing!

1 Like