Hi All,
For the purpose of abbreviating the words “Cantabile 3 Performer” I will use “C♪3” to refer to the Cantabile 3 Performer host throughout this instruction set.
I have been working on another new approach to the Scrolling racks and Fader racks I’ve been making. Primarily I wanted to get away from using a media player and MIDI file to produce a means of controlling the speed of incremental events used when scrolling or sliding up or down a Gain control.
I set the rack up so it automatically scrolls the Show Notes with no other bindings required and it is tied to the main transport for it start, stop and pause commands. It has the same behavior as the SongBook type scroll function minus the inter song pauses. It will behave in the following way when using the Main transport
-
Play will start the pre-scroll (for the pause for the instrumental intro on most songs) and then the scrolling event for the notes
-
Pause will pause the scrolling and Resume will continue the scrolling
-
Stop will stop the scrolling and put the Show Notes at the position 0 when pressed.
You can also use CC’s listed later on that start, pause, stop and reset the scroll event like the transport buttons in C♪3 do. You can select the disabled mode by changing to the second state with the Stop sign transport icon on it to disable the transport linkage and CC switch inputs on the scroll rack so it won’t auto-scroll when you don’t want it to.
So, in use you drop in the song, decide on the pre scroll pause time & enter it, calculate the song length & enter it, save your settings and check with the transport to make sure it times right for you
The easiest way to start off on the right foot is to unzip the contents of the .zip file to the C♪3 Racks folder location you use and it’s ready to go. It’s contents include a PDF manual as shown here.

In the Tools>Options>Miscellaneous>Advanced area make sure ‘Show Loopback Ports’ are checked!

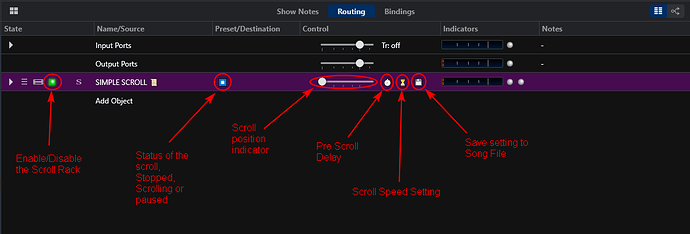
In the picture above you see a description of the rack buttons on the rack that help make it easier to use I hope.
-
the rack states hamburger menu acts as the mode indicator for the rack.
-
the racks’ gain slider acts as a position indicator for the Live Notes Scroll position
-
the first custom button is used for opening the binding dialog box for setting the pre scroll delay time
-
the second custom button is used for opening the binding dialog box for setting the delay time that sets the scrolling speed
-
the third custom rack button is used for updating & saving the settings plus resetting the scroll to the top
The hamburger menu mentioned in the picture above has a few different states that act as indicators of Stopped, Scrolling or Paused for the rack.
As mentioned earlier the 1st custom rack button opens the dialog box for setting the pre scroll delay value …
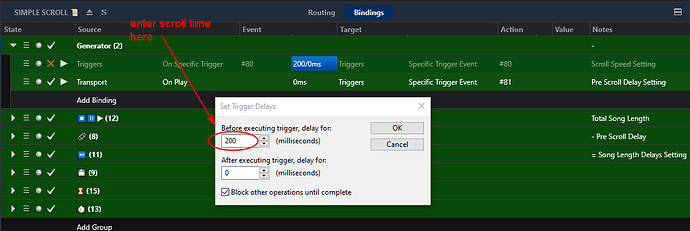
Once you press the custom button it opens to the dialog box where you set the delay value in the top box only leaving the bottom box set to 0 milliseconds. The value is entered in milliseconds into the value box so the rack is made so that (1000 ms in the delay box = 1 second of pre scroll delay time) so for example 10 seconds pause before starting scrolling would be entered as 10000 ms.
when done you press OK and then you can either edit the scroll time value in the binding above or close the rack editor using the Close Rack icon on the rack or the escape key on the PC keyboard.
The 2nd Custom button on the rack opens the setting box for the scroll time settings.
It is entered in to the top box as in the previous setting for the pre scroll delay time. The formula for the value is based on 1 ms in the box = 1 second of scroll time. So a song that was 3 minute 40 seconds would be 220 seconds which with no pre scroll pause would be entered into the box. When adding the pre scroll delay option you would subtract roughly that value from your song speed entry. e.g. song time = 240 seconds & pre scroll delay = 10 seconds so you enter 220 for the speed value instead of the full 240 seconds. This ensures the Show Notes will get fully scrolled to the bottom in the time the song tracks run. There is a little room to play with both the pre scroll and the scroll time values that help customize it for each song so experimenting is needed at first to figure each song out.
As with the pre scroll settings when done you press OK and then you can either edit the scroll time value in the binding above or close the rack editor using the Close Rack icon on the rack or the escape key on the PC keyboard.
and then press the 3rd custom button on the rack to update & save the settings
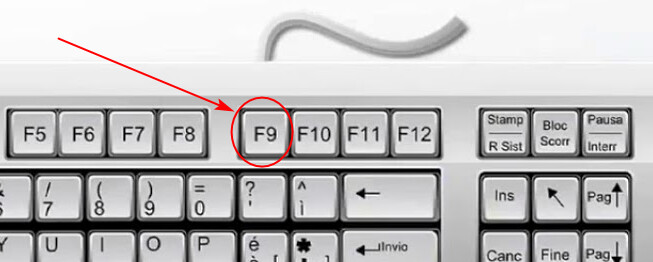
You can also use the Windows Function Key F9 from the inside of the rack after setting either or both the delay binding values to update & save your settings and to automatically close the rack editor with one keystroke.

The following switches mentioned above are some CC numbers to use when operating the scroll rack remotely independent or in concert with the main transport with some foot pedals or MIDI switches instead.
CC3 is starts the pre scroll>scrolling event
CC4 is pauses and resumes the scrolling
CC5 stops the Transport and resets the Scroll
CC2 stops the transport, returns the show notes to position 0 and resets the Rack
My previous versions had only 127 steps which were interpolated into the 0.000 to 1.000 scaling used by the Show Notes position bindings. I decided to use that scale to test it but didn’t like the chunkiness of it and later expanded the rack to include high resolution scales that were achieved using MIDI Fine bindings and longer sequences of numbers in the value boxes. In the case of the scroll function I settled on 1 to 1 ratio, no interpolation or 1000 steps. In practice this equaled splitting the full active show notes content into 1000 scroll steps no matter the font size. This produced a much smoother response in the Show Notes scrolling action than the 127 interpolated action. Thanks to @SteveK for testing it and suggesting the pre scroll feature ![]()
Here is a zip file with the rack along with a pdf manual that is a copy of this post …
SIMPLE SCROLL ![]() .zip|attachment (13.2 KB)
.zip|attachment (13.2 KB)
Special Thanks to Brad Robinson for creating and supporting Cantabile 3 Performer and all the good folk of the Cantabile User Community.
NEW VERSION posted March 1,2021
Thank You for Your Interest ![]() Dave Doré
Dave Doré ![]() February 2021
February 2021


