I made this rack for setting levels similar to the DAW track approach to initial level setting and for calibrating my monitors in the studio. The active ingredient is a cool little free simple Pink Noise Generator VST from CredlandAudio software called Pink. It didn’t have any calibrated settings and the knob labels didn’t jive so I put it in a rack, created the states and calibrated the different states using a good RMS meter. It has a few familiar Cantabile settings like -7 db, -14 db and -18 db which represent the New, Classic and Center meters available in Cantabile. It can also be used to calibrate your monitors for Bob Katz style K-metering.
Just download the plug from CredlandAudio using the link above and install it in your VST folder, and the rack will load it up. When you first run it you need to open the rack and the plugin to register it. The rack has the states set to control the plugin Gain for the different levels. It should translate across different setups.
That’s true Torsten, I did it that way for years and it is a good way to go. I never had access to a stand alone generator that was free until now. The K-Meter has this feature built in but only for the Katz values of -20 -14 and -12 db. Thanks for the feedback.
Dave, this concept is new to me. Can you elaborate on how pink noise is used? For example, could I use it to get a rough volume starting point for plugins in a song?
This Sound on Sound article explains the concept well, and is the one that got me interested in trying it out for DAW mixing. It is not a replacement for the detailed tasks mixing, but a means to get a uniform balance across all of your tracks in a few minutes before you then start working on the detailed mixing it is great. I use it on all songs I work on. And as you mixing to a uniform(ish) output level - I use the K-14 reference advised in the article, all of your mixes are never wildly out in volume, and you have plenty of headroom.
I hadn’t thought about using it for live volume balancing (doh!) so will be trying out Dave’s rack when I can.
do you use pink noise to calibrate your volume levels between songs? I’m struggling with some sounds that appear pretty loud on a RMS / LUFS meter but can’t seem to cut it in the mix. Sounds like pitting them against pink noise would be an interesting alternative…
No, for one of my adventures I do a one man show with backing tracks and use it to balance the mix and then check that my live part is in the game. I then turn it off and tweak to taste. I have not done what you are suggesting but I like the idea a lot. I also have some songs where I have similar troubles with some tones not cutting through, it would be cool to test this idea of yours out. Let me know what you find!
Dave
P.S. I didn’t mention that I also play in a duet with a drummer who uses a very good Roland electronic kit. The electronic drums by their very nature are kinder to me and my perceived levels in C3 and you can turn down easily if the player is a hard hitter! This allowed me to sub in a drum machine track for private rehearsal and I could mix my backing tracks the drum track and then check my lead volume and so on. Very reliable and repeatable. Like you I shoot for a balance of loudness across songs so this works good.
The real drums (which I love) present a new wrinkle because I can’t use a drum machine to sub for that when setting up my songs and patches for that use. My favorite gig is a 6 piece combo with no backing tracks with all parts played live the old fashioned way with an acoustic drum kit, full latin percussion battery, electric guitar and bass each with their own amps, 4 vocalists and all the mics and the whole deal. This is when cutting through is the difficult and is the hardest situation for me with Cantabile because the overall mix of people and different sound sources can’t be reigned in some rooms no matter how quite the players are. Everything is louder in this group so I have to have a special song list with mixes for this but it is a work in progress (a polite way of saying a mess). Thankfully the good people in Germany at RME put a big round knob on the Babyface for situations like this and I can turn up and down there if I need to. I’m not sure how pink noise would help me here and I never used it on the creation of these sets. If you have any tips I’m all ears!
Thanks again for your input to the forum and for helping me.
These are the times when your volume knob maxes at 11 and you need 31 . The sound can get away from you very quickly in a band that size without a sound man, or a strict volume level. I used to “shoot” the room before gigs, with a digital mixer, just to EQ the Mains to the venue. But, the PA would only be pushing vocals, and sometimes a kick drum. Floor monitors for everyone. Everything else was amped. In a band such as that (old school), it really became ridiculous to calibrate anything. Mostly a free-for-all. For the most part, I am fortunate enough to perform with musicians that have been performing that way for decades, and mostly know how to fit into their sonic space within the band.
On the other hand, I performed last Friday with my experimental 3-piece. No amps, only PA mains… No background recordings…all live. We have all in-ear monitoring, Electronic Drums, Bass thru pedal, Guitar and Keyboards ( through C3) are all sent to digital mixer. I shot the room after setup with pink noise to EQ mains for the room, and used iPad to set levels with a pre-recorded “live” performance running through mains. We set pre-gains low, as to prevent clipping when one of us starts to push volume. It gives us plenty of headroom and the sound sent to mains and in-ears is always clean. I love this setup because it always sounds great, we are not competing for sound space, and customers are not complaining about “too loud”, cause we can control overall room volume.
Just my 2 cents…but since I am broke, please accept my I.O.U.
I know, quite an old thread, sorry to bring it back but I’ve never heard about it and have 2 questions:
If I understood correctly, it is all about to get uniform levels in a mix, or between instruments in a song or between songs in your setlist. So you set the level to just barely hear the sound against the pink noise, which acts as the reference level.
Should you hear the instrument in all its frequencies? For example, in my electric piano I hear better the higher frequencies against the pink noise.
I haven’t understant the concept beneath -7 db, -14 db and -18 db. Could someone please elaborate here?
The way I understand it is that it is program dependent so where your piano parts are played in that song you adjust for that situation. So, I would say you adjust so that the most audible frequency of the range you play is the calibration point for that part.
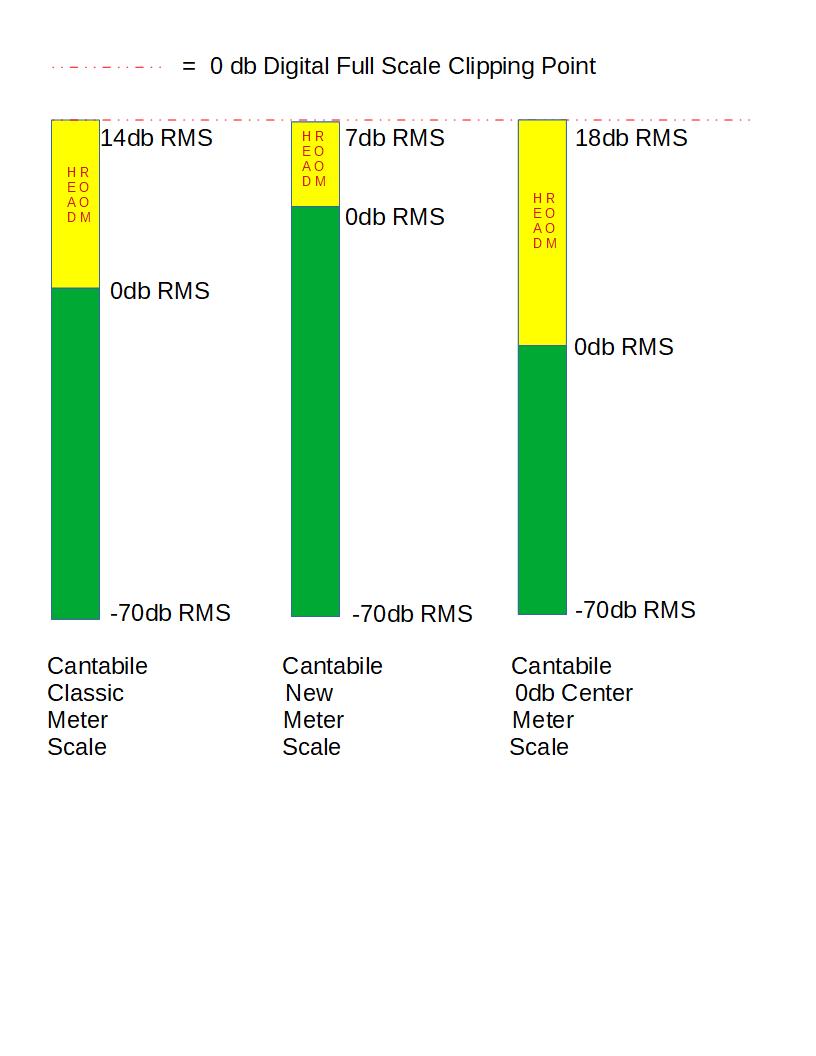
In our case Digital audio has a maximum of 0db full scale. Anything more and you start to clip the output and introduce distortion and artifacts. The various db levels you ask about are relative head room measurements for your overall audio output. The lower the number the more head room before clipping. You set your meters and sliders up in Cantabile to have 0db VU set at one of the available configurations that are in the Options for C3. The old classic scale was -14dbFS = 0 dbVU (-14db full scale = 0db on our C3 meters). The New scale is -7db FS = 0db VU and so it has less headroom but is much louder when hitting 0db on the meters in real use. -18db is the old standard for headroom on most recordings ans has a lot of headroom.
Ok, I should decide by myself if I need the lower frequencies in my electric piano… and this level is just the starting point.
Thanks Dave, I now understand the various db levels. I was confused because I don’t think my song levels as they were in a digital mix, but as they were analog-hardware without clipping being possible (which I know is false)
It makes me think how Cantabile treats the clipping. I remember reading something in the manual. Will read it again.
This shows how the different scalings affect the headroom for peaks and how apparently loud you are to start with (in RMS). Old recording folks are well versed in center type or -18 db. It was the standard for a long time. Dynamics are affected by each choice as well. More headroom = more air. Less headroom = more crowding and compression (assuming you have a limiter, compressor or saturator on your channel). Different styles of performance can use a variety of loudness setups so Brad made sure they were available.