I’m contemplating how best to organise routes and bindings. Today I have C3 as the centre of the universe and use the background rack to manage routes between C3, Reaper, Ableton, LivePrompter, BOME and all the hardware.
I have an embedded rack within the background rack which contains all of my bindings, but this is getting unwieldy now with lots of entries.
I’m thinking about putting each type of control hardware in its own embedded rack within the Background rack with its own bindings.
Racks could be
1. “Control Surfaces” - containing Korg NANO and Behringer x-touch mini with lots of individual bindings
2. “Foot Pedals” - containing the 3 pedal unit on my home piano, the sustain pedal on my slab piano, and the MIDI Expression.
But then, for example, where should I put the binding from the lowest note on the piano that switches me to the next song state? I also have other buttons on the control surface, and a foot pedal to go to next song state. Should these go in the song bindings, or the piano rack?
I have my ‘all songs’ common switches in the background rack bindings (no embedded racks) but I don’t have many. These would include toggle grid view, next song, previous song and next song state. I set the rest of my bindings at song and rack level. First off I set up ‘notes only’ on all my MIDI routes in my songs and then create bindings for that song at song level which I pass to whatever linked racks I have in that song. I can copy and paste commonly used bindings from song to song in a set list as needed to speed up editing. The idea behind doing this is that only the desired MIDI control data will pass to plugins and it can be seen in a glance what the bindings are for that song so quicker troubleshooting. These bindings would include sustain pedal, expression pedal, ‘on song load’ commands, triggers, ‘on state load’ commands, rotary speed pedal, cross-faded pedal setups etc… My racks are made similarly, I set my routes up as notes only and set the bindings to handle any controllers I might use on that instrument. For piano racks I would have the bindings for sustain, soft and expression pedal. For an organ rack I would have rotary speed, expression/swell pedal, chorus/vibrato switches and draw-bars. For horns rack I have expression swell and hold pedals. I then just create the bindings at song level and send them to the rack MIDI in and the already made bindings inside the rack will recognize them.
That’s my way, or should I say a hybrid way based on input from the forum (Thanks Guys!). There are also other ways that are being used where linked bindings racks are dropped into the songs where they are needed. It’s pretty subjective, I know, as to how to organize, it should make sense to your way of working.
Thanks Dave that is food for thought. I would prefer to keep as little config at song level as possible. So that if I change the hardware, or add bindings then I don’t have to change every song.
So perhaps the “binding rack” approach would work for me for bindings that don’t fit into a hardware rack.
Don’t forget that if you create a linked rack that encapsulates your hardware specific routes/bindings, and you reuse it across songs, if you change hardware you only need to change that rack, and it’ll just work in all songs using it. I do this for my expression pedal, which I don’t need in all my songs. Don’t feel you have to put all your hardware handling into the background rack, unless it is absolutely ubiquitous across all songs.
I use a similar approach - I encapsulate both my keyboards (keys only) in separate racks, my pedals (sustain, sustenuto, expression) in another, controllers (mod wheel, aftertouch, pitchbend) for both keyboards in separate racks. Then I have one unified rack “sliders” that abstracts the sliders / controls on my masterkeyboards plus my launch control and provides logical output ports like “main keys volume”, “reverb volume” so I can connect them wherever useful in my songs.
For controls that don’t change like “next song state”, I have a couple of global bindings in the background rack. Since I have two configurations (one keyboard, two keyboards), I have two corresponding states in my background rack that activate the relevant bindings per configuration. For example, the lower keys on my 88 key master are used for “next/previous state” and “VoiceLive bypass” in my single keyboards configuration; in my two-keyboards config, these commands are issued by pads on my upper keboard, so in the corresponding state, the lower-key bindings get de-activated.
I may actually bundle the state-dependend bindings into embedded racks in the background rack for organization purposes, but that’s just cleaning up…
Thanks Torsten, so for example if you had a pad on your Launch Control that needed action “next state” on say your piano rack, how would you configure that? Your Launch Control pad is a different rack to your piano rack.
Actually, I don’t do that. My racks are simple “preset sound modules” - all switching happens at song level. I control SONG states, not rack states, from my Launch Control, so advancing to the next state is a song-level operation. For each song state, I can select different rack states for some of the racks involved or change the output level etc. I don’t use a controller to change individual rack states; just pre-defining song states like verse, chorus, solo and setting my whole configuration to fit this section (across both keyboards plus my VoiceLive) is far better than fiddling with the individual racks.
There is one song where I actually DO select individual rack states; that’s my “Universal” song. This one I use for any song I haven’t yet built an individual song file for. This one has two racks called “upper” and “lower” for my two masterkeyboards; I have two banks of buttons on my upper keyboard that simply select rack states for both keyboards individually. This song has just my basic sounds (piano, Rhodes, organ, solo synth, … 8-10 songs for each keyboard) so I can easily start jamming and try out new songs.
This idea of “abstracting” the controllers into a rack (and both of your last posts) are infinitely fascinating! I’d like more info on how you precisely go about abstracting the controllers in that rack. Is it merely several named input entries with pre-defined filters in the Options/MIDI section? Or do you set up the inputs as two keyboards there, and then abstract out the controllers from within the rack?
Anything that can give some definition to ones controllers - with names showing somewhere per assignment - is a handy approach!
currently, I have a rack for my main keyboard and one for my secondary.
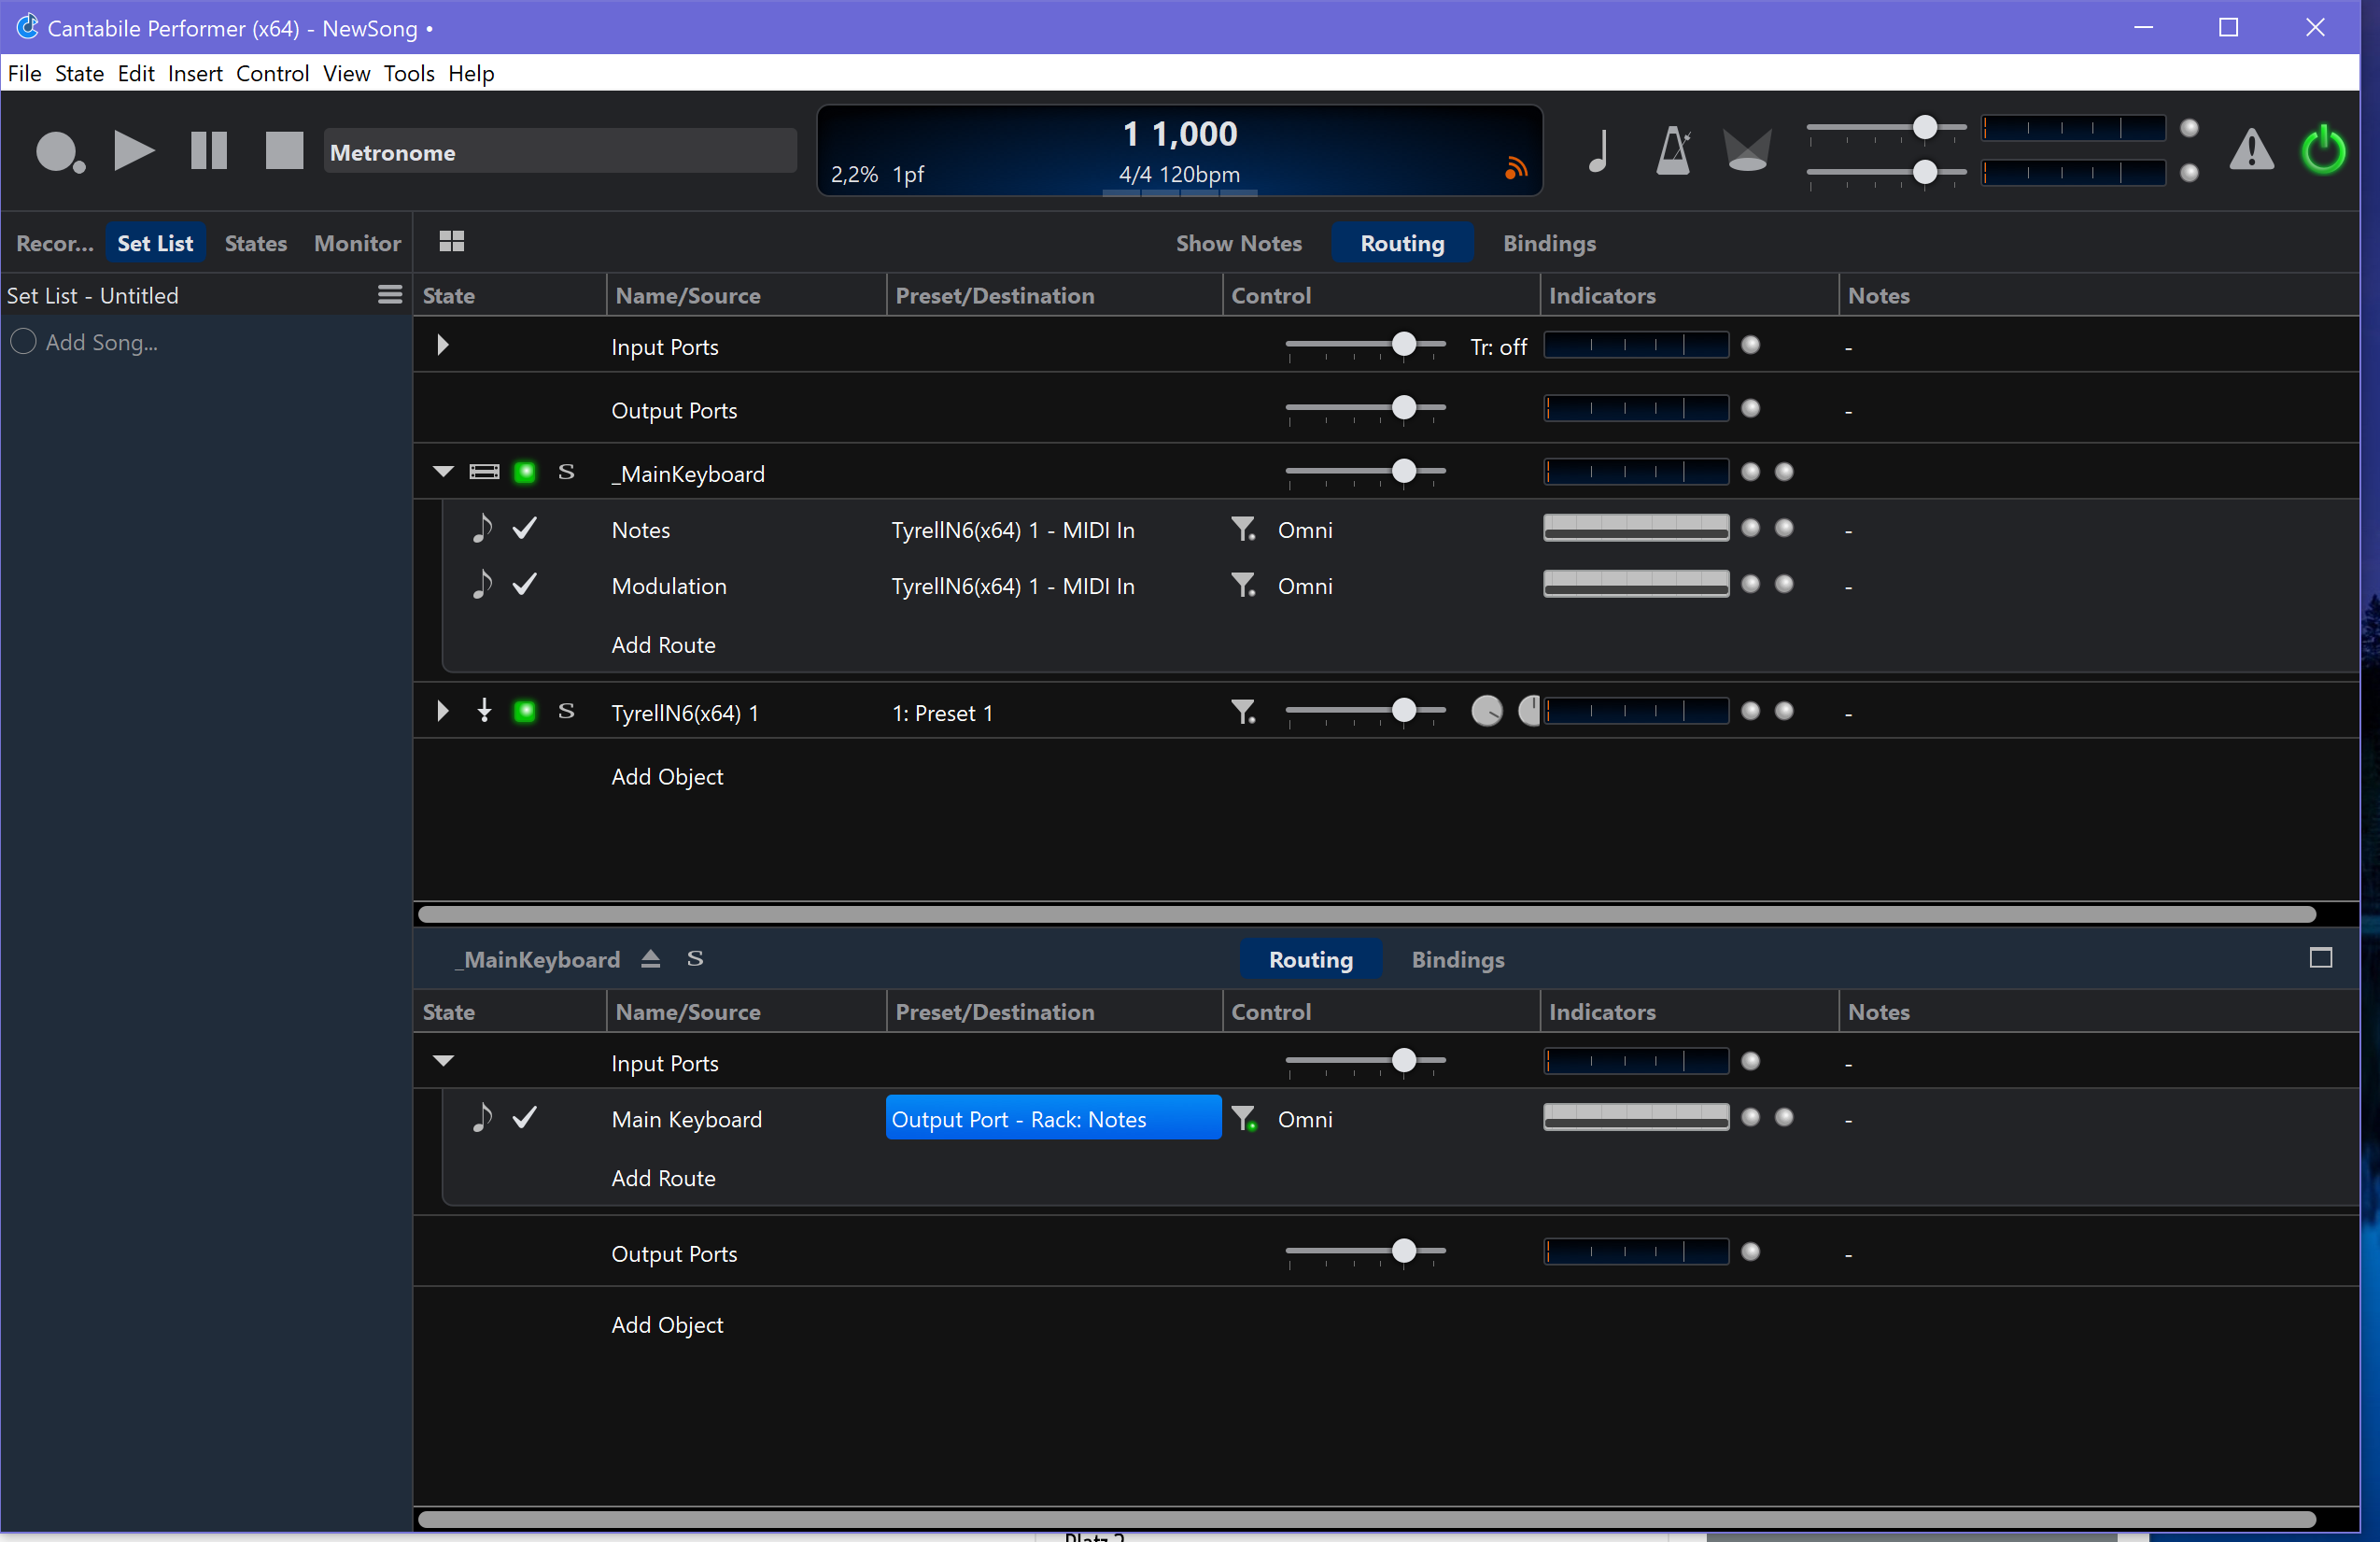
Each rack has multiple MIDI output ports:
notes --> sends nothing but notes, all controllers filtered out
aftertouch --> only channel pressure messages
modulation --> only CC1
pitchbend --> only pitch bend messages
ribbon (for my Kurzweil main board) --> CC21 hi-res
For pedals, I have a separate rack with the output ports:
sustain
soft
expression
Two reasons for the separate rack: first, I treat pedals as independent from the keyboard - sometimes sustain applies to the upper, sometimes to the lower keyboard -, second: I have a MidiExpression box in my rack that I can connect pedals instead of directly to the keyboards. That one gets mapped in the pedal rack as well, so I can just use whatever makes sense.
So when I build a song, I can create very explicit routes from the keyboards and the controllers like:
main keyboard notes to piano and strings
sustain to piano and strings
main keyboard modulation converted to CC7 and routed to strings --> control string volume via modwheel
main keyboard aftertouch converted to CC14 and routed to strings --> control string filter cutoff via pressure
second keyboard notes routed to lead synth
second keyboard aftertouch scaled to 0…48 and converted to CC1 --> pressure on lead keyboard creates modulation, but not too much
This song contains three input racks: Main Keyboard, Second Keyboard, Pedals. All the connections above are made by creating routes from their specialized outputs to the respective destination. This makes things very easy to create, understand and diagnose (Route Keyboard 1, notes --> StringRack, MIDI In).
There is also a fourth rack called “faders” which combines fader input from main and second keyboard plus my Novation LaunchControl into dedicated ports like “MainReverbLevel”, “MainDelayLevel”, “MainKeysLevel”, … and sending CC7 to each of them. This way, whenever I change fader assignments or use a different piece of hardware for main or second keyboard, I simply edit the “Faders” rack and everything’s fine for all songs.
BTW: there is an additional advantage to my input rack: I can customize some input processing in it before it hits the song. My 49 key kontroller in my studio has a very light touch, even with its hardest velocity curve. So I created a separate MIDI port (Studio KB) just for this keyboard and route it through the MainKeyboard rack with an additional velocity curve MIDI filter, whilst my Kurzweil PC3 as my normal Main Keyboard passes through un-processed.
Similarly, I route my Studio KB through the second keyboard rack, but filtered with a different MIDI channel. So depending on the MIDI channel selected on my Studio KB, it addresses Main Keyboard or Second Keyboard - this way, I can test my two-keyboard setups in my studio with one controller.
And of course, my input racks map all incoming MIDI data to channel 1 to make sure nothing goes wrong when I accidentally change the MIDI channel on one of my keyboards…
This is very good information to pass along. It just might be the subject of my own first video – a walk-through of me setting up such an arrangement. (Once I figure it all out and do it a couple times, of course!) OR you could beat me to it and make this into a video.
Without a doubt, I am going to be setting this sort of thing up myself this evening. Thanks for the details - I’ll let you know if I run into any bumps!
@Torsten I hate to admit this, but I’m going to need to see a picture of a sample set of such racks. You likely have some around here elsewhere.
I started, mistakenly, making racks in the background rack - those are all embedded and are thus un-recyclable. Back to the drawing board!
I added a new linked rack, but once inside I noticed the outputs available were only “Plugin”, “Embedded Rack”, Embedded Rack (from File)", and “Media Player”. I clearly was in the wrong district.
So, I suspected you meant to add an input port directed simply to “Output Port - Rack MIDI Out”. But there is no way to re-name the “Midi Out” items. I am seeing nowhere that I can specify a “Notes”, “Controllers”, etc. output. So, I’m stumped at the start.
Please, some explanation and clarification for this process in visuals?
Terry
P.S. - This came right at the heels of my creating several filtered input items in the “Options/MIDI Ports” section, which seemed a bit cumbersome, but universal. The state changes can still apply to the input sections of the songs, and they are each named. Having taken this road is probably why I am confused now by your explanation, using racks instead of the Options/MIDI Ports approach.
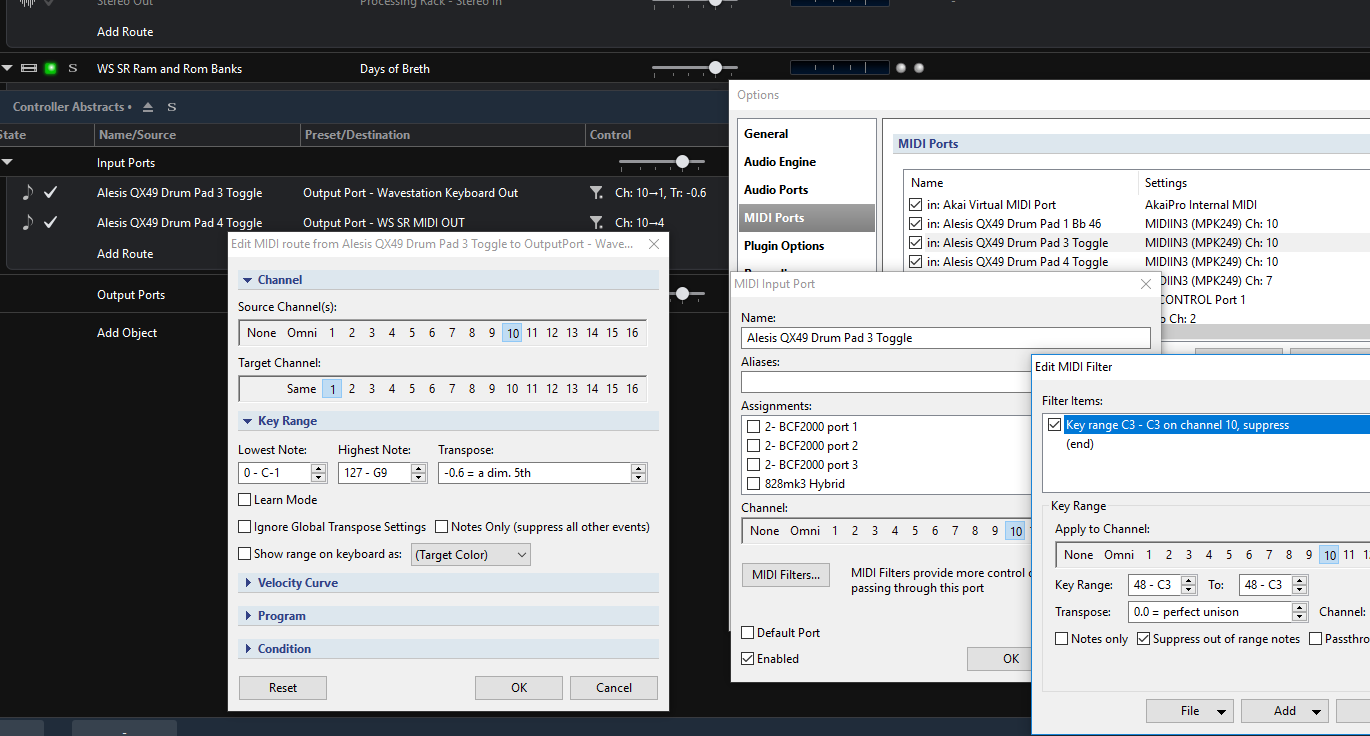
The example below abstracts a single pad that is set to toggle on the Alesis QX49 so it can send and hold a drone “one finger wonder” note on any of my drone-worthy synths, in this case each of the two Korg Wavestations. The note sent from the Alesis stays constant (isolated via filters in the “Options/MIDI Ports” section), which I transpose to the desired note from the “MIDI Route” settings in the rack. (Those update with state changes, whereas filter-based transpositions in the rack do not.)
Yup, that’s what I’m planning - a series of videos walking through my setup, including these input abstraction racks. Currently sketching out content for some first introductory sessions.
Good vehicle to learn doing these kinds of screenshare videos
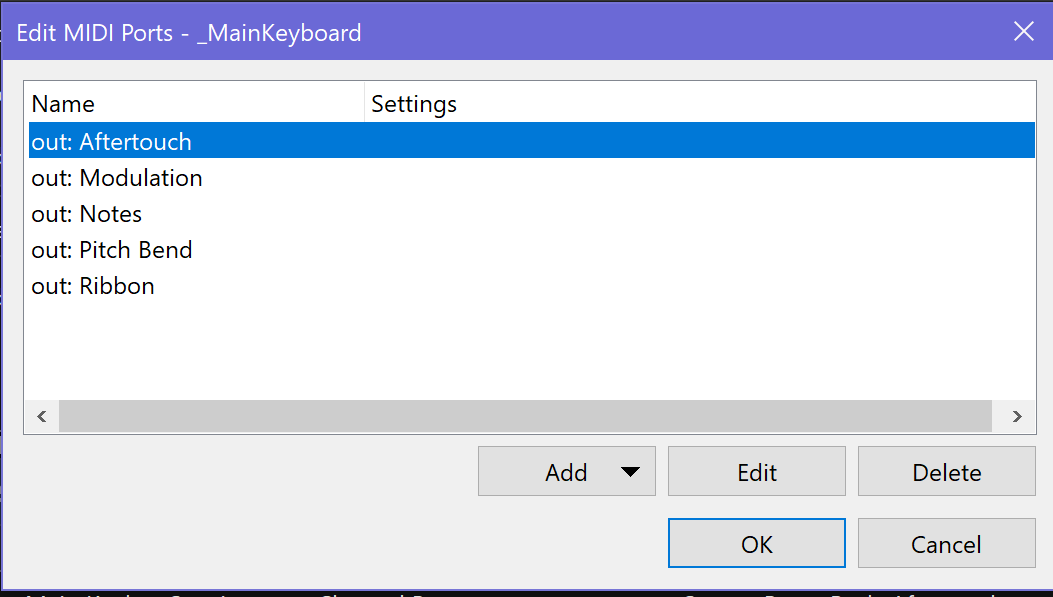
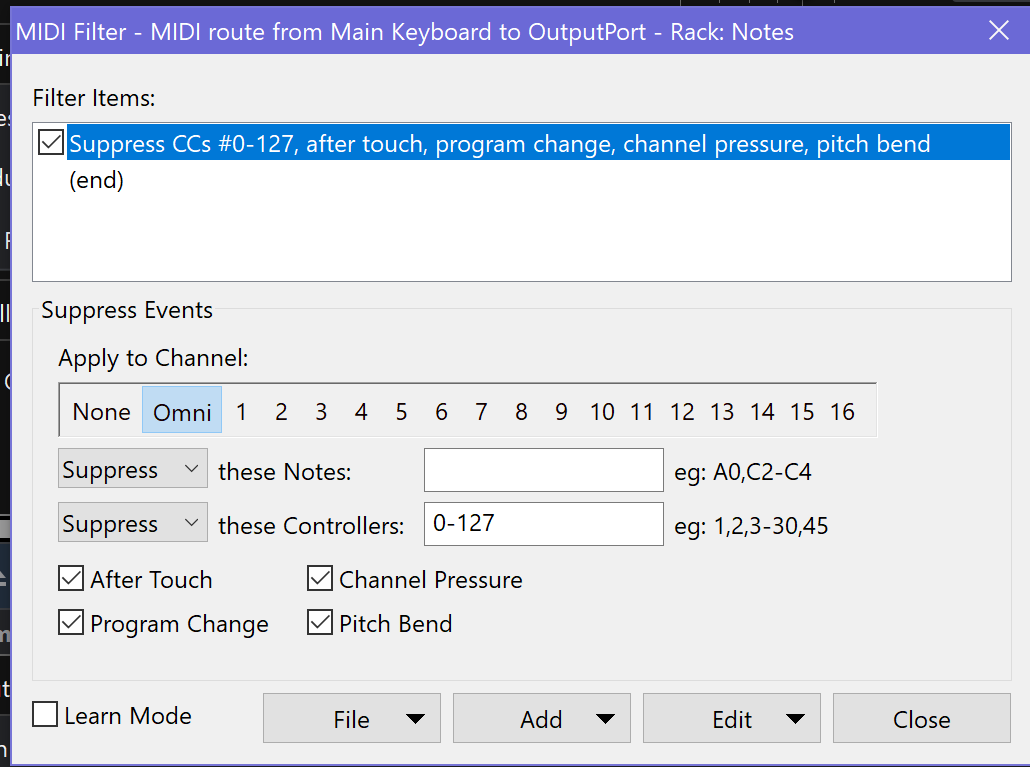
As you see in the first picture, there is a direct route from the “Main Keyboard” MIDI port to the rack output port, but it’s filtered to only pass throuth the notes:
So, in a nutshell, the rack connects directly to the respective input port and then distributes the MIDI data to individual rack MIDI outputs via filtered routes and bindings. I don’t use the “input ports” section in the Routing page anymore, but simply connect between input racks, sound generating racks and effects/mixing racks.
Sorry for any confusion - I didn’t mean to say the Bindings page but of course the ROUTING page. The “standard” way of building a song is to connect the “input ports” section of the routing page to your individual racks (if Cantabile isn’t doing it for you automatically). But I ignore the input ports section, since my abstracted input racks (like the Main Keyboard rack shown above) are so much more powerful - and also easier to debug.
So when starting a song, I first drop in my input racks (Main Keyboard, Second Keyboard, faders), then some instrument racks (piano, strings), effects (reverb, delay), and mixing racks (main keys volume, solo volume, master rack) and then string everything together via routes. Well not quite - of course I have a basic template that already contains some of the elements - but you get the picture.
Actually, this is all very much work in progress - I still have most of my songs in the “old” logic; the idea of abstracted input racks is a pretty recent one (was a result of moving to a second keyboard in Cantabile), so I’m reworking my repertoire song by song when I find the time. And of course refining the approach while I’m doing that.
Once I’ve gotten to a certain level of maturity with this approach, I’ll start doing videos and share it here…
The Bindings approach to handling the routing is more powerful because you can create states that do some pretty nice things - like re-map a controller for you differently with each state (once “Enabled” and “Target” are selected, of course). Absolutely brilliant! I was stymied by the fact that states had no affect on the filters in the routing section - one could not change the re-map via a state, for instance - but this seems to allow the sky to be the limit!
Ok - this is a totally different mindset - and will force me to stop ignoring the Bindings section as I have for too long… Excellent stuff!
Torsten, I’m finally getting around to trying this. A question.
How would you handle different locations? For example, my main keyboard when out playing may be my 2nd keyboard at home. Also, the “sustain” pedal jack on my portable keyboard might be plugged into a sustain pedal when out, but an expression pedal when home, So I need to take that into account in the pedals rack.
Would you do this in the Tools, Midi Ports assignment?
Hmm, that’s a challenge! But I think this could be done:
Do I understand you correctly in that your “main” keyboard has its own dedicated USB MIDI port? So it is always connected to e.g. “Yamaha MIDI In”? This would mean that you can’t simply use multiple MIDI assignments in Tools->Options->MIDI Ports; you need to use multiple Cantabile configurations; one with “Yamaha MIDI In” assigned to the “Main Keyboard” virtual MIDI port, the other with “Yamaha MIDI In” assigned to “Second Keyboard”. Now you simply start Cantabile with the “Studio” or “Live” configuration depending on where you are - and your Yamaha keyboard will play the respective role; your songs simply keep referencing the virtual MIDI ports “Main Keyboard” and “Second Keyboard”.
If OTOH your main keyboard is simply plugged into a “traditional” MIDI interface, I’d simply plug it into a different port at home and use MIDI ports assignment to be sure it is assigned to “Second Keyboard” - but that’s probably too easy
Now for your pedal jack, this is a bit more difficult. First, I am a bit confused: usually a “sustain” pedal jack is a simple switching input (with a simple TS plug), not a continuous controller (with a TRS plug). So plugging an expression pedal into your sustain jack will usually not be a very useful move .
But let us assume we have a controller port on your keyboard that should send different controllers to Cantabile depending on your location. This you can solve in the Background Rack: For your “studio” configuration, create a binding in the Background Rack that will map the original controller coming from your main keyboard to a different controller numer and send it to the “Loopback:Main Keyboard” MIDI port (you need to enable the environment ports to be visible in racks to do this. Now the important bit: you need to set this binding to “Routing Mode:Suppress”. This means that the Background Rack will not let the original CC pass on to the song to be processed, but will only send the changed one.
Of course this means that you’ll need to have different background racks for your two configurations “studio” and “live”.
Yes my keyboard can take an expression pedal input into the sustain jack. It is also USB MIDI.
Do you use different rack states in your _MainKeyboard rack? If not, then perhaps I could just use the states in this rack which change the enabled bindings for the different locations. I’ll have to try.