New personal project / case study: A Cantabile Overlay for flexible rehearsal options

Sharing my latest little project here - maybe interesting to some to inspire some Cantabile configuration madness :wink: and maybe also an inspiration for future development of Cantabile?

The Problem:

I am super-happy with Cantabile’s capabilities when it comes to creating song-specific configurations of multiple input and output sources - there’s really nothing you can’t create when you really put your mind to it. Any splitting, layering, routing configuration to play all kinds of tone generators through oodles of effects is possible - BUT: that all takes a bit of careful thinking and preparation.

What I was missing was a way to QUICKLY select and combine a couple of sounds in a rehearsal situation (or spontaneous jam session): ā€œI’ll need a Rhodes on my main keys, plus a split of bass and hammond on my upper keysā€. Typically, I get through rehearsals with my set of ā€œPiano + Xā€, ā€œRhodes + Xā€, ā€œWurlie + Xā€ etc. standard songs, with song states defining the ā€œXā€ for the upper keyboards. But that’s rather limited - and I don’t want to start creating new Cantabile songs on the fly in a rehearsal situatiion. So I was looking at different scenarios how to be more flexible and have more sounds and configurations on call QUICKLY.

The Concept

First thing was to decide HOW flexible I need to be, based on my typical way of playing. Being a pianist first and multi-keyboardist second, my typical setup is having a piano-type (Grand, Wurly, Rhodes, …) sound all across my (weighted) lower keyboard, possibly layered with a string or organ layer. I don’t typically use my lower keyboard in multiple zones, unless that is required by a specific song (but for these, I would build dedicated Cantabile songs anyhow).

My upper keyboard is mostly for lead sounds - mainly Hammond-type or my favorite fake sax (SWAM), but also analog synth type sounds. Typically, that sound is across the whole upper keyboard, but I may also split the upper to do left-hand comping while soloing with my right.

Beyond this, I want the ability to select from a broad range of workstation-type synth presets, both for the lower and for the upper keyboard, in order to fill all kinds of sonic requirements.

To have all of this available quickly and accessibly on a touch screen, I designed and programmed an overlay for Cantabile that allows me to make these kinds of selections very quickly and flexibly without having to design new Cantabile songs.

The Overlay

This is what this overlay looks like:
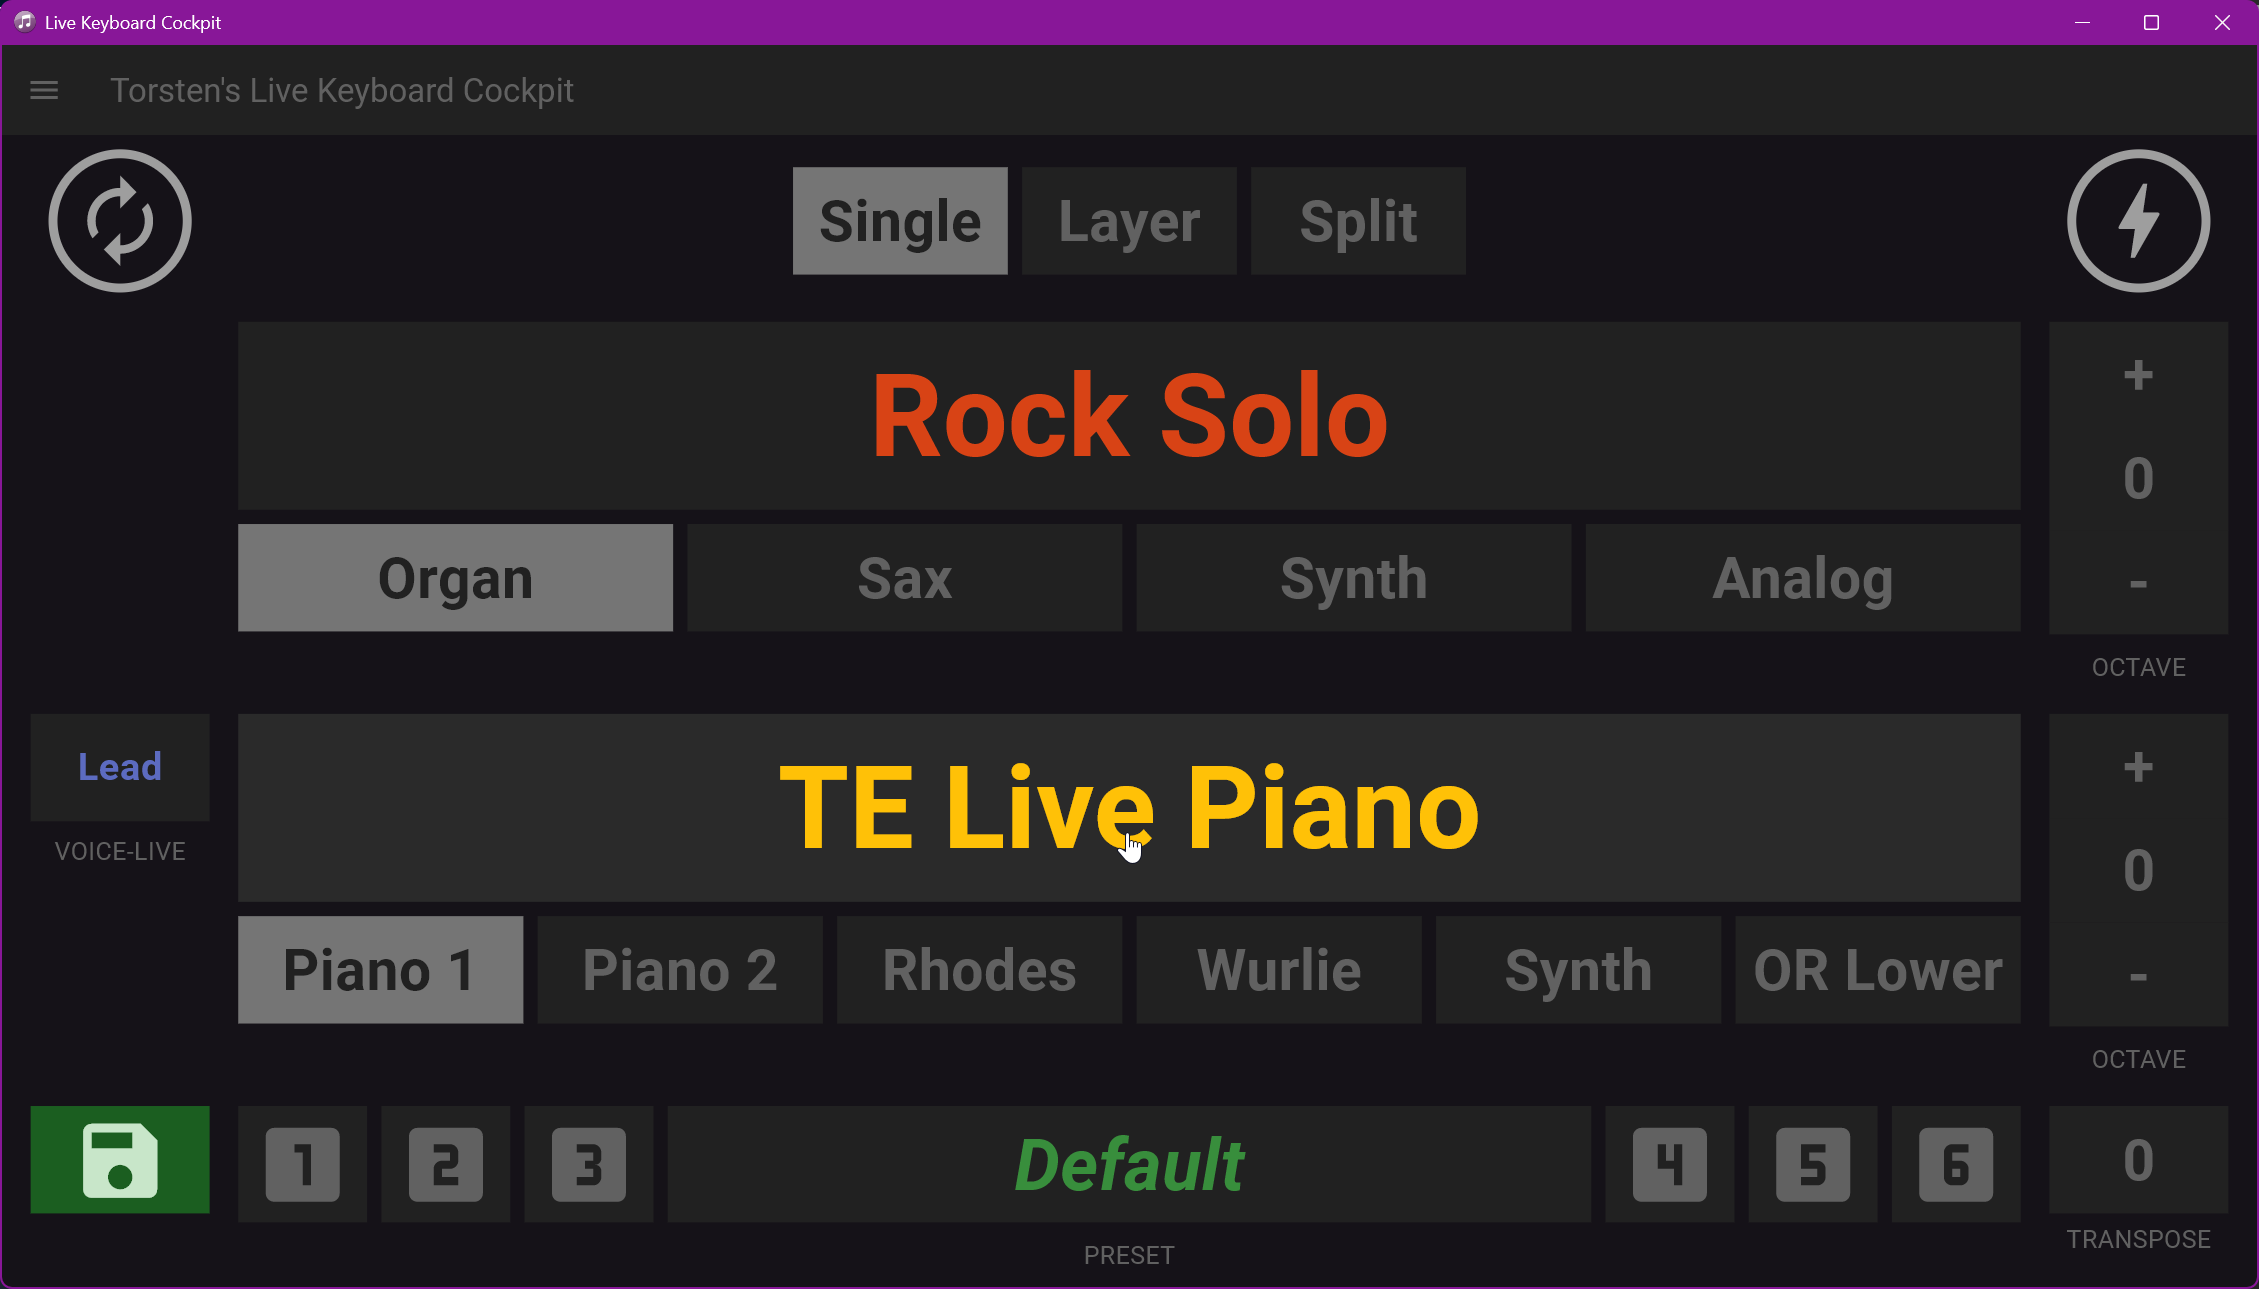
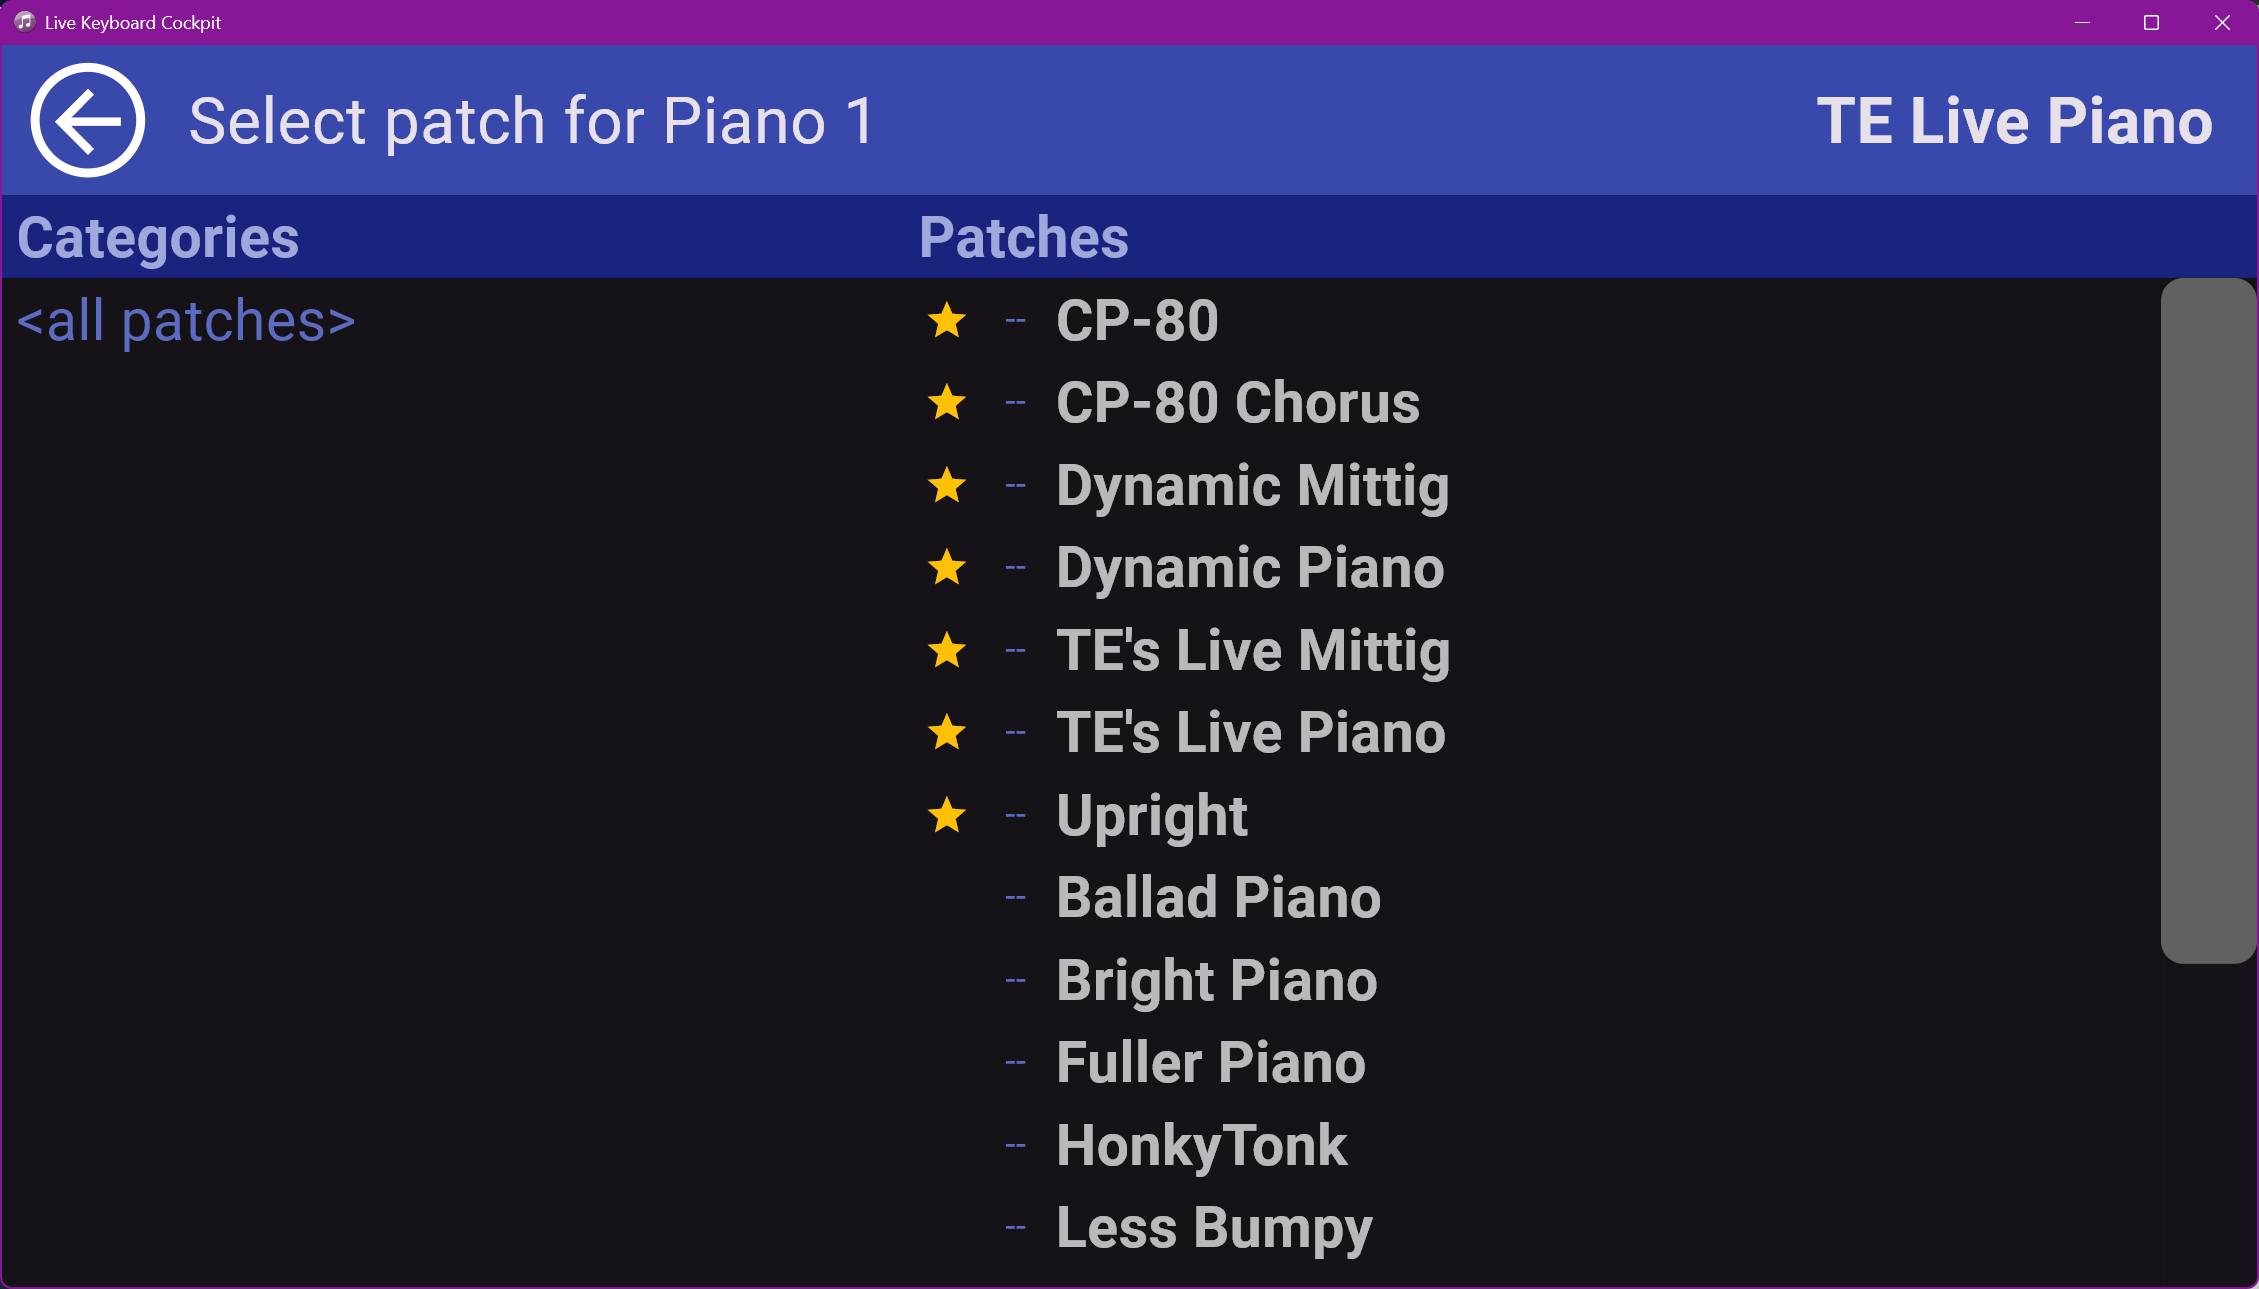
  • each of my keyboards (upper and lower) can be assigned to some pre-defined instrument slots (targetting a separate instrument rack in Cantabile), each of which has presets that can be selected by tapping the currently selected preset (e.g. ā€œTE Live Pianoā€):

So when I select Piano 1 for my main keyboard, I control a rack using Addictive Keys, Piano 2 uses a Pianoteq rack, Wurly has UVI Workstation using VTines etc).

The lower keyboard can also act as the lower organ keyboard for an Organ Rack using IK Multimedia’s Hammond, so I can play a 2 manual organ between upper and lower keyboard

The upper keyboard has fewer slots - mainly the Hammond rack (IK), the SWAM Sax, an analog Synth rack using Surge XT, and a workstation synth (Triton Extreme) for all other bread-and-butter sounds

I chose Triton Extreme as my bread-and-butter workstation sound generator, and I use three instances of the same rack in this Cantabile song.

The upper keyboard can easily be re-configured to split and layer configuration, and the split config allows to quickly pick a split point from a couple of useful pre-configured settings:
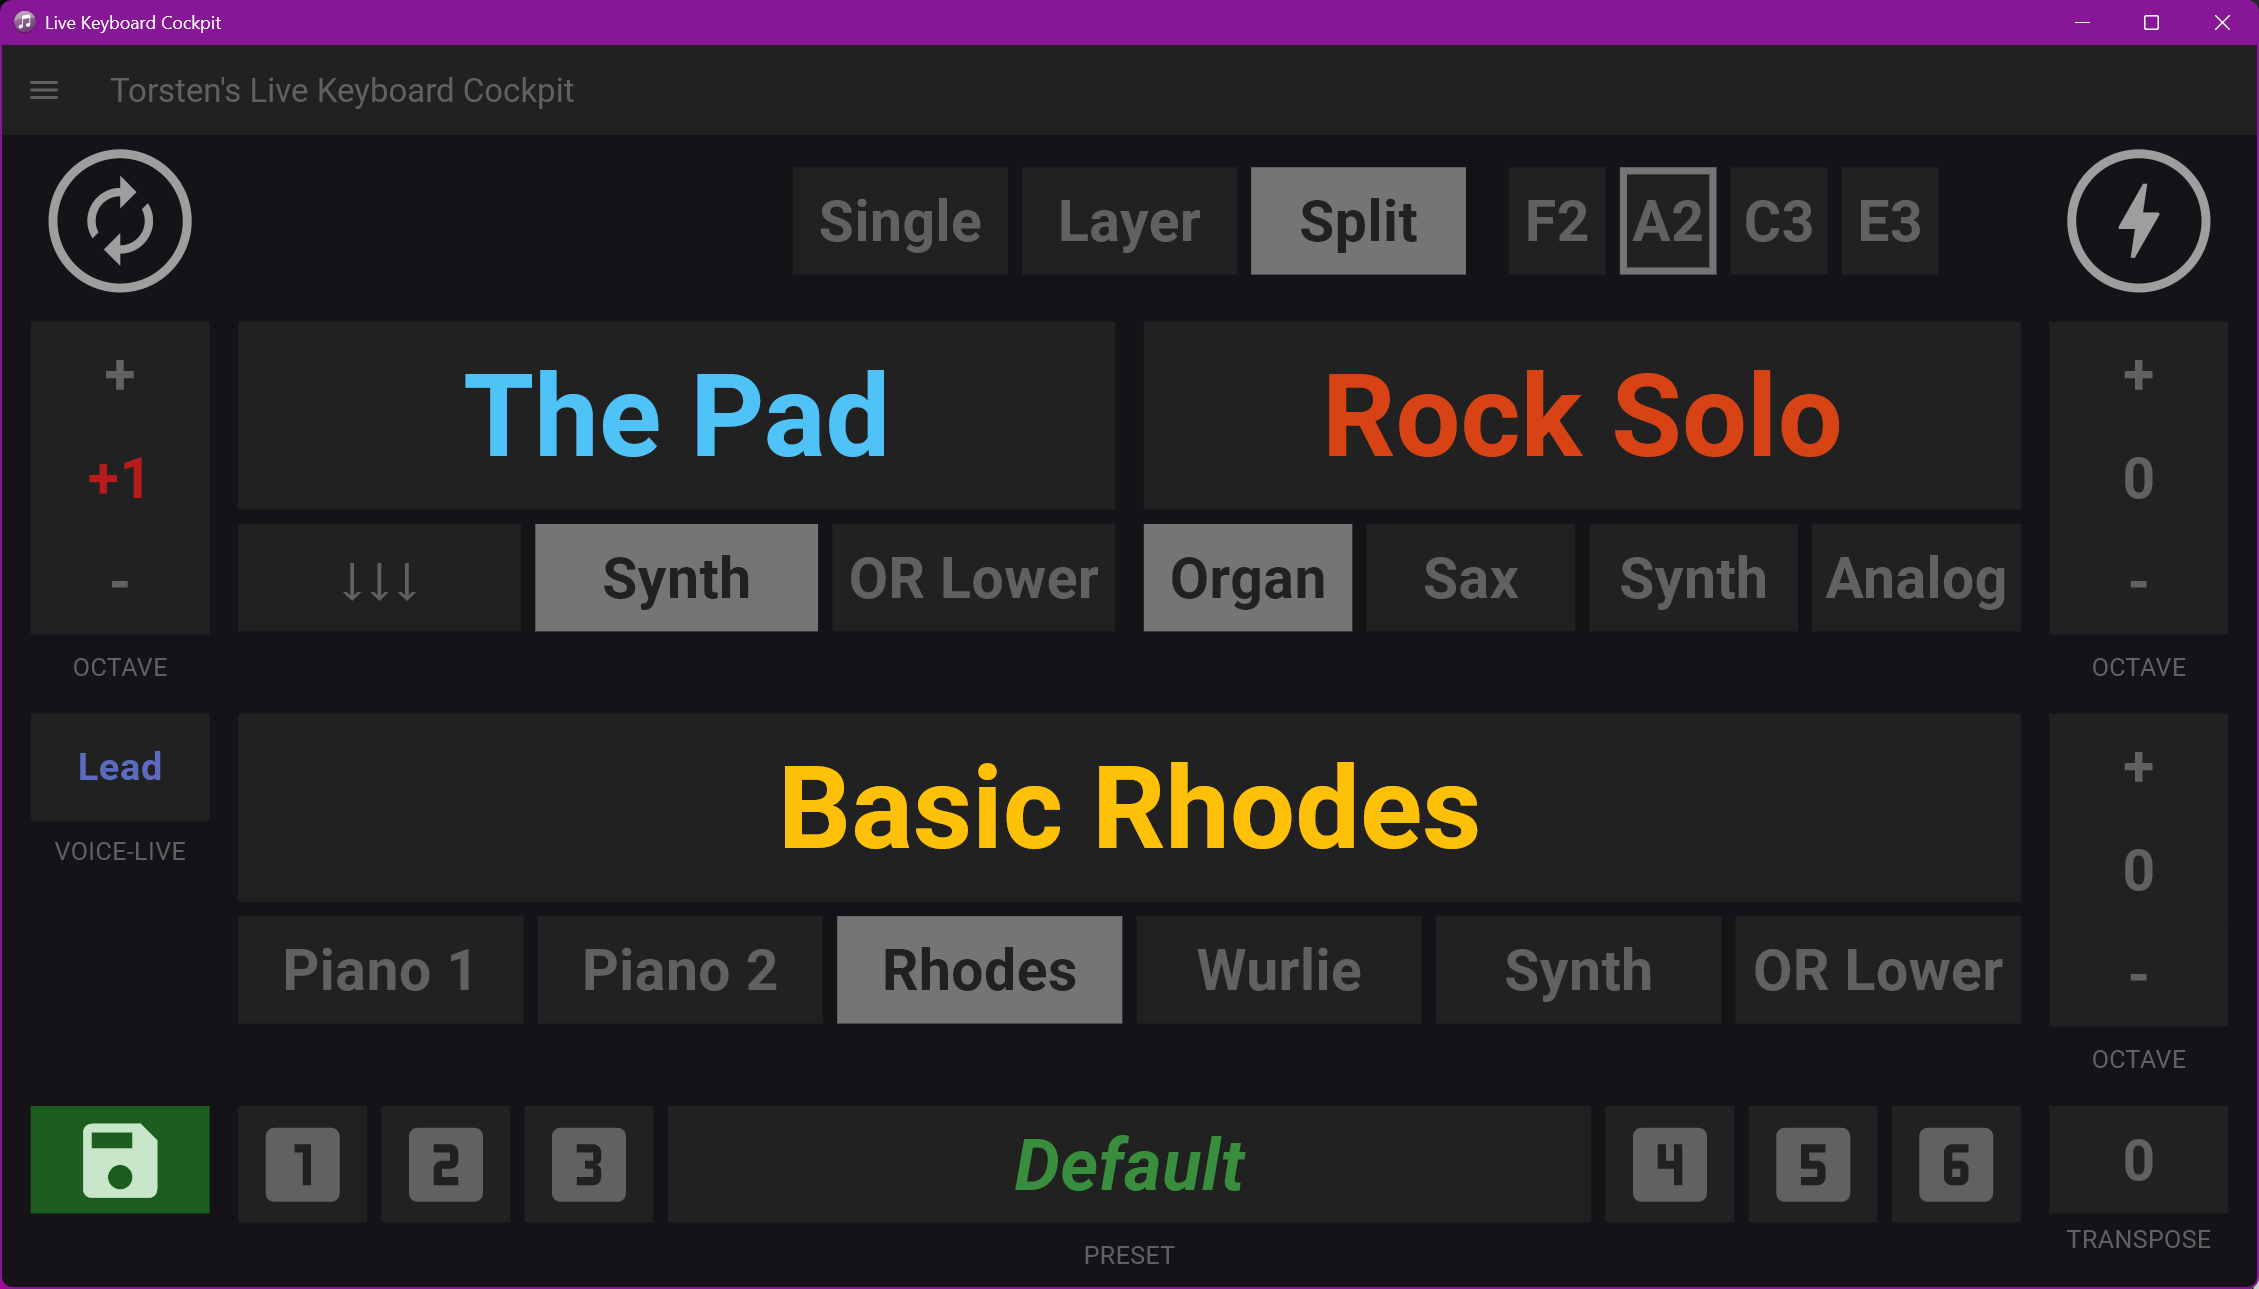
Now there is a new slot for upper left that has fewer options, but enough for me:

  • it can play the destination of the lower keyboard - makes it easier to have both hands on the upper keyboard, left hand comping with my main piano sound, while the right does lead stuff
  • it can act as the lower manual of a Hammond organ, so I can play two-manual parts on the upper keyboard alone
  • for anything else, there is the workstation synth - the third Triton Extreme instance

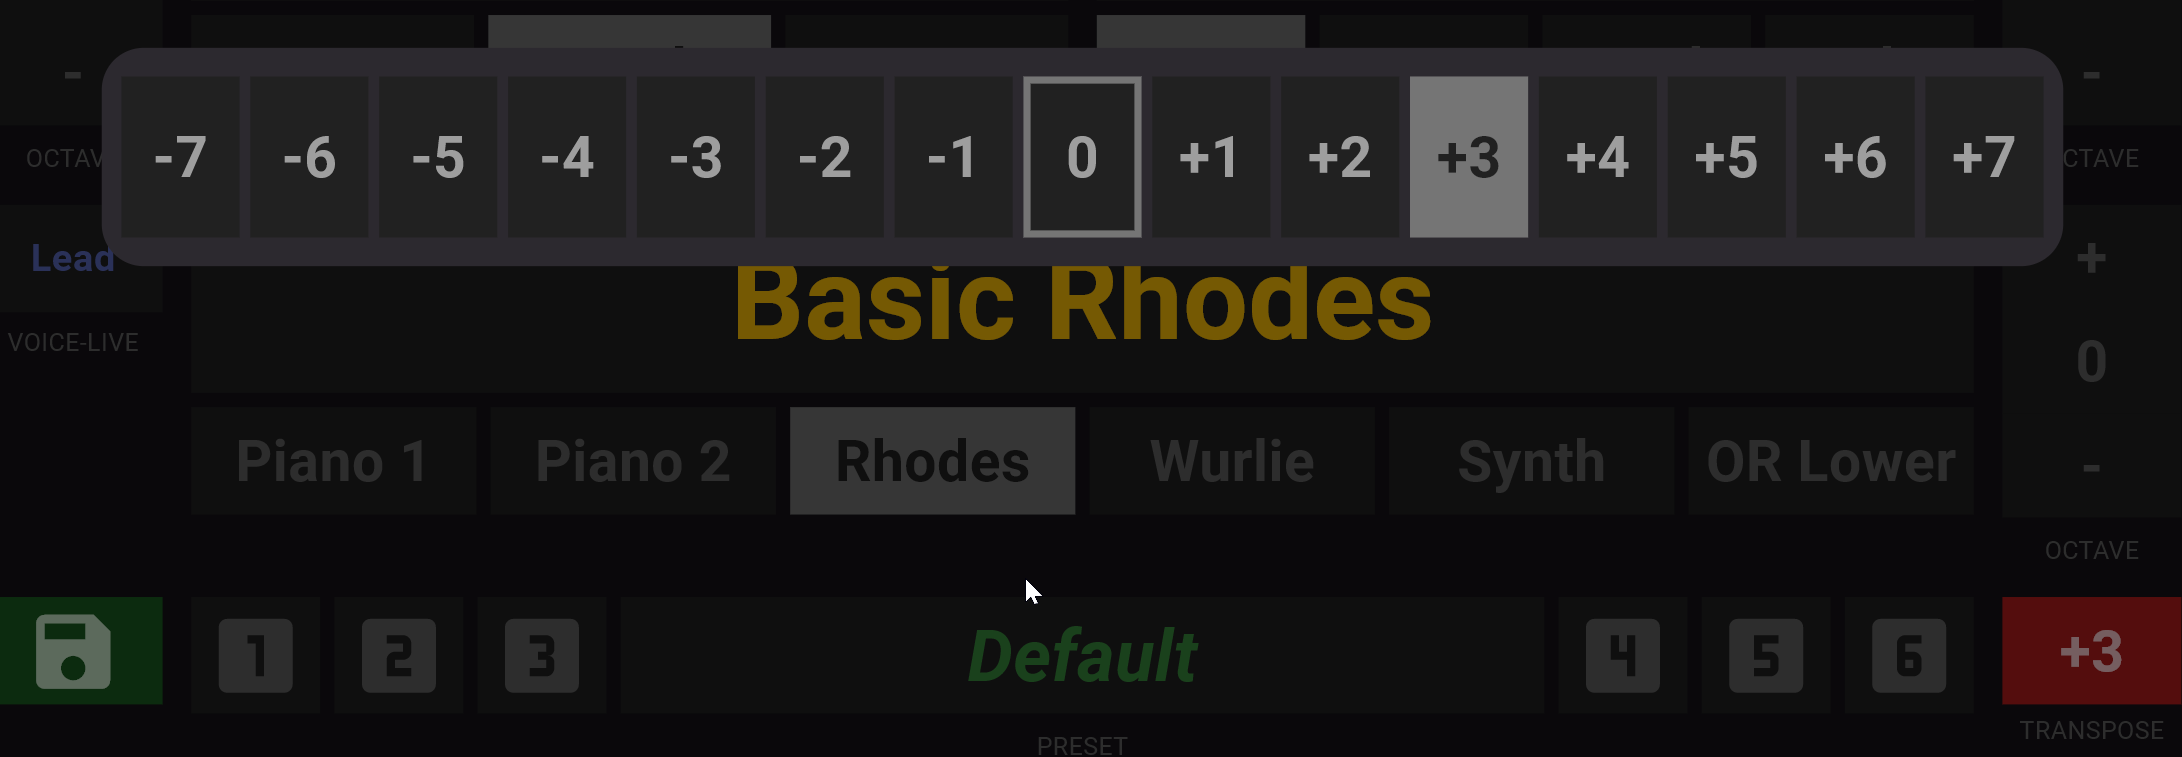
Every instrument slot has its own octave switch so I can quickly tap in the right octave (or reset it by tapping the middle). Then there is the overall transpose button on the bottom that controls Cantabile’s Transpose setting and lights up red when transposition is active:
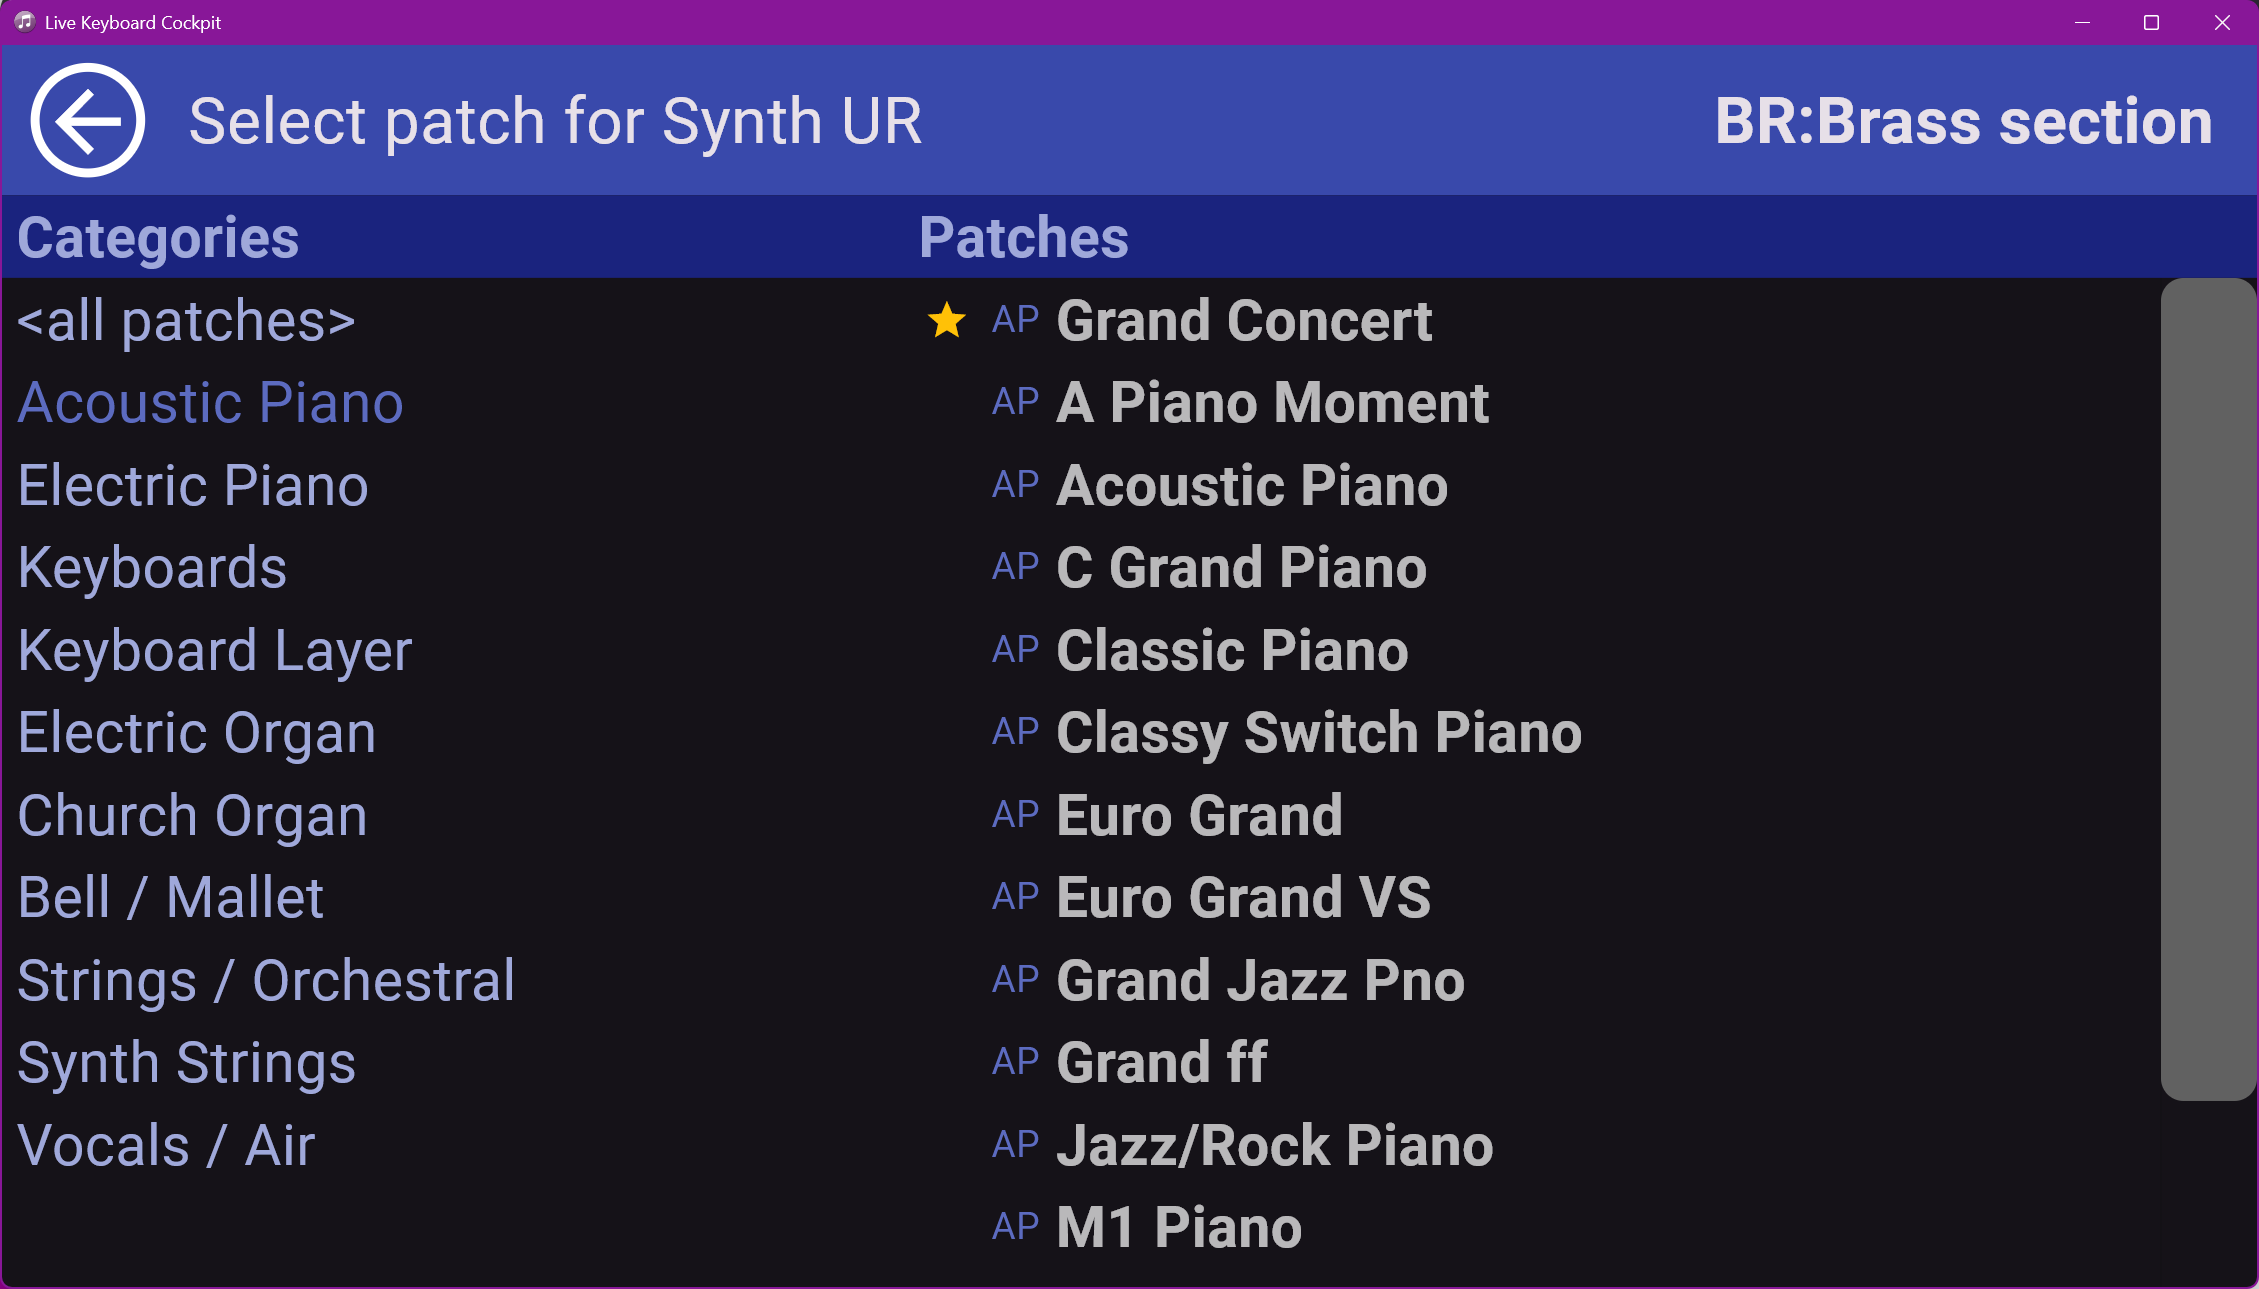
To help picking sound quickly, there are sound categories that help navigating, which is especially useful with the huge amount of workstation sounds, and favorites (which get listed first):
A complete configuration of this can be saved/loaded as a preset (the green box at the bottom) and stored / recalled using the six quick-access ā€œradio buttonsā€.

With this, I have a complete ā€œsuper-workstationā€ on my screen that allows me to create configurations on-the-fly using a touch screen - faster than I could even on a hardware workstation or arranger keyboard.

Connecting this with Cantabile

All this overlay does is create program change commands that get sent to Cantabile via a virtual MIDI port. All the real magic happens in Cantabile: changing the routing of the MIDI events coming from the physical keyboards to instrument racks, routing layers and splits and controlling the octaves. No live MIDI events are routed through the overlay, so no delay or latency - everything is in Cantabile and would keep working even if the overlay crashed.

Program changes are used to (a) load presets in the individual slots and (b) select instrument slots for the individual keyboard zones. Since there are only 16 MIDI channels, I had to resort to control changes for octaves, transpose and split point, but the mechanism is the same.

Implementing in Cantabile

The corresponding Cantabile song is quite a beast: it hosts all the instrument racks and effects and has a host of routing racks to ensure that MIDI notes get sent to the correct instrument rack depending on the overlay configuration:
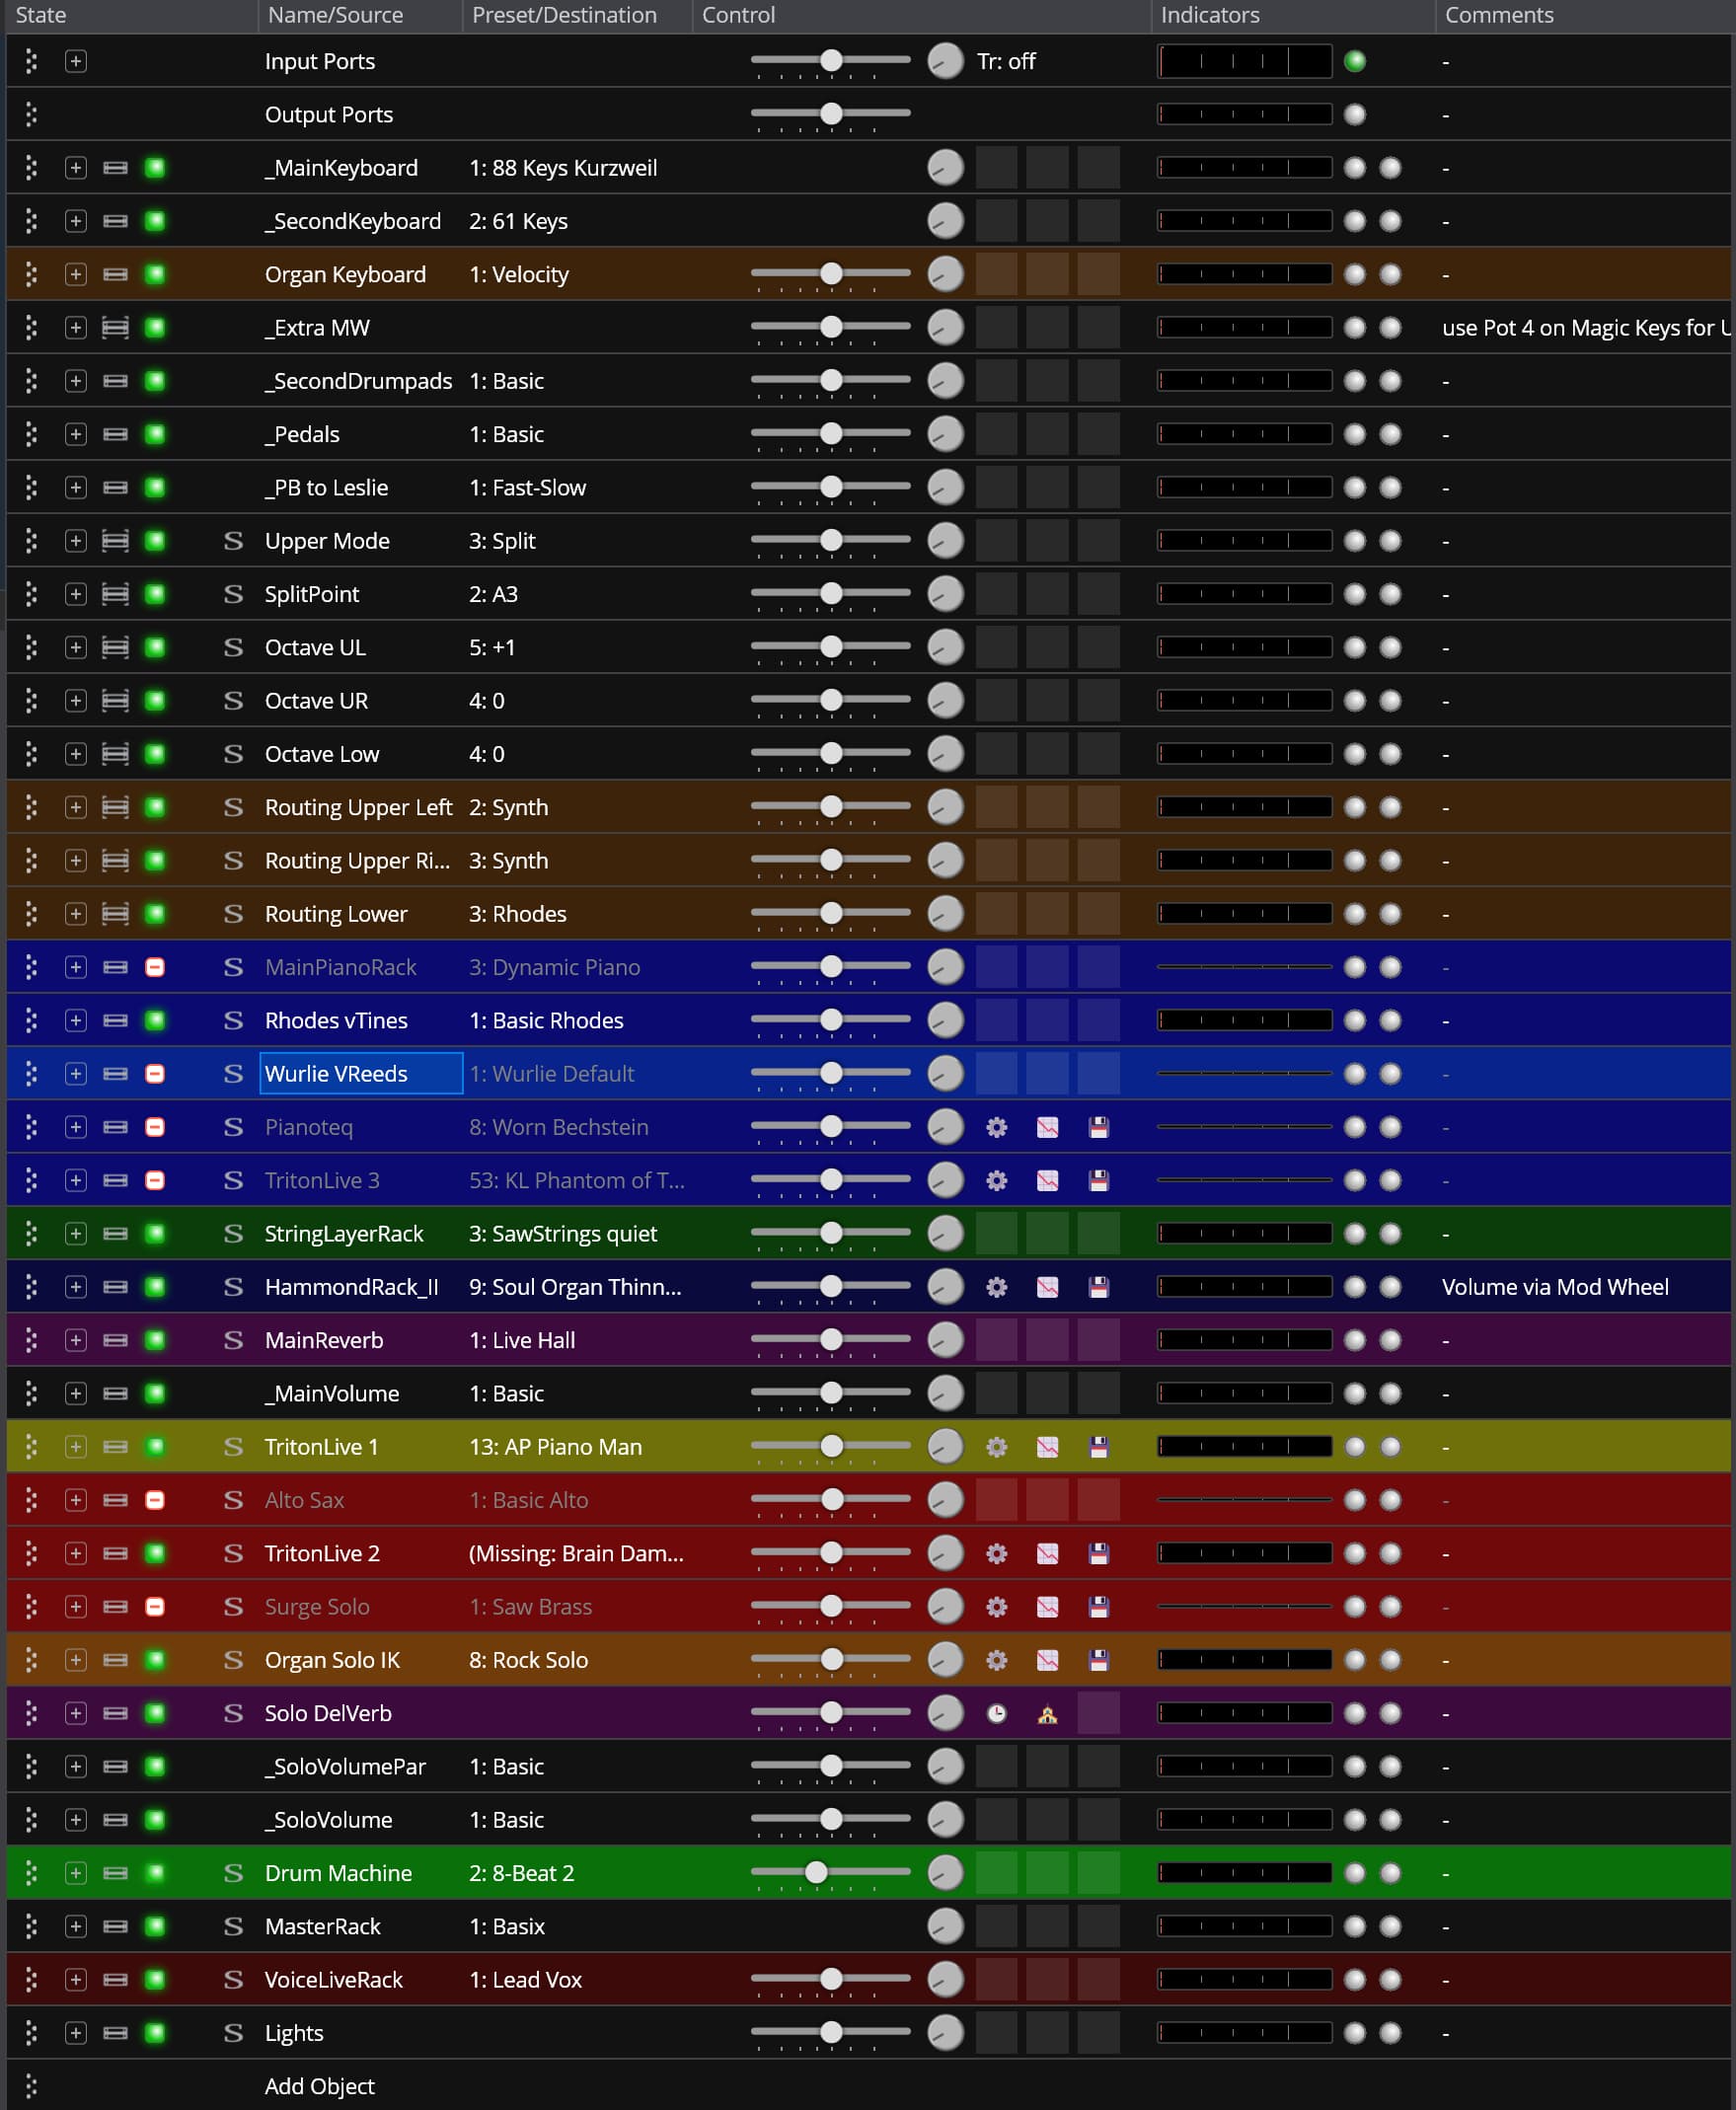
Plus, there is a number of Binding groups that take care of preset loading, managing the active racks per slot, mode switching, transposing etc.
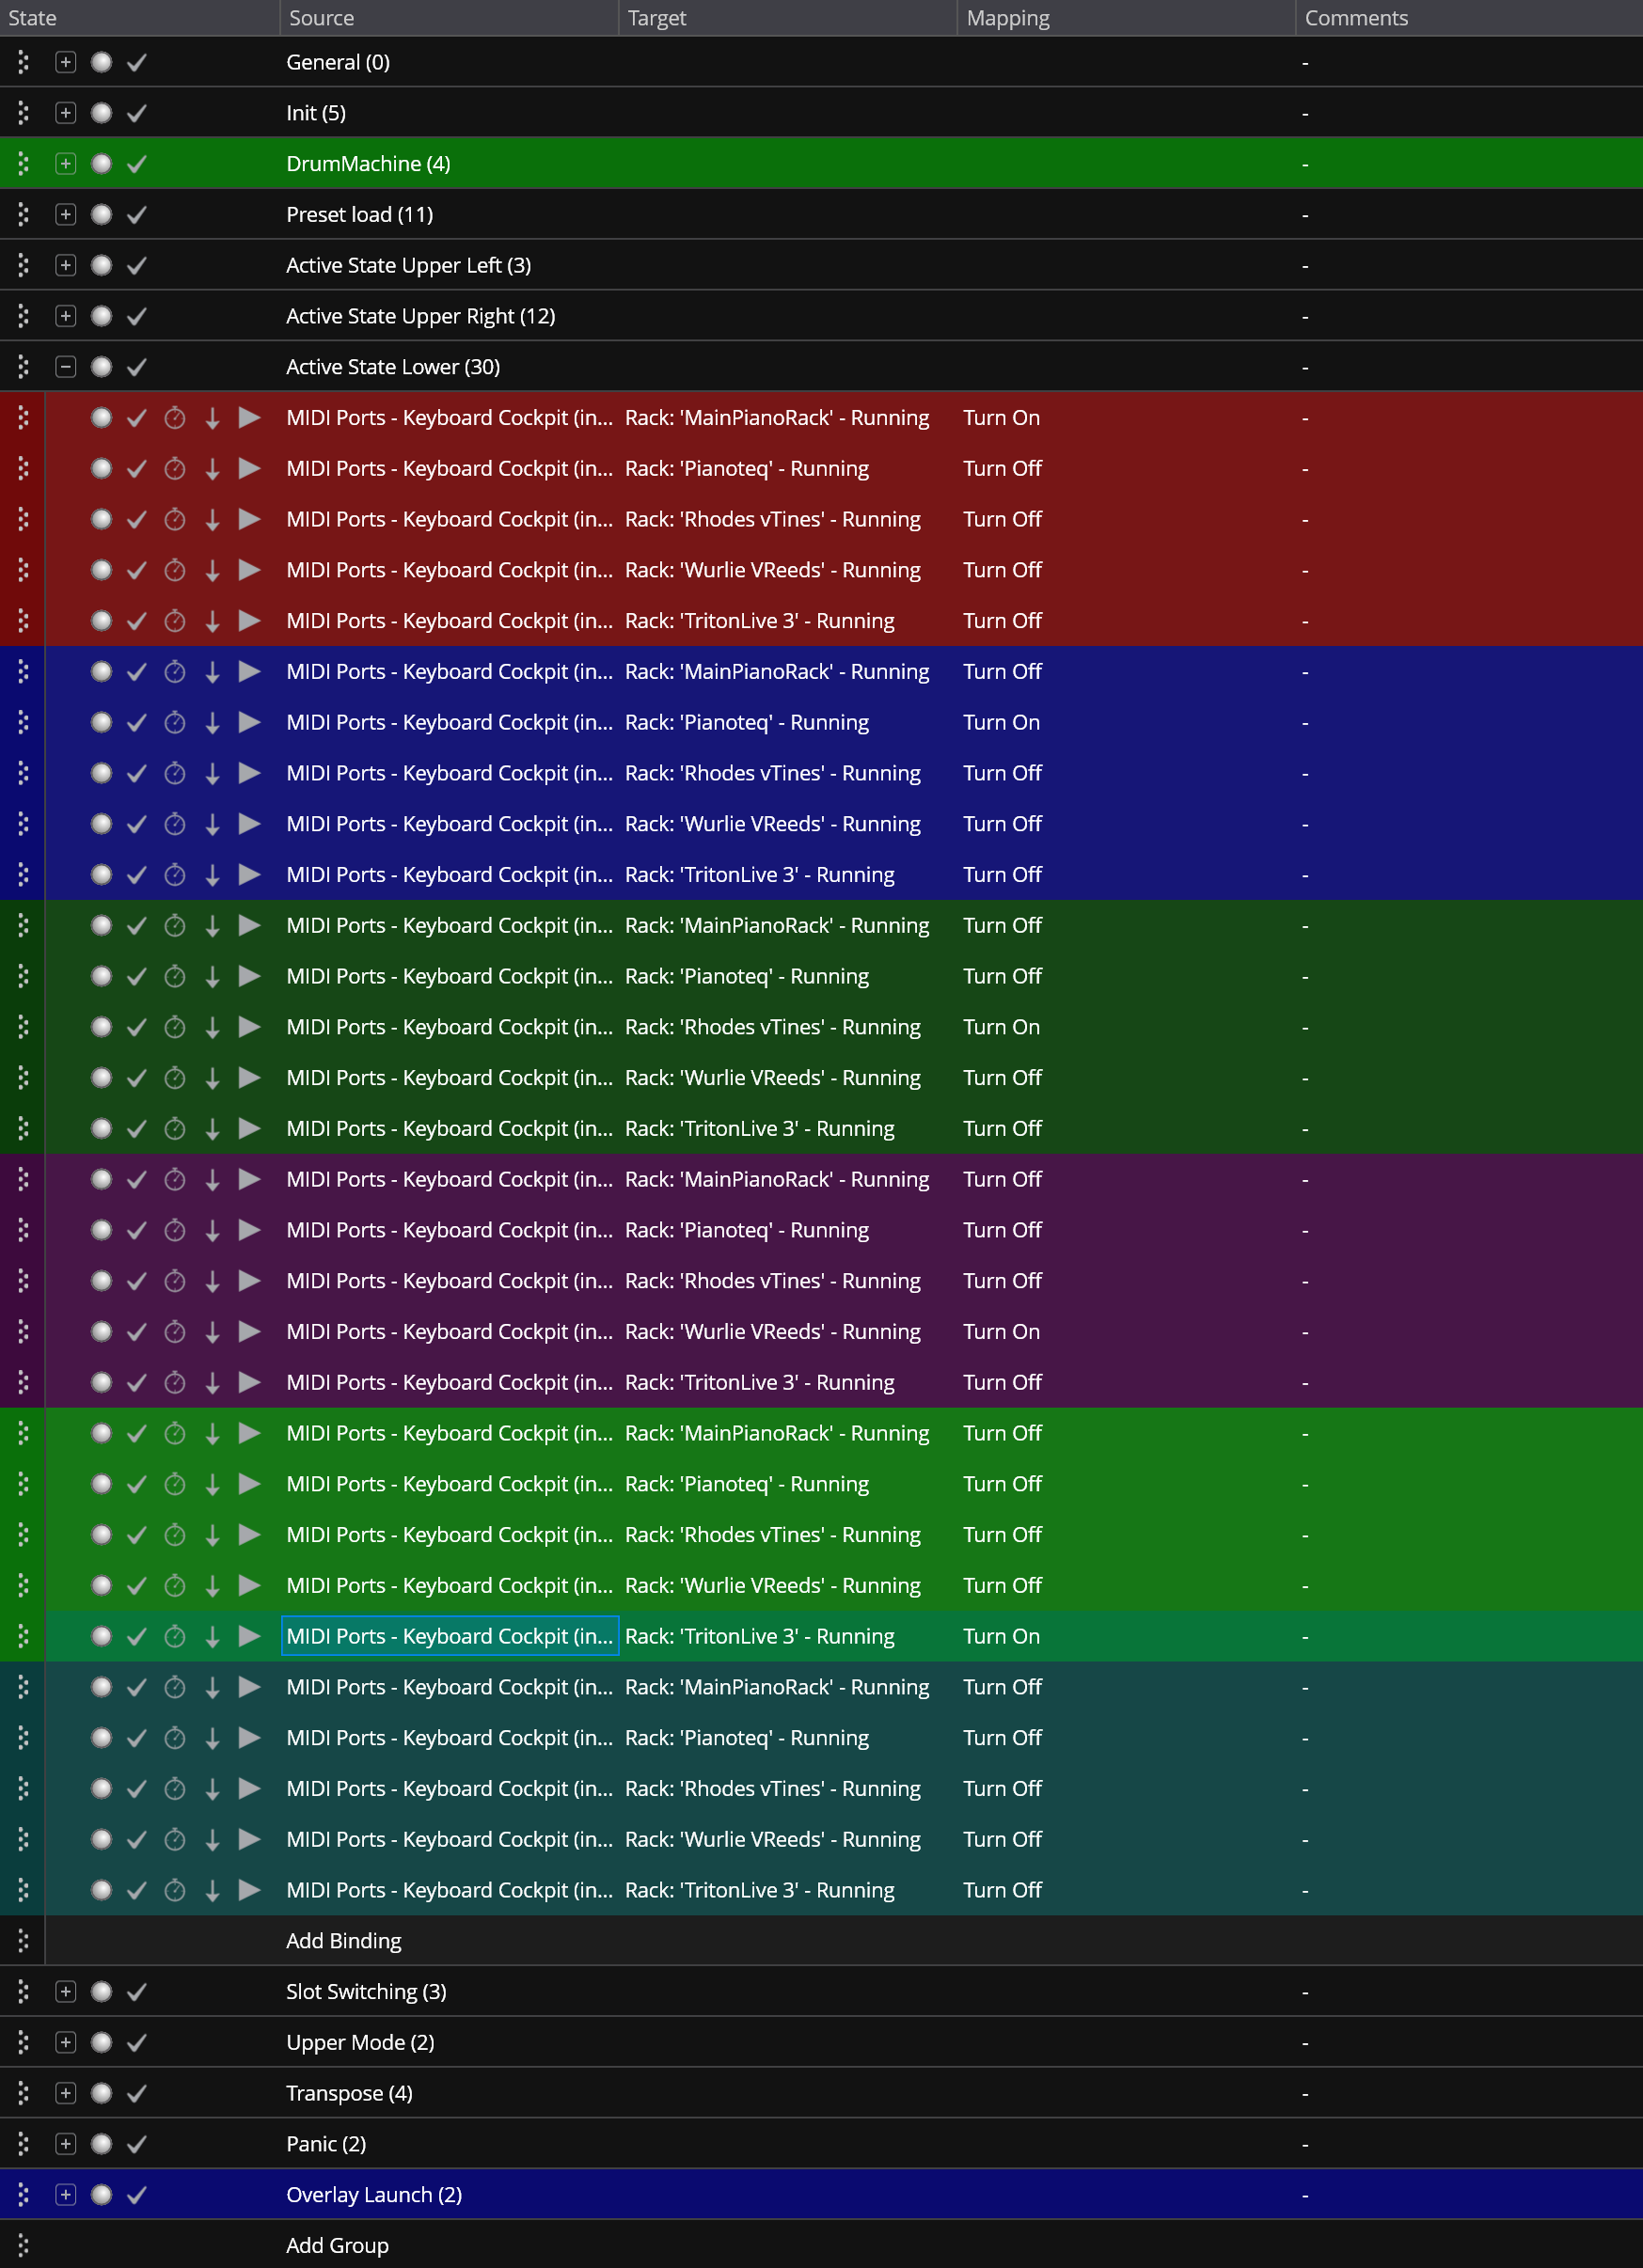
There is even a set of Bindings that automatically launches the overlay (or un-minimizes it) when loading this song and minimizes it when leaving, using an AutoIt Script:

Performance and Usability

Given the complexity of this beast and the number of concurrent plugins, I expected this to stretch the limits of CPU performance, but once I created the bindings to only activate the currently selected racks and turn the rest off, performance on my live cubes has been pretty decent with no hiccups so far.

So far, this has been working flawlessly, and it is so much fun to be able to quickly knock together a sound configuration for exploring a song. I have built the interface using big finger-friendly blocks and sizes, and this makes it very pleasant to work with on my 10’’ touch screen. I even built my own on-screen keyboard for entering preset names :wink: …

Of course, once a song has been explored in rehearsal, I’ll still build a custom Cantabile song - no need to have dozens of instruments loaded pulling on the CPU, and I’ll want to customize the assignment and custom song states beyond what is possible in this ā€œuniversalā€ config. This is mainly a ā€œrehearsal / jammingā€ tool, not intended for live performance of rehearsed songs.

What do you think?

Cheers,

Torsten

9 Likes

Great job Torsten! It makes for a nice simple skin for jamming while still harnessing the power of Cantabile. I like it a lot and compliment your coding of it. Thanks for the viewing. :slight_smile:

Dave

2 Likes

Great job indeed.

1 Like

Wow @Torsten, that’s some really nice work. Love it.

Brad

2 Likes

Amazing, that’s a great tool.
Is it a .NET application?
I’ve always wanted to do something like that with the web API but never had time to finish it.

Nope, it’s built in Flutter/Dart. Useful when building multi-platform apps; the overlay will run just as well on an iPad or an Android tablet, connected to my Cantabile PC via MIDI.

Just…WOW! :smiley:

Gabriel

2 Likes

Great job, Torsten! That’s what I call inspirational.

Great idea!!

Hi guys! Hi Torsten!
I’m kind of new to the forum (and, in fact, to Cantabile), but I’ve seen your project and, man… this is almost exactly what I’ve been looking for ever since I started using a VST based live setup. I was using Ableton to run my plugins, and it worked, but the lack of possibilities started to bother me, and now I think it’s time for a change. So, I’m reviving this topic in the the hope that you can help me a little bit with achieving a similar setup. I’m a programmer, but not a Cantabile expert (just started to be honest), which make things a little harder for me. But anyway, if you’re available to help a fellow noob, let me know hahahah.

Regards

1 Like

Hi Leo

Welcome to the community!

Good to hear that my project is inspiring you, but TBH there is no way to guide a Cantabile beginner through something like this in a reasonable amount of time, even if you are a programmer…

This is quite a bit of complex wizardry, using a combination of pretty advanced stuff in Cabtabile, combined with a pretty complicated bit of programming for the overlay. Not something that can be vibed in a couple of evenings…

I’d suggest you work your way through the basics and the advanced topics of Cantabile and see if it gets you anywhere near what you need in your musical life. Cantabile is an awesome piece of software, and it can make your life as a musician easier at all stages of knowledge…

Cheers

Torsten

This is understandable. I get the idea behind racks, bindings, routing, etc., but I’m still struggling to get some things to work. Yesterday, I was able to make a very simple prototype, but some of the features that I had in mind were quite tricky. For example, I simply couldn’t find a way to create a bind to enable/disable a MIDI route… :sweat_smile:

Anyway, I’ll keep trying, but would you mind sharing the overlay source or the Cantabile files? That way, I could study them and get a better understanding of how everything works, and maybe even adapt them to my needs! Again, only if that’s possible.

Thanks, my friend :slight_smile:

Hi Leo,

That is because routes don’t have specific binding point names until you name them.

  • select the route you want to bind
  • hit F2 to rename the route to a name you like
  • now there is a binding point available for your binding

Hope this helps

Dave

1 Like

Wow! That definitely helped a lot! Hahaha, I racked my brain for ages trying to figure it out, and now it worked like a charm! Thanks, man. :slight_smile:

1 Like

Hi, Dave! How are you doing?

You just helped me with that silly problem of enabling/disabling a route via bindings, and now I have another silly problem that I’d really appreciate your help with too hahahahaha…
Torsten overlay has a split feature where you can select a note to use as a split point, right? For my use case, though, a single point isn’t enough; it would be very helpful to have both low key and high key points.
I assumed I could send a MIDI CC to achieve this, since the MIDI Route Settings screen shows key range going exactly from 0 (C-1) to 127 (G9). But, again, I couldn’t find the corresponding binding mechanism to achieve this.

Thanks in advance!

Hi Leo,

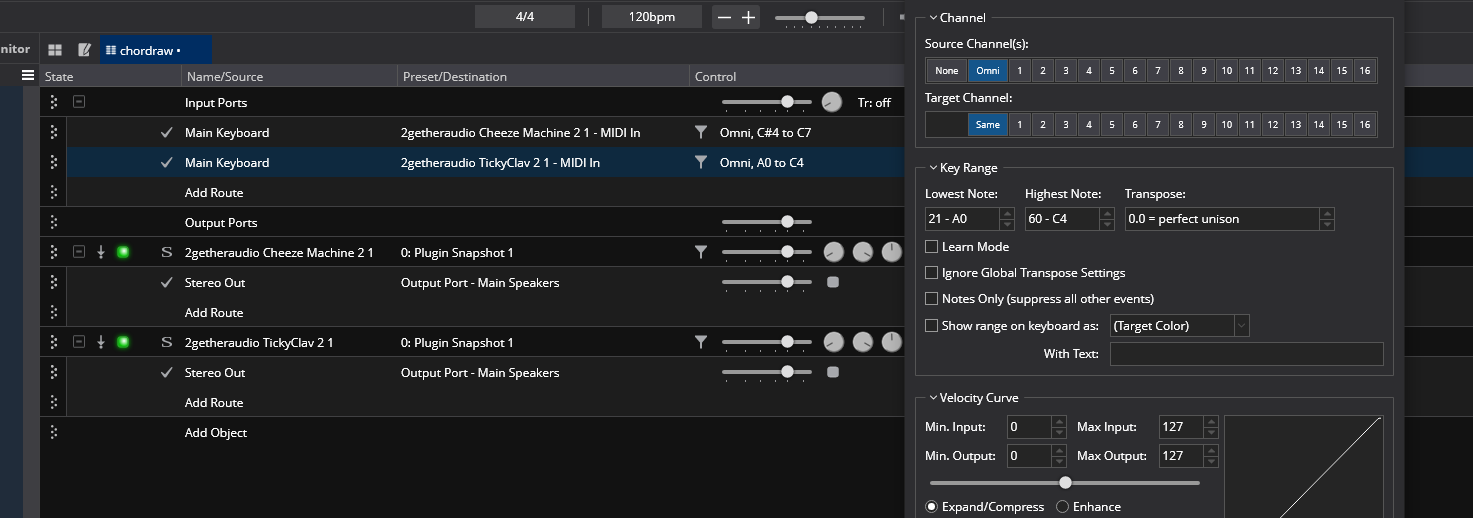
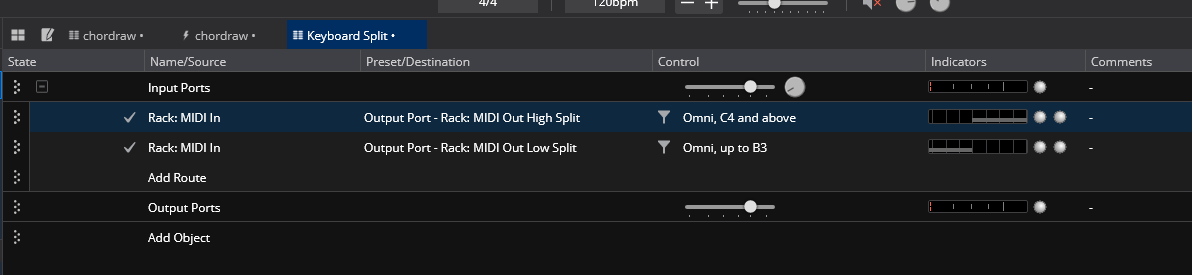
I’m not sure of @Torsten 's method but in general terms splits are acheived using the route settings. So if for example I had 2 Synth VSTis I wanted to play on a split keyboard I would set it up in a Cantabile song or linked rack like this.

The upper part of the split

The lower part of the split

So as shown you just set the ranges of the target VSTis to whatever you want. The way you can split as many times as you want given that you prepare the range settings in the routes.

What I believe Torsten does is use routes like this in a generic or global way in a linked rack of his setup and is able to easily switch the preset route configurations using rack states.

Best,

Dave

1 Like

Oh, that makes sense!

What I was trying to achieve is being able to change the boundaries ā€œin real timeā€, so to speak, without any previous preparation. This way, with that rehearsal/improvisation mentality, I would be able to change the key range via my custom overlay (similar to Torsten’s, but with the exact lower and upper points) by sending CC messages.

I don’t know if I’m explaining in a way that makes sense, but maybe if I show you the setup I have in mind, you could help me better.

I’m trying to create ā€œslotsā€ that allows me to load any sound from my library. The plan is to have 8 slots available in a song to simulate a sort of ā€œperformanceā€ mode. This way, I can make virtually infinite patches combinations without setting them up previously.

That’s why I tried to make this split selector, but I don’t know if it’s possible to control the route’s key range via a binding, so that my overlay can send, for a specific loaded sound, on a specific slot, where it should be ā€œplacedā€ in the keyboard.

Does that makes sense? Sorry if I’m being confusing, English is not even my native language (another obstacle to make things harder to me hahaha). Anyway, thanks again for your patience!

As far as I know that is not possible. That is why Torsten had presets for specific routing settings he wanted to do likely in a utility style linked rack. There is no split point function in Cantabile only ranges that can be separate or overlapped. You can change transposition with a cc message in a binding but not ranges. My best advice would be to similar to Torsten collect the common split points you think you’ll need and build a utility rack to hold the route entries and switch them using rack states from a binding. If you need help build such a rack I can post a starter example.

Dave

2 Likes

That’s unfortunate… but I get it now! Thought that maybe I was searching in the wrong place. I’ll try this common split points approach.

Again, thanks for your patience and help, Dave! If you have this starter example it will certainly help!

Regards
LƩo

Hi Leo,

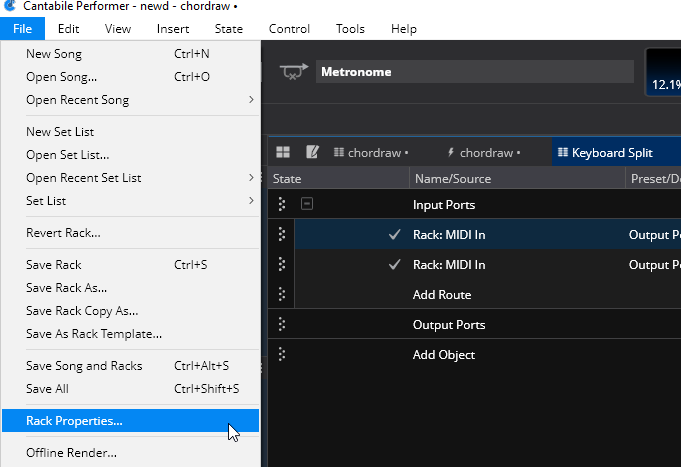
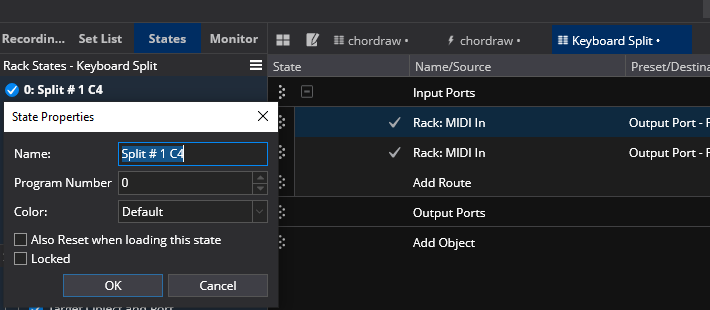
OK, first you create a new empty linked rack and name it splitter or something like that. Then open the new rack and go to the file menu and open the rack properties for the rack.

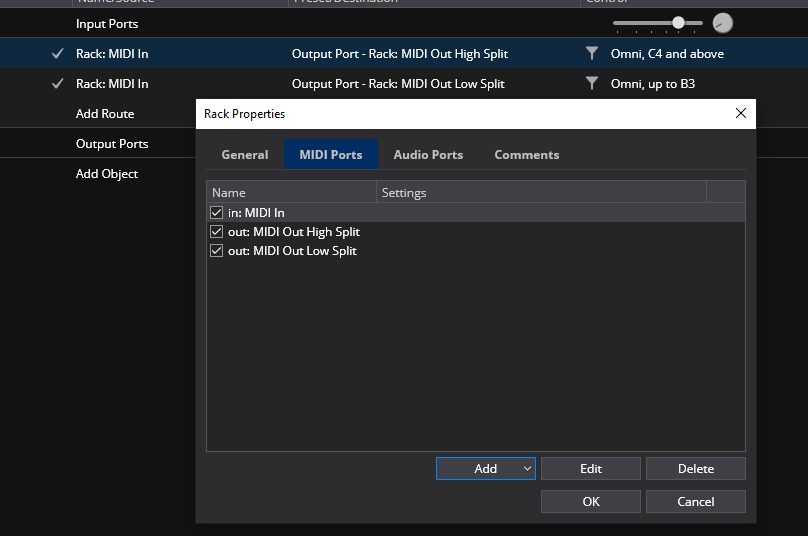
In the box that opens up go to the MIDI Ports tab and use the Add button to add another MIDI port to the rack. In my example I added it and renamed the default MIDI out port.

Ok your changes and return to the open rack tab. On the left select the States panel for the upper pane and click New State. Name the state in a way that explains it.

Create the two rack input/output routes, one for upper and one for lower.

Edit each route to what is wanted.

To create more points you just add States to the rack and on each new one simply edit the routes. The rack states will remember you settings for each state you make. My example has these already done for 3 split points.

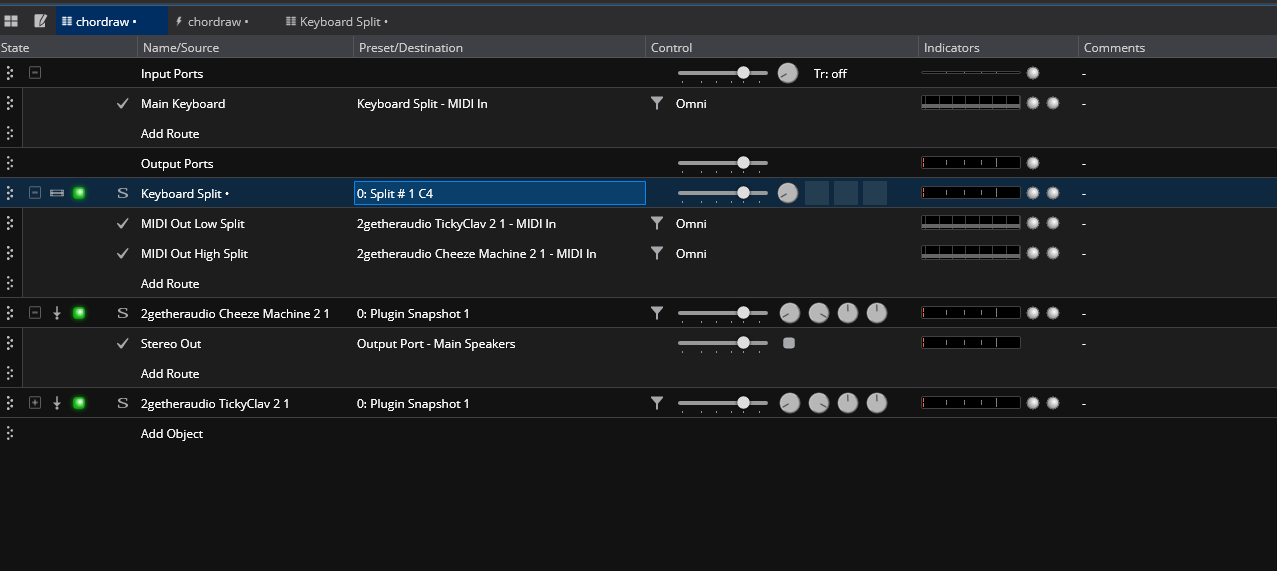
You would want this rack in all the songs and like Torsten you may want to add more to it as you go along. In the routing it is pretty straight forward. From the keyboard you want to split to the splitter rack and from it’s 2 MIDI outs to the 2 VST instruments.

You would need a binding for each state change. I will include the rack I whipped up, it should be a starting point to work with.

Keyboard Split.cantabileRack (13.5 KB)

Dave

1 Like