Hello everyone. I have been playing with Brad’s new Tempo LEDs and have managed to make a working prototype for my nanoKontrol. Thank-you @Brad for giving us Tempo LEDs. I understand the original intent was to use this with microcontrollers, but thought this would be useful information and insight to what is currently required to make it work with a nanoKontrol or similar controller that uses CC data to trigger LEDs. It just goes to show you that Cantabile is so versatile and can adapt to all kinds to situations. ![]()
Be warned, this is a long post and does get a bit convoluted at times.
-
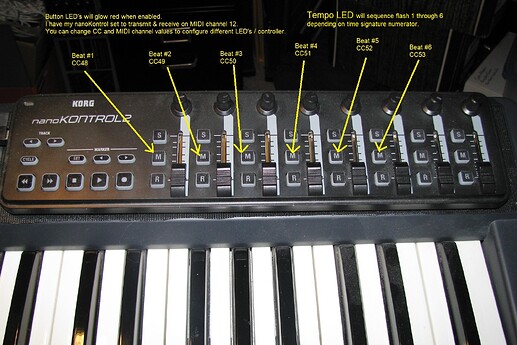
Here are the LED’s I decided to use on my nanoKontrol. The CC values are factory default. I did change the MIDI send/receive channel to 12 for my setup.
-
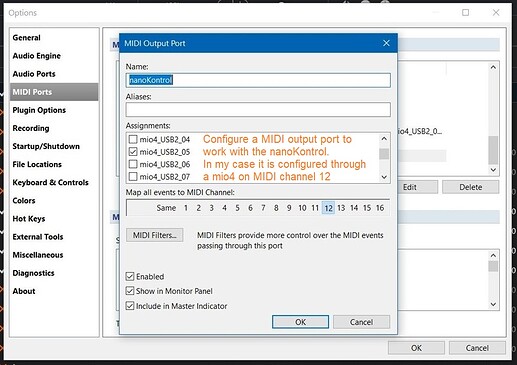
Next up was to create a MIDI output port for the nanoKontrol
-
Now the head scratching part.
I had to figure out the tempo binary bit structure.
From Brads LED blog;
Bits 0-3 contain the current beat number
Bits 4-6 contain the current time signature numerator minus 2
Knowing this I could make a binary bit table for time signature & beat number and convert to decimal. I used these decimal values in the output bindings to control the nanoKontrol LEDs On/Off sequence.
2/4 beat 1 = 0000000 = 0
2/4 beat 2 = 0000001 = 1
3/4 beat 1 = 0010000 = 16
3/4 beat 2 = 0010001 = 17
3/4 beat 3 = 0010010 = 18
4/4 beat 1 = 0100000 = 32
4/4 beat 2 = 0100001 = 33
4/4 beat 3 = 0100010 = 34
4/4 beat 4 = 0100011 = 35
6/8 beat 1 = 1000000 = 64
6/8 beat 2 = 1000001 = 65
6/8 beat 3 = 1000010 = 66
6/8 beat 4 = 1000011 = 67
6/8 beat 5 = 1000100 = 68
6/8 beat 6 = 1000101 = 69
-
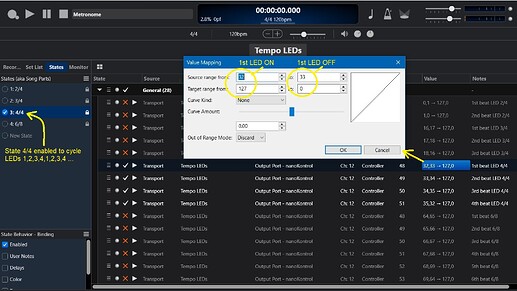
Now the states and bindings to turn the LEDs on & off. I used states to switch the time signature. Each state enables or disables its corresponding bindings. The decimal values calculated previously are now used here in the value mapping.
-
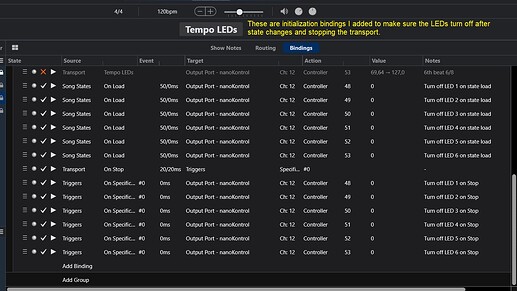
Lastly I created initialization bindings for the LED’s after state changes & transport stops. This is to make sure no LEDs are stuck on.
Hope this helps @richmn and other community members
Dave.


 Thanks for sharing.