Hi,
I have several Kontakt drum libraries. These libraries have different loops on each key to play.
For live playing, this structure is not suitable, cause, the different loops are spread other up to 20 keys.
So I made a midi recording on one the the loops keys and put it in the media player.
This works pretty good to bind it to a hardware button (or Cantabile control button).
By using to aboved named midifile and transpose it up/down (key by key) I have in a rack all the loops
I want to start/stop via hardware button. Works.
The thing is: so far I have now 12 mediaplayers in the rack, which are all bind to one hardware button.
The predictable thing is now, that all mediaplayers starts even I play/hear one loop  This makes
the start/stop process naturally slow.
-
Is it possible in the rack states to prevent/bypass on single media players the start/stop process?
For VST it is naturally possible to bypass. I didn’t found such feature in C3 for media players.
-
Is my workflow (described above) not the best way?
I tried already to have only 1 media player and change e.g. transpose settings per rack. But, here
I was not successful: if I change the transpose settings in the media player it effects all rack states.
Or should that work, having one media player with different transpose settings per rack state?
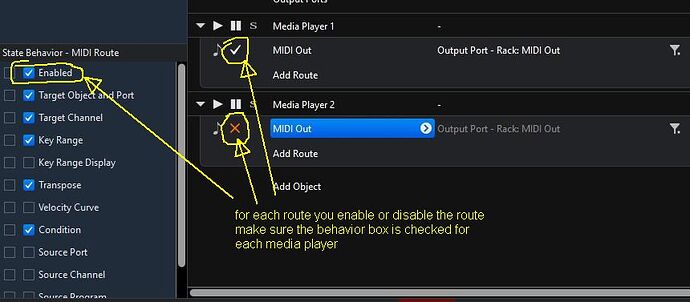
Yes make sure the state behavior for the media player output route has the enable check box checked on each media player out put route then just go through each state and disable all the media player output routes you don’t want and select only the one you want to be heard for each state. After you do each state it should switch correctly from one player to the next.
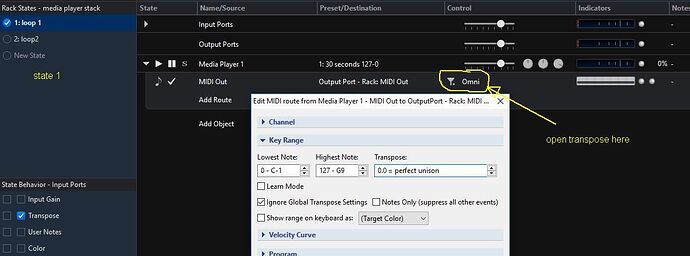
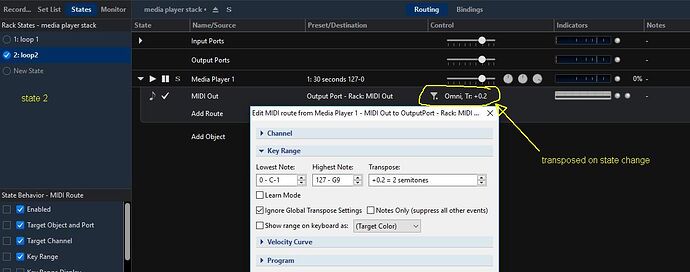
You could do it all with one media player loading your midi loop into it and then for for each state change the transposition
like this
Hope I understood what you wanted
Best
Dave
3 Likes
Hey Bladerunner,
I thought I might also add that as an alternative you could also consider using bindings inside a linked rack to control the on and off of the desired notes see below
-
each binding has the enabled check box selected (lower left corner) for each binding (you have to do this manually) and they are arranged in pairs
-
1 binding in the pair controls the turn on of the note and the next the turn off of the note using either the onscreen control bar buttons set to different cc numbers or any hardware buttons you want set the same way. (They effectively replace the transport start/stop in the media player way you are using)
- The state changes select the desired note to press and so the loop is different from Kontakt
It may seem complicated but it is what the bindings were designed for, problem solving like this …
hope this at least adds to the thoughts on it
Dave
2 Likes
Hi @dave_dore,
thanks a lot for the extensive answer/info and the made screenshots!
Now I have an good idea, which would be the best workflow for me and will try it soon.
I’ll come back to this 
Best regards
Blade
 This makes


