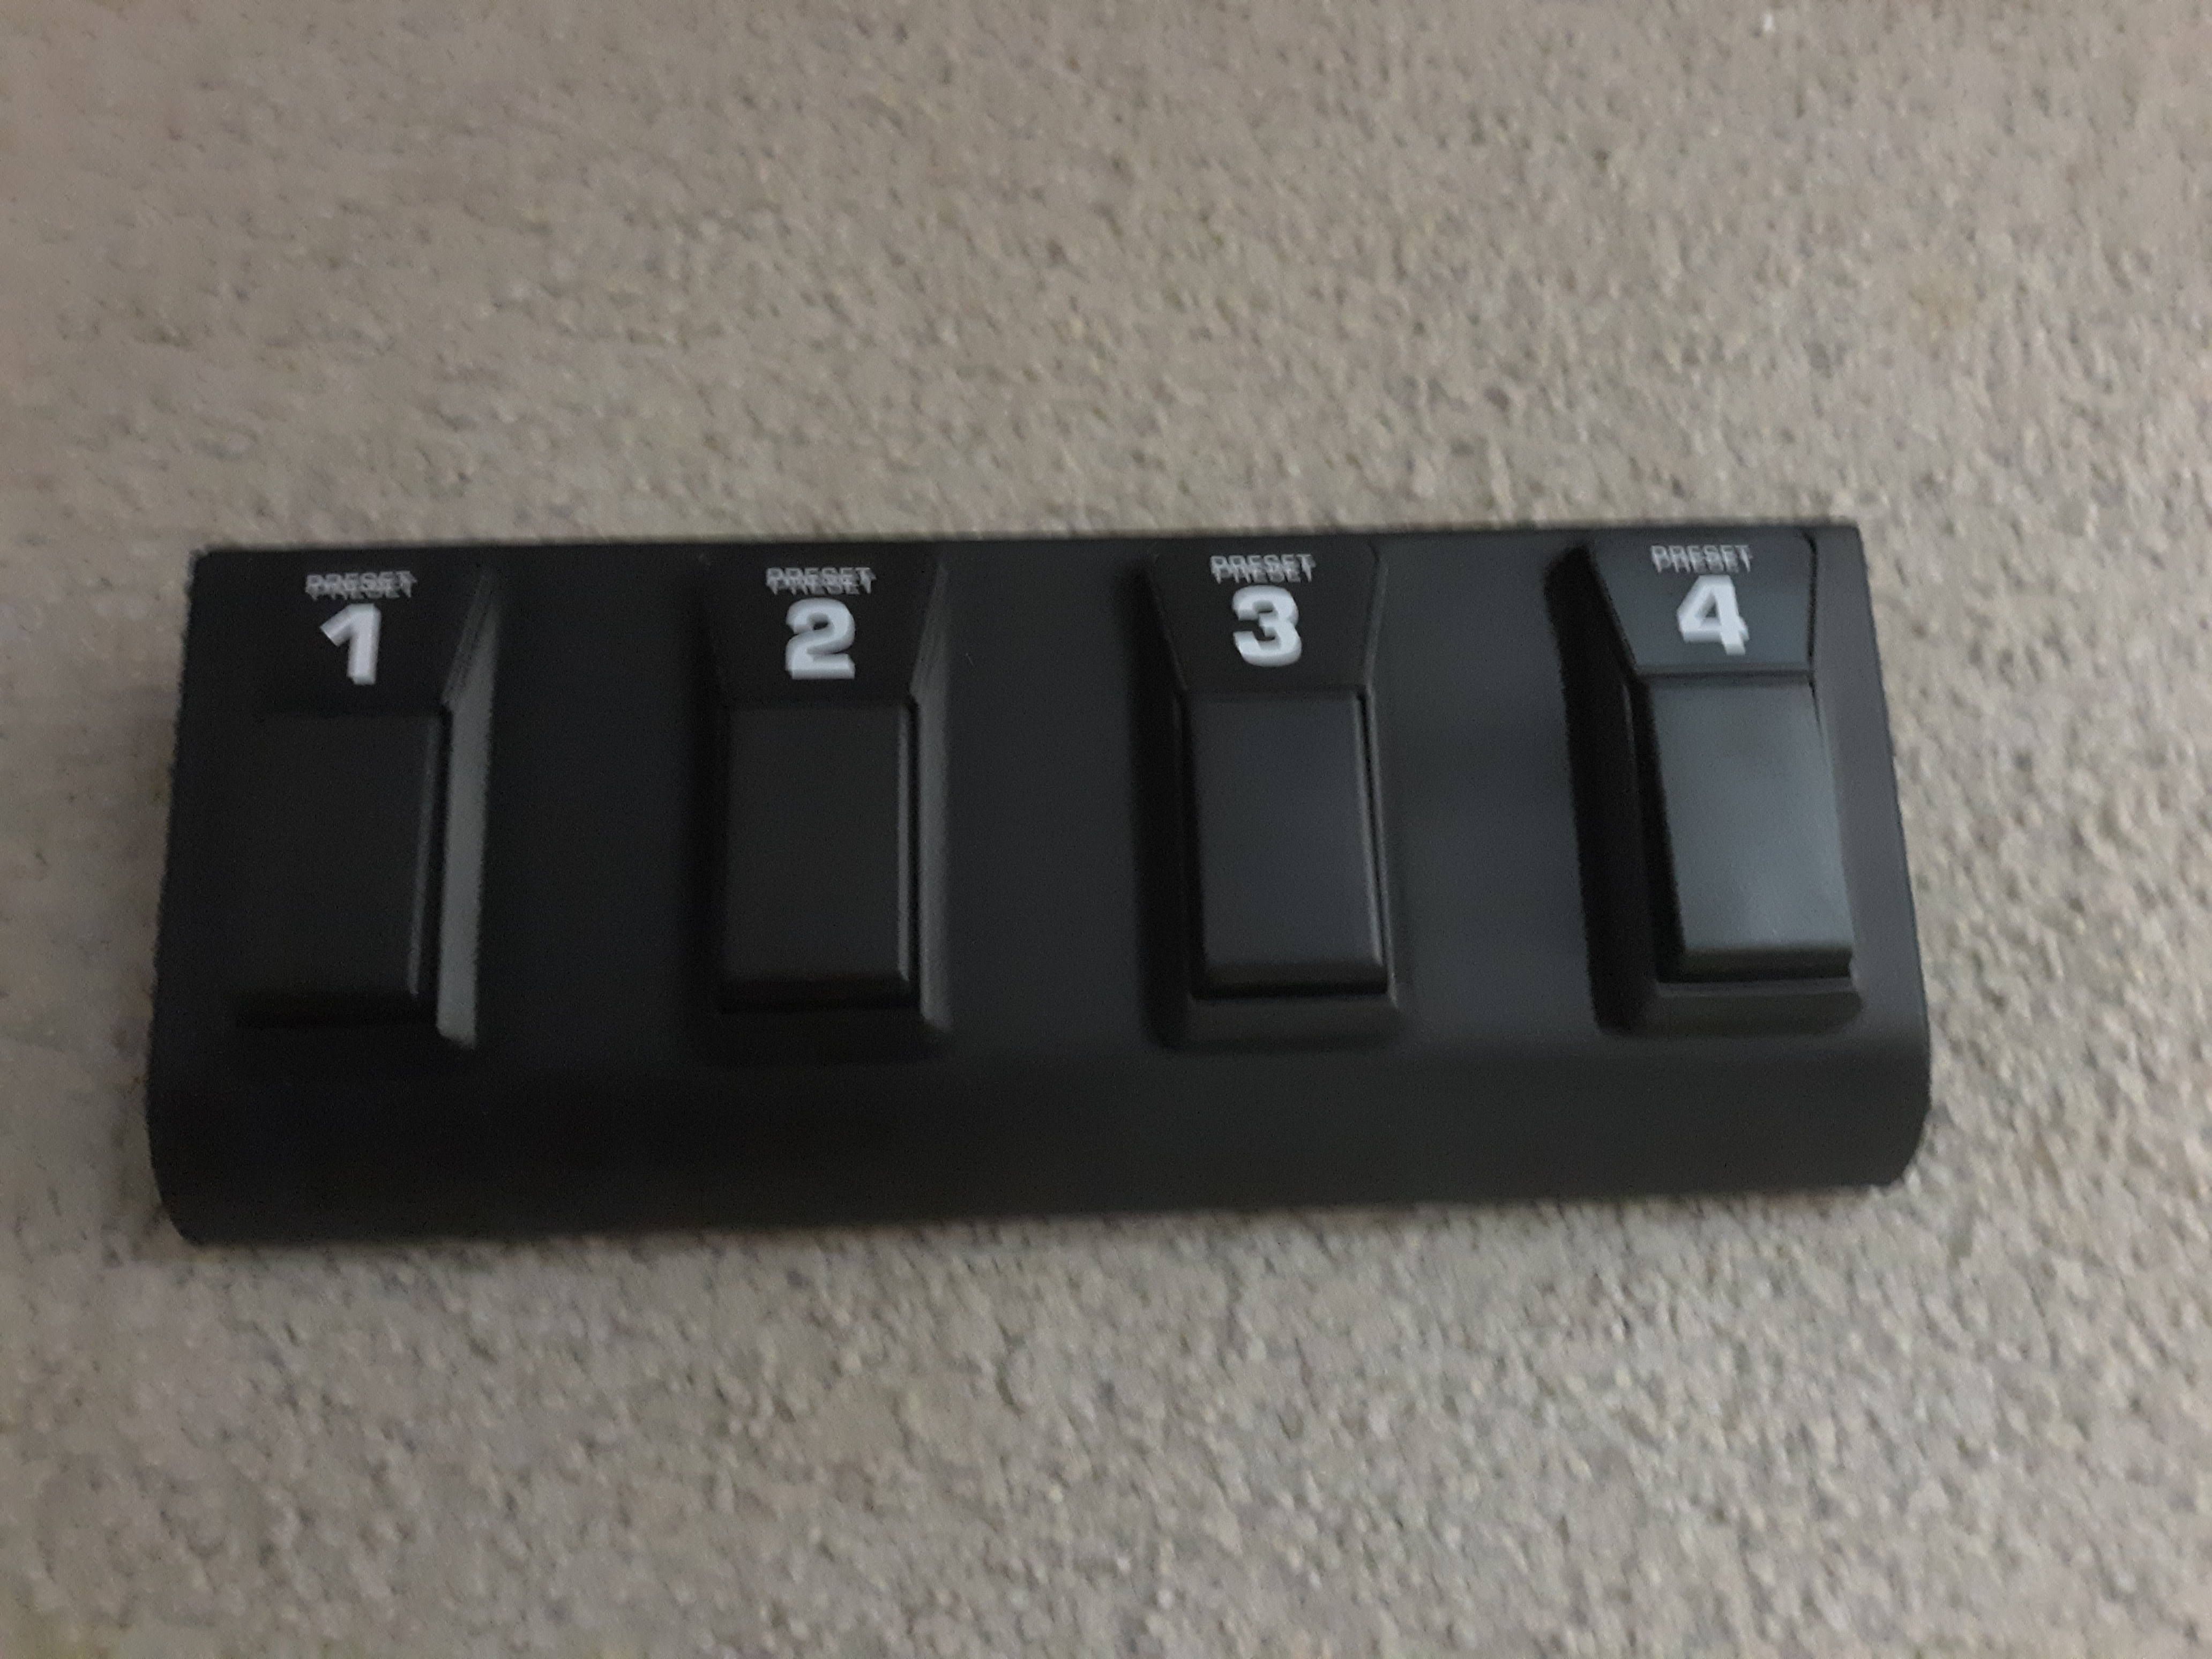
I made this MIDI compliant foot switch from a modified Behringer FS114 and an Arduino Uno. I programmed it to send CC 111-114. Very nice micro switches, extremely well built in a heavy metal case and stays put on the floor.
If anyone wants, I can post the wiring diagram and Arduino code to build your own. It can be programmed to send any MIDI command on each of the four switches. I bullt this one in less than an hour.
4 Likes
Surely you may share your schematic. I’m a hardware and software designer for industrial devices, and I built myself a few devices for my musical setup, during the years. I don’t know the Arduino platform (better: I know the hardware, but not its programming environment), so I’m a bit curious about your DIY project.
Paolo
The schematic is too simple. In the Behringer there are five leads to the attached cable. One ground and four from the switches. I removed the cable and soldered connections to the Arduino digital inputs and ground. That’s it for the wiring schematic!
Programming the Arduino (which I had never done) was a piece of cake. There were several examples on the web which were very easy to modify for my project. The MIDI.h file is available on the Arduino site.
#include <MIDI.h>
MIDI_CREATE_DEFAULT_INSTANCE();
int readSwitchNew; //footswitches
int readSwitchNew2;
int readSwitchNew3;
int readSwitchNew4;
int readSwitchOld;
int readSwitchOld2;
int readSwitchOld3;
int readSwitchOld4;
//MIDI Control Numbers
#define footSwitch1CC 111
#define footSwitch2CC 112
#define footSwitch2CC 113
#define footSwitch2CC 114
#define defaultChannel 2
void setup() {
MIDI.begin (MIDI_CHANNEL_OFF); //start midi
Serial.begin(31250);
//configure pins as an input and enable the internal pull-up resistor
pinMode(2, INPUT_PULLUP);
pinMode(4, INPUT_PULLUP);
pinMode(6, INPUT_PULLUP);
pinMode(8, INPUT_PULLUP);
}
void loop() {
//read the Footpedal Switches value into a variable
readSwitchNew = digitalRead(4);
readSwitchNew2 = digitalRead(2);
if (readSwitchNew != readSwitchOld) {
readSwitchOld = readSwitchNew;
MIDI.sendControlChange(footSwitch1CC, 127, defaultChannel);
Serial.print("Button 1: ");
Serial.println("Change");
}
if (readSwitchNew2 != readSwitchOld2) {
readSwitchOld2 = readSwitchNew2;
MIDI.sendControlChange(footSwitch2CC, 127, defaultChannel);
Serial.print("Button 2: ");
Serial.println(“Change”);
}
if (readSwitchNew3 != readSwitchOld3) {
readSwitchOld3 = readSwitchNew3;
MIDI.sendControlChange(footSwitch3CC, 127, defaultChannel);
Serial.print("Button 3: ");
Serial.println("Change");
}
if (readSwitchNew4 != readSwitchOld4) {
readSwitchOld4 = readSwitchNew4;
MIDI.sendControlChange(footSwitch4CC, 127, defaultChannel);
Serial.print("Button 4: ");
Serial.println("Change");
}
delay (5);
}
1 Like
Quite easy
Yes it was! At some point I may add a 1/4" jack for an expression pedal too.
Nice! I guess I’ll have to get myself one of these Behringer thingies…
You might want to use the “bounce2.h” Arduino library to avoid double keypresses - also makes the reading of keypresses easier without all the readSwitch commands.
Cheers,
Torsten
Drat - looks like the Behringer thingy isn’t for sale anymore. At least not in my corner of the world…

They used to come with one of Behringer’s guitar amps.
They are no longer produced. I bought two on Reverb.com. There are a few on ebay. Make the seller an offer as they are not good for anything else. I got mine for half the asking price.
Haven’t had any issue with bounces. That is handled by the ReadSwitchOld/New values and the delay(5), but thanks for the suggestion.
Nice!!
Same idea here!!
I just did the same some years ago with a Proel pedalboard and arduino, but I also added some pots and leds, and even a MIDI port!!
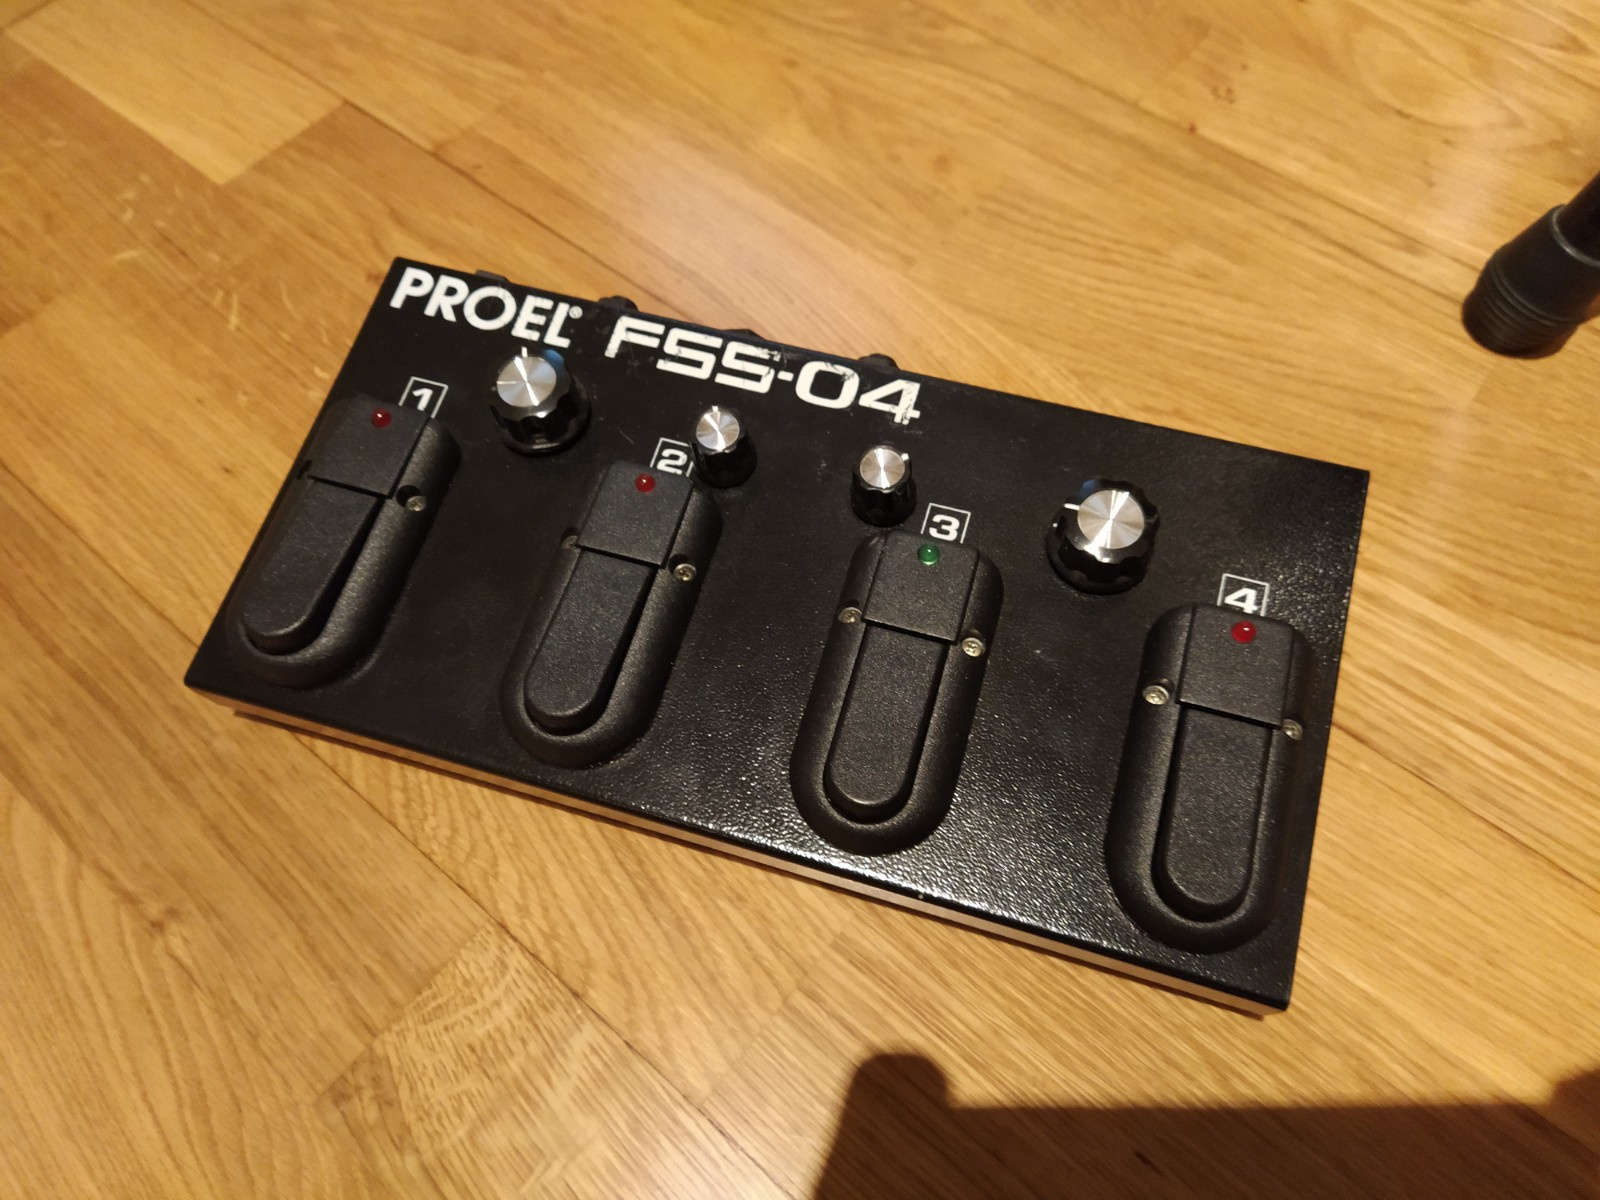
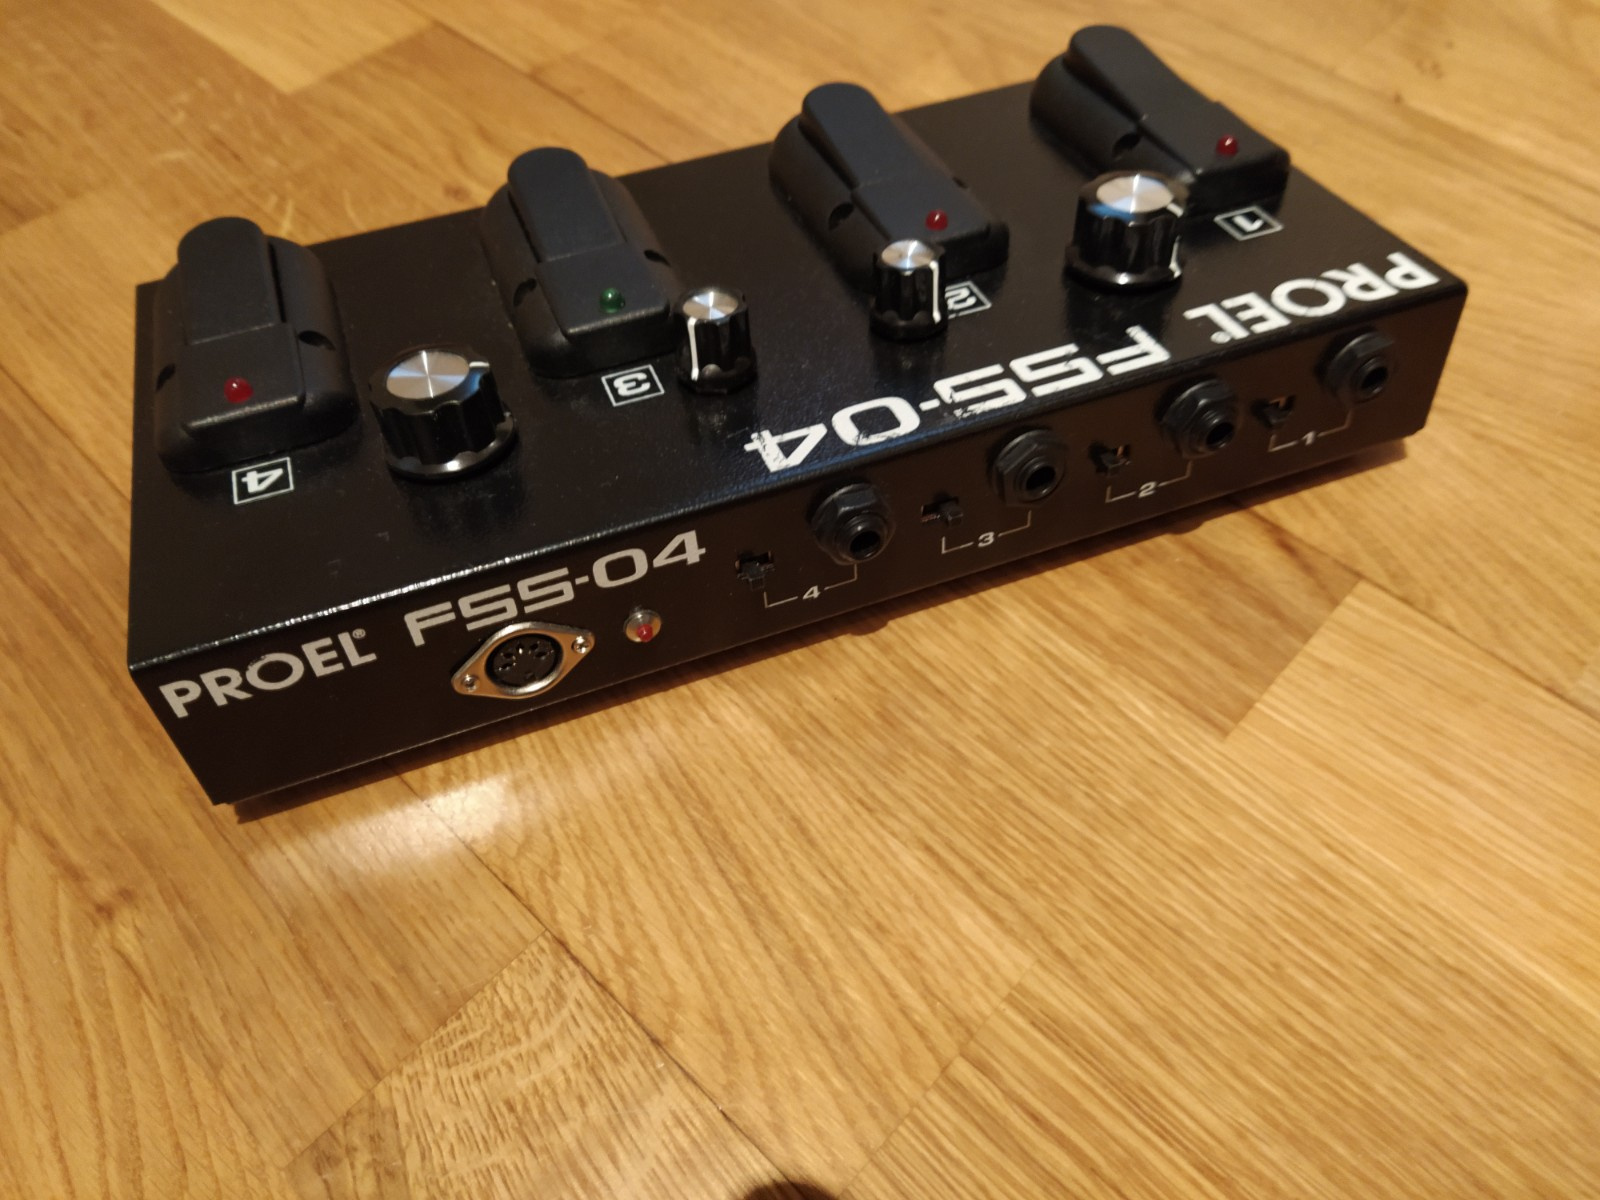
BTW, It is meant to be used with the hand…
Ramon
2 Likes
Absolutely useful! Thank you for your share Jtoth and other guys! I’m thinking to create a foot switch device with 3 button to emulate close hat and double kick notes using free SSD5.
In this way i could play with hands on keyboard for arms and feet on pedals for legs 
(brackets)
Now i just have a foot switch with 4 button but it has a minimum time gap in which i can play multi button so…now i can play one “kick” but the second kick is played to fast in time  and the midi message gets skipped.
I recently wrote a routine based on stuff I found on the net for a midi expression port. I implemented mine on an ATtiny85, but the code should work on most Arduino boards with little change. Probably remove the Software Serial part and change to hardware serial for Arduino boards… Here is my code complete with comments:
// Serial midi epression pedal port works with ATtiny and most Arduino boards.
// Standard expresion pedal wiper is read by POT_PIN (A/D input) and serial midi
// is output on Pin 0 via software serial. It may be desireable to convert the
// software serial to hardware if the device has native serial out.
const int POT_PIN = A3; // pot connected to analog pin (A1, A2, A3 available)
const int POT_THRESHOLD = 7; // threshold amount to guard against false values (noise filter)
// optimum is 1023 native A/D res divided by 127 midi res minus 1
const int MIDI_CONTROLLER = 4; // MIDI Controller (Foot Pedal coarse)
const int MIDI_CHANNEL = 1; // MIDI Channel 1
#include <MIDI.h>
#include <SoftwareSerial.h>
SoftwareSerial mySerial(1, 0); // RX, TX
MIDI_CREATE_INSTANCE(SoftwareSerial, mySerial, midiOut); // create a MIDI object called midiOut
void setup()
{
// set the A/D input pin
pinMode(POT_PIN, INPUT);
// setup serial for MIDI
mySerial.begin(31250);
}
void loop()
{
static int s_nLastPotValue = 0;
static int s_nLastMappedValue = 0;
int nCurrentPotValue = analogRead(POT_PIN);
// use threshold to guard against a noisy potentiometer
if(abs(nCurrentPotValue - s_nLastPotValue) < POT_THRESHOLD)
    return;
s_nLastPotValue = nCurrentPotValue;

// map 0-1023 native range to 0-127 midi range
int nMappedValue = map(nCurrentPotValue, 0, 1023, 0, 127);

// don't resend the value if it was the last value sent
if(nMappedValue == s_nLastMappedValue)
    return;
s_nLastMappedValue = nMappedValue;

// send MIDI (ctrlr, value, channel)
midiOut.sendControlChange(MIDI_CONTROLLER, nMappedValue, MIDI_CHANNEL);
}
I stuffed mine in my old RFX Midi Buddy pedal, added a 1/4" TRS jack for the expression pedal, and it works great. Just plug an expression pedal into the MidiBuddy pedal and whalah, program change and expression thru a single midi cable. Works fine with 10K and 100K expression pedals. And though I would not recommend using this, it also worked using a 500K Ernie Ball vol pedal with the appropriate cabling to create an expression pedal.
Enjoy.
BTW, to patch the ATtiny into the MidiBuddy, which of course has its own circuitry for generating midi control changes and its own 5 pin midi out and midi thru, I simply added a 200 ohm resistor to the ATtiny output pin (as assigned via SerialOut) and connect it to the data pin of the MiddiBuddy 5 pin midi out jack.
The midi thru jack is simply a paralleled jack, i.e. no circuitry. Just zero ohm wire connections to the same pin numbers of the midi out jack. Therefore there is no problem adding another such paralleled port in the form of the ATtiny (or Arduino board) as long as a 200 ohm resistor is in place to current limit the device output so it does not get damaged.
Of course the lack of buffering and queuing the midi signals in theory could result in signal collisions, but in practice, who does program change and expression at the same time? Therefore adding an expression port as a discrete device to an existing midi program change controller is feasible.
And if you do need 100% certainty that you can do program change and expression at the same time, simply merge the two Arduino sketches in this thread together for a single device to accomplish both functions.
Well, my primary purpose for a midi expression port is for wah on guitar. The code I posted above works quite well except for one thing…no bypass switch in the foot pedal like a real wah. And bypassing via a switch in another pedal simply is not feasible for live use imo.
In order to avoid modding the pedals with switches and recabling/rejacking everything to accommodate another conductor for the switch, I will try programming a “double toe tap” in the expression port code to detect midi 127-110-127 movement within .3 seconds or so to send a second controller message that can be used as a toggle for bypass.
I’ll re-post after trying it out and dialing it in if it works…
1 Like
Maybe an idea for an alternative to the “double toe tap”: on my Kemper, I have multiple wah bypass modes that deal with the lack of a toe switch:
- bypass on toe - bypasses the wah when it is pressed all the way
- bypass on heel - same as above, but bypassed when brought back to 0
- bypass on stop - bypasses the wah when the pedal hasn’t been moved for some time and turns it on immediately once it gets moved
I use mostly the “bypass on stop” mode - most intuitive for me: just move the wah pedal and the wah is on; leave it alone and it will automatically turn itself off…
You could program your pedal to send three different CC messages on toe, heel and when there has been no movement for some time, and maybe another one for “wake up” after time-out. You can then deal with the output within Cantabile to bypass or activate your wah plugin. You’ll probably want to create a smooth crossfade with a plugin (e.g. a reaJS script) with these bypass modes - you might have artifacts from just plain switching the wah on and off. The Kemper does this very smoothly…
Cheers,
Torsten
Thanks for the ideas!
What I ended up doing is mapping about 85% of the pedal travel to 0-127 midi values (this way it should work with both 0-126 and 1-127 systems with no ill effects).
The next 10% or so of travel is reserved for dead zone and finally the last 5% for a second controller signal that can be utilized as a bypass toggle. No further expression msg is sent once the pedal travels past the point it generates 127.
And when the pedal travels past a dead zone into the last 5% or so, a bypass midi msg (a second user defined controller/channel with a fixed value) is sent one time. No further bypass will be sent until the pedal first travels back into the 85% range and begins sending expression msgs again.
I’m probably off with my travel % guestimates but its very similar travel as my BudWah.
So, I add some compressible rubber or foam under the toe end of the pedal where some resistance occurs at 85% travel. Then keep pressing thru resistance until bypass. Just like extra toe pressure to bypass a real wah.
Pretty slick huh?
You could expand the below sketch to provide a panel switch for enabling/disabling toe switch behavior so you can have user selected “basic expression port” and “expression port with toe bypass”. I don’t need that, so not doing it myself at this point.
Here is the code:
// Serial midi epression pedal port works with ATtiny and most Arduino boards.
// Standard expresion pedal wiper is read by POT_PIN (A/D input) and serial midi
// is output on Pin 0 via software serial. It may be desireable to convert the
// software serial to hardware if the device has native serial out.
const int POT_PIN = A3; // pot connected to analog pin (A1, A2, A3 available)
const int POT_THRESHOLD = 7; // threshold amount to guard against false values (noise filter)
// optimum is 1023 native A/D res divided by 127 midi res minus 1
const int MIDI_CONTROLLER = 4; // MIDI Controller (Foot Pedal coarse)
const int MIDI_CHANNEL = 1; // MIDI Channel 1
const int BYPASS_CONTROLLER = 3; // BYPASS sends second midi signal in last 5% of pedal travel
const int BYPASS_CHANNEL = 12; // to be used for toe press bypass such as in wah pedal
#include <MIDI.h>
#include <SoftwareSerial.h>
SoftwareSerial mySerial(1, 0); // RX, TX
MIDI_CREATE_INSTANCE(SoftwareSerial, mySerial, midiOut); // create a MIDI object called midiOut
void setup()
{
// setup the A/D input pin
pinMode(POT_PIN, INPUT);
// setup serial for MIDI
mySerial.begin(31250);
}
void loop()
{
static int s_nLastPotValue = 0;
static int s_nLastMappedValue = 0;
int nCurrentPotValue = analogRead(POT_PIN);
int nMappedValue = 0;
static bool bypass_flag = false;
static bool prev_bypass_flag = false;
// these values determine the range of pedal movement that generate 0-127 expression output
// and where in the pedal travel the bypass midi msg is sent
// the values below give about 85% pedal travel for 0-127, then about 10% travel "dead zone
// then a single bypass msg sent when pedal goes past 95% travel.
static int max_AD_for_midi = 760;
static int min_AD_for_bypass = 1000;

// use threshold to guard against a noisy potentiometer
if(abs(nCurrentPotValue - s_nLastPotValue) < POT_THRESHOLD)
    return;
s_nLastPotValue = nCurrentPotValue;

// map 0 thru max_AD_for_midi native range to 0-127 midi range
if (s_nLastPotValue <= max_AD_for_midi)
    nMappedValue = map(s_nLastPotValue, 0, max_AD_for_midi, 0, 127);

// don't resend if equals the last value sent
if (nMappedValue == s_nLastMappedValue && s_nLastPotValue <= max_AD_for_midi)
    return;
s_nLastMappedValue = nMappedValue;

if (s_nLastPotValue <= max_AD_for_midi)
bypass_flag = false;

// send MIDI (ctrlr, value, channel)
if (s_nLastPotValue <= max_AD_for_midi)
    midiOut.sendControlChange(MIDI_CONTROLLER, nMappedValue, MIDI_CHANNEL);

//
if (s_nLastPotValue >= min_AD_for_bypass)
    bypass_flag = true;

// don't resend the bypass if flag not changed
if (bypass_flag == prev_bypass_flag)
    return;
prev_bypass_flag = bypass_flag;

// send bypass (ctrlr, value, channel) use value 120 so no 126 vs 127 issue
if (bypass_flag = true && s_nLastPotValue >= min_AD_for_bypass)
        midiOut.sendControlChange(BYPASS_CONTROLLER, 120, BYPASS_CHANNEL);
}
Tested with both 10K and 100K expression pedals.
Pretty bizarre how this board handles cut-n-pasting the code, but you should be able to piece it together…
Hi John,
I have an FS114 and would love to use it in this exact way, but I am a real newbie when it comes to most of this! Any chance you’d share a more detailed step-by-step?
Hi. I recently managed to get my hands on an FS114.
Unfortunately nothing I use can take the PS2 connector.
Ideally I would like to rewire the lead to a 1/4 inch TRS so it can go into my RC500 boss looper and send midi signals. Would love advice on how to do this.
Failing this, any advice on changing the head to a modern midi 6 pin?
Hi @BassistBoy89 … welcome to the group!
I don’t have an FS114, but I believe you will be in business with an chain of two adapter cables: a PS2 to MIDI DIN5 and a DIN5 to Type A (1/8") TRS. These adapters are generally available these days.
I’m not exactly sure what MIDI the FS114 puts out - documentation is scarce on this unit, but you may be able to figure it out from the Ultrasonic ACX1000 documentation (that amp included an FS114).
I hope this helps!
What an awesome thread!
I saw an FS114 at the thrift store for 15$ and I was confident that i did not “need” to buy it…
Until I found this site and now I may have to go back and get it…
Thanks!!