In the background rack, is there a way to assign an event to a specific rack, rather than just Rack or Rack by Index? For example, I always want Slider 1 on my NanoKontrol to be assigned to my Pianos rack, even though I might load that rack in a specific song. The only way I see this working using Rack by Index is to always place the Piano rack in a song and always place it in the same order relative to other loaded racks. And what’s the difference between Rack and Rack by Index?
Hi Lee,
Rack refers to the rack you are inside of and editing regardless of the order it is loaded in to the main out routes list of slots.
Rack by Index means that all the racks in the output routes list of slots are numbered #1 and up no matter where they are mixed in with plugins and media players. So the rack that is top most in the slot list is Index #1 and all other racks that follow are numbered sequentially. If you always order things the same you can use the Rack by Index binding features not available for the plain Rack binding features.
Dave
I’m familiar with Rack by Index. I don’t always order things the same or even load the same racks for every song, but I always want slider 1 to be assigned to the Pianos rack, slider 2 to Pads, Slider 3 to strings, etc.
So it seems that I should be able to create a gain binding within the Pianos rack. Oddly, Cantabile does not detect the Nanokontrol when I try to use the Bindings “learn” function. It does, however, recognize when I twist a knob on my keyboard. And I can still use the Nanokontrol to create a binding at the song level.
Confused 
Actually, some general routes you could go:
-
assign bindings at instrument rack level so that your pianos rack reacts to cc81, your pads rack to cc82, etc… You can actually bind directly to your sliders inside your instrument racks by enabling “show environment ports inside racks”. But the disadvantage of this is that you really hard-wire this control into your racks, so no way to override this for a specific song. As long as your setup stays the way it is, this is pretty easy and stable.
-
use a number of “volume control” racks in your songs and bind each of them to one of your sliders as above. Now you have a number of “slider” racks in your songs; you can now route your pianos, pads, etc to the appropriate slider rack. This keeps you more flexible in case you want to have slider 1 control hammond in a song instead of piano
-
My way is a bit more complicated, but it fits my way of working best: I have an abstracted “Faders” rack with individual MIDI outputs like “main volume”, “solo volume”, “strings volume”, “special parameter”. These are bound to the actual faders in my setup inside the rack, but each of these outputs send either CC7 (for “volume”) or CC11 (for “parameter” controls). Now in every song, I route these to where I want them (strings volume to the strings rack directly, main volume to a “volume control” rack that receives all the sounds from the main keyboard layer). I have a song template with a basic setup already pre-routed so I don’t need to start from scratch.
Regarding the “learn”: I believe Cantabile only learns from the “default” MIDI input. Since I have deactivated “default”, I usually create my bindings manually in the bindings page. This should work for you as well - select your Nanocontrol and the appropriate CC value as the source and whatever you want to manipulate as the target.
Cheers
Torsten
1 Like
Thanks Torsten, great ideas which I will explore!
I’ve played with this a bit. I think I have the general concept of what you’re doing. Implementing it- not so good. I found the “show environment ports inside racks” and now can see and select NanoKontrol for my Binding source. But I haven’t gotten much further. I created a binding inside the Pianos rack to control the rack gain, but it doesn’t work other than moving the NanoKontrol slider causes the source green light to turn on. If you could give me a little further guidance I’d appreciate it. Oh, and why did you recommend assigning cc81 as the starting point for my controls? The Nano sliders are already assigned from 0 to 7.

Edit #2- well now it’s working. When all else fails, try turning the computer off and on again.
That was just an example - I could have picked any number ![]() Sorry for any confusion…
Sorry for any confusion…
Cheers,
Torsten
No problem. I’ve learned some new and useful things about bindings.
@Torsten How do you create a “volume control rack?” Is there anything in there besides input/ output routing and the normal volume control fader? Thanks… Thom
Hey Thom,
the simplest form of a volume control rack looks like this:
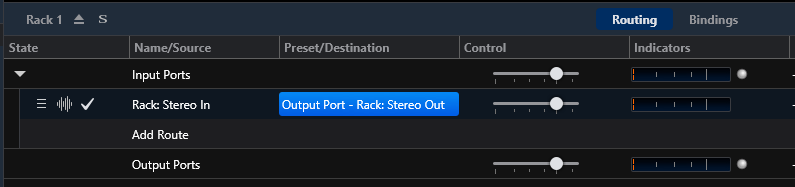

So when you send CC7 to the rack MIDI in, it modifies the rack MIDI output gain. from -oo to +7,3 dB, with 0 dB at a CC7 value of 96, as long as you use Cantabile’s current MIDI response curve (Options - Keyboard & Control - Control Curves). If you change the control curve to "Cantabile (0dB center) you get -oo to +17,9 with CC7=64 for 0 dB.
My volume racks look a bit different: I actually use a free volume plugin (FreeG by Sonalksis):
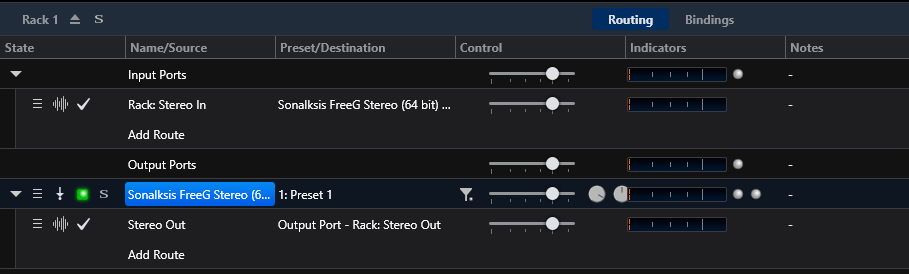

So I use CC7 to control the “Gain” parameter of the plugin. Plus, I have one binding that resets the volume rack to 0dB on any song change so that changes made in one song don’t affect the next. Easier for me than using the Reset mechanism.
I have similar FreeG instances in most of my instrument racks for individual control over their output.
Why am I using FreeG? Mostly, it’s historical - I started it before @brad introduced MIDI control curves, because I liked the FreeG response to MIDI faders. I may actually convert my racks to using output gain over time to free up some processing cycles…
Cheers,
Torsten
1 Like
Many thanks. Great ideas.
Honestly, I’d really like to have a rack or plugin right before the main speakers that will increase or decrease the entire music and vocals to a consistent level. Some backing tracks and/ or VSTi are louder than others. It would be nice for the audience and much easier for me than changing everything individually.
Do you think AutoGainPro or something else could do this in a live situation?
Thanks again …
Thom
TBH, I’m a bit averse to using any “fix-all” method to repair what is essentially sloppy preparation. Any volume automation plugin will likely damage the dynamics of both your backing tracks and your music - think of a song with a quiet intro that builds up to a thundering climax; running this through something like AutoGain will completely ruin the effect. Plus, applying this at the final stage can lead to crazy imbalances in your overall mix: against a quiet playback, your vocals will be overwhelmingly loud, whilst a loud playback will suddenly drown them, since the AutoGain will pull everything (including vocals) down…
Yes, a bit of compression and limiting, judiciously applied at the final stage CAN be quite useful, but they can’t really replace decent preparation of your material:
- setting the right levels of your instruments, both for “normal” as well as for solo use
- choosing well-produced backing tracks and leveling their volumes
- using decent microphone technique and maybe some compression to avoid nasty volume jumps in vocals
Yes, a plugin like AutoGainPro will level everything you feed into it to a homogenous loudness - but do you really want to play a whole evening at a constant loudness level?
Sorry for ranting a bit ![]()
Cheers,
Torsten
Torsten, I’m interested in using the Song Onload binding. Can you explain what the numbers “0,50” under Value represent?
Yes, it simply means 0.5 on a German PC ![]() . VST plugin parameters are commonly scaled from 0.0 to 1.0, so a value of .5 sits right in the middle. Setting the Gain parameter of FreeG to .5 sets the volume slider to exactly 0dB. Setting it to 1.0 would set the slider to +18dB
. VST plugin parameters are commonly scaled from 0.0 to 1.0, so a value of .5 sits right in the middle. Setting the Gain parameter of FreeG to .5 sets the volume slider to exactly 0dB. Setting it to 1.0 would set the slider to +18dB
I use this Binding to make sure that any weird fader moves I’ve made in a previous song don’t affect a newly loaded one. Since there is still some strange behavior in the Reset feature (@brad, I’ll have to take this one up with you separately, it’s a weird one - parameters get reset without being supposed to…), I’ve implemented this simple binding in all my racks that resets all externally controlled parameters on SongLoad.
Cheers,
Torsten
@Torsten, This is what mine looks like when I try to set it up within the Instrument rack. Is that correct?

Doesn’t look right to me: not sure why you have set two values for output gain (0.0dB, -oo). If you want to set your rack volume to neutral, you should simply set it to 0.0 dB; with your current binding, Cantabile will alternate between setting volume to neutral and muting volume (-oo), which doesn’t make sense.
Cheers,
Torsten
Yes, I see what you mean. Thanks for the feedback. Still learning the ins and outs of how Cantabile works two years later! 
Hi Torsten,
As I’ve mulled over your points here, I believe they are all valid. And thanks for taking the time to share them. Here are a couple of reasons why I think these points aren’t absolutely valid for me.
-
I don’t have quiet intros and thunderous finishes. My clients/ audiences are mostly older. I play events that are typically quieter. Dinners, cocktail parties, etc. If the event evolves into a dance party all bets are off.

-
I don’t mean to be sloppy but no matter how I try to make backing tracks the same volume it never works well. How do you do that? Normalizing?
-
I don’t really want compression or limiting on the master out. I’d prefer something just ride the fader for me and make small adjustments to keep the loudness consistently within a reasonable range. Like virtually the same volume as the last song so mingling patrons don’t look my way just because a song started too loudly, etc.
-
I definitely wouldn’t put the vocals behind Autogain. I know from one song to the next exactly what my mic is doing.
-
I’m going to try your idea of “volume control racks” or some variety thereof. I’m going to check out FreeG. I might even have something like that in my billion dollar plugin arsenal already.


Thanks for your help. Lots to think about. I always learn something from you. Thanks again. (I’ll bet you even play better than I do … LOL)
I’ll get back to you when I stumble with this…
~ Thom
Hey Thom,
I don’t currently work with backing tracks, but when I did, I built them all myself, so I had reasonable control over the arrangement. Mostly, they were just Drums and bass, possibly percussion. I made sure that the foundational drum sound was always at the same level (mostly used the same Toontrack drum kit), save for playing dynamics (just as you would with a real band), then arranged the rest around it. That way it was assured that all backing tracks would gel with each other.
If you use third-party backing tracks, it helps to use a similar approach: choose a reference backing tracks and then use A/B checks to compare your other tracks against this one, listening at first mainly to the drums. This way, you can balance the foundation of your song levels, adjusting by ear. To support this A/Bing, you can use tools like Reference or MCompare, but simply putting the tracks next to each other in a DAW and muting/soloing will also do the trick. Simply adjust the track fader of your to-be-calibrated backing track until it fits with your reference, then note down the fader level and replicate this in Cantabile’s media player.
Classic “normalizing” will not get you anywhere, since it usually means scaling a waveform so the peaks hit 0 dB. What might help a bit is a loudness meter - I’ve grown accustomed to LUFS meter, which gives you a nice overview of frequency-balanced loudness over time, with short-, medium- and long-term averages. So if you want to use a quantitative tool, something like this would be my recommendation.
Last, if you use third-party backing tracks, a bit of EQ might be needed to adapt for the differend sound aesthetics between backing tracks providers. This would best be done in your DAW again (you’d then need to re-render your backing track with the EQ and gain change applied, possibly also applying a brick-wall limiter to avoid distortion in case you’re increasing volume on your track). Just be sure you apply the EQ before your gain correction…
Yes, this is a bit of manual work, but it definitely pays back…
You know, even given the parameters you laid out, I’d still be worried about quiet backing tracks being pulled up too loud by a fader-riding plugin: say you have a quiet piano ballad in one song (just a bit of ride cymbal and some strings), and the song after would be an uptempo groove with full drums and bass. Now imagine both these playbacks playing at the same loudness - shudder…
But do give this idea of a fader-riding plugin for your backing tracks a try - YMMV, but if you have pretty homogenuous backing tracks, it might work.
Cheers,
Torsten
1 Like
Thanks Torsten. I have a lot of work ahead of me. I’ll give it all a try. I want this to work as I imagine it can. It has to work. I’m not getting any younger and my fingers and memory are not going to get better. I need this to at least take some of the small stuff off my plate and make gigs easier.
OK.Here I go …
Thanks again…
Thom