Designing New Virtual Rack- best way?

Hey David

You would be best to keep two separate racks for the keyboards. Here is how I handle it, as convoluted as it is:
I have a 49 Key upper, and a 61 Key lower…normally. But, sometimes I use an 88 Key lower. This is how I use the switching:
In my “background” rack, I have states setup for each keyboard. When I go to a gig, I set the states in the BG rack to the controllers I am using. That way, I can make sure that bindings are set for whatever controller is being used. They are set for the rest of the gig. Understand, I did this long before abstracting controllers, and purchasing controllers with more controls, so I have some work to do to get the new ones in, if possible with BG Rack limitations. Of course the controllers are aliased to Main Key, or Key 1, that way only one input is used.

I guess you could put two racks in one rack, and switch with states, but you would have to change it in every song it seems. You could also create an output rack at the end of every vst. I really believe there are many ways to do this, and you should set it up the way it works best for you. As I’ve added vsts and controllers, I have spent many hours to align everything, and after many failures, I usually find one that works. I have roughly 750 songs for 5 bands I was in pre-covid. The songs are still there, but the bands aren’t, so I expect more work in front of me as gigs pile up.

Good idea about the background rack - I forgot about it! I could also use that for another issue I recently encountered. In a couple of bands I play left hand bass, but in another there is a bass player. I had configured my _Lower abstract rack with states for Splits and for entire keyboard, but I always need to remember to switch for each song. If I move that to the background rack, then I only need to set it once for the entire rehearsal/gig.
As you have said, in C3 there are often many ways to configure functionality!
Cheers!

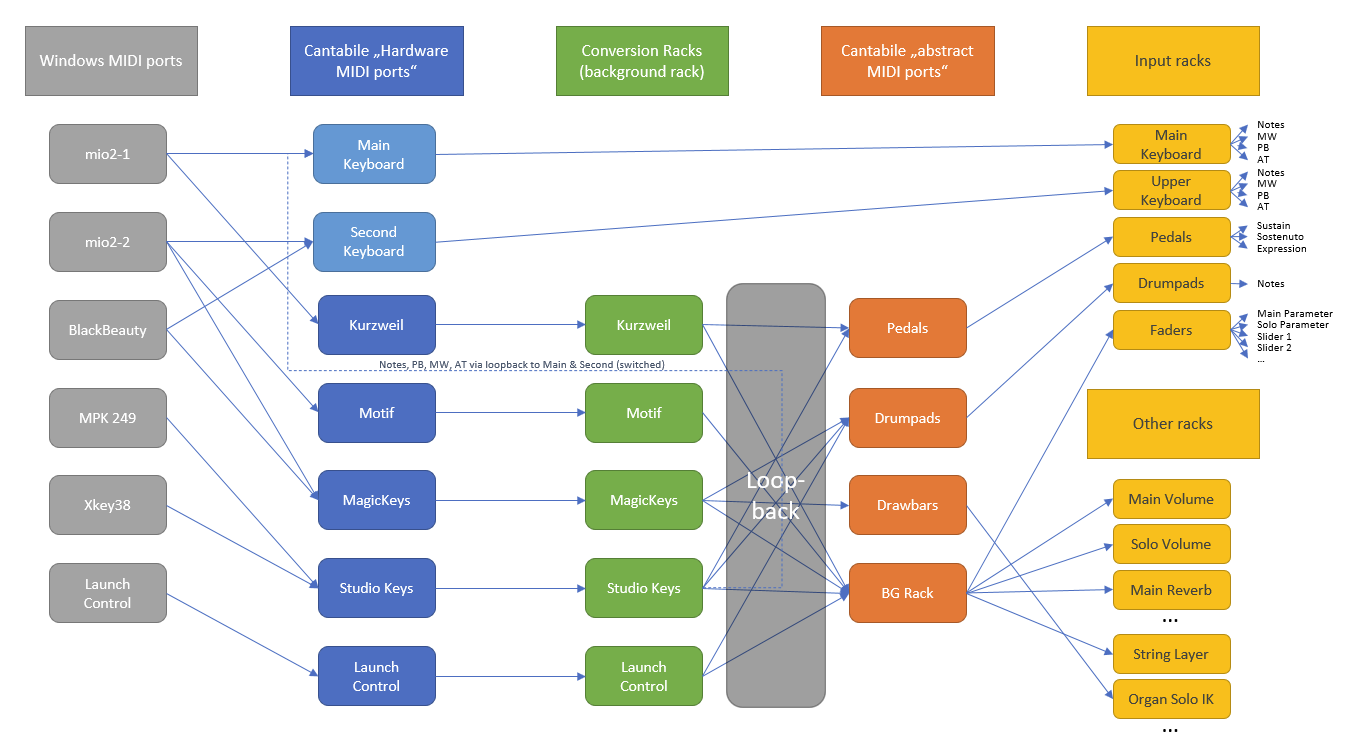
I use separate conversion racks inside my background rack for that. I have an abstract MIDI port called “BG rack” that handles all my sliders, knobs, faders etc. No physical device is connected to this MIDI port directly; it is fed by the conversion racks inside my background rack.

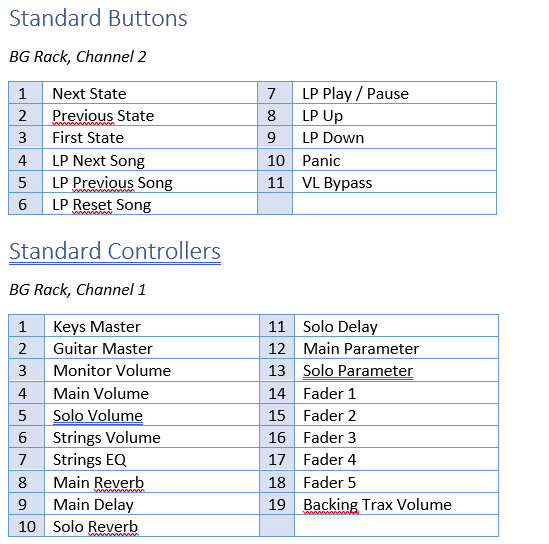
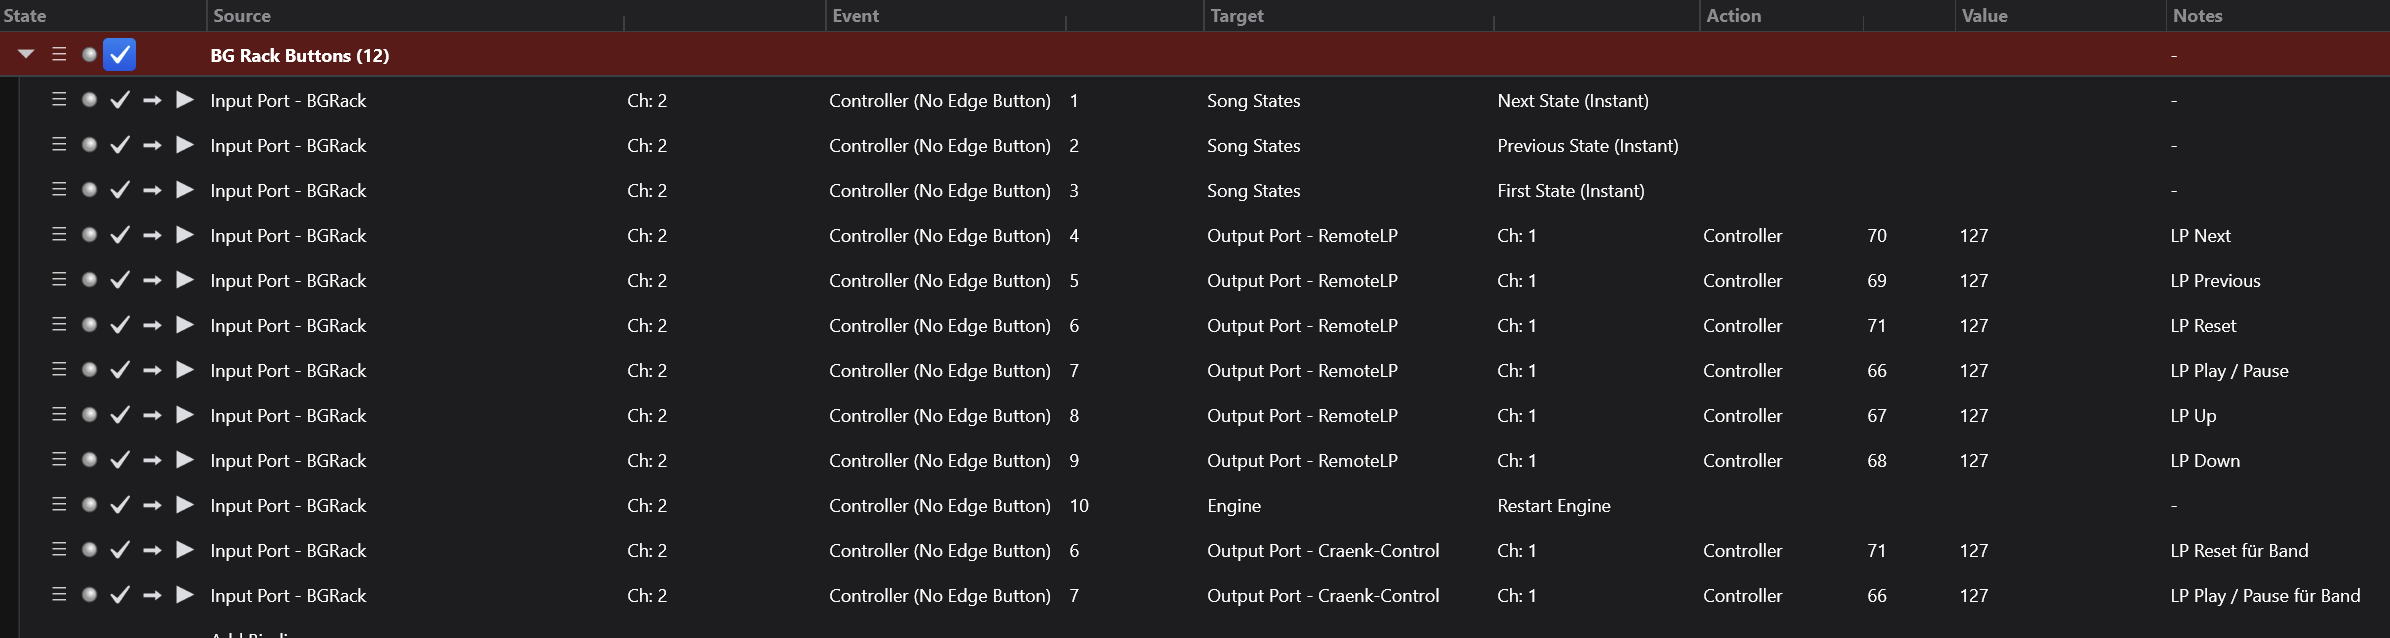
Now the first thing I did was to create “standardized” controllers that feed into my songs from the BG rack, e.g. keys master volume, guitar master volume, main level volume, solo volume, main reverb level, solo reverb level, etc. Same with “standard buttons” like next state, previous state, next song, …

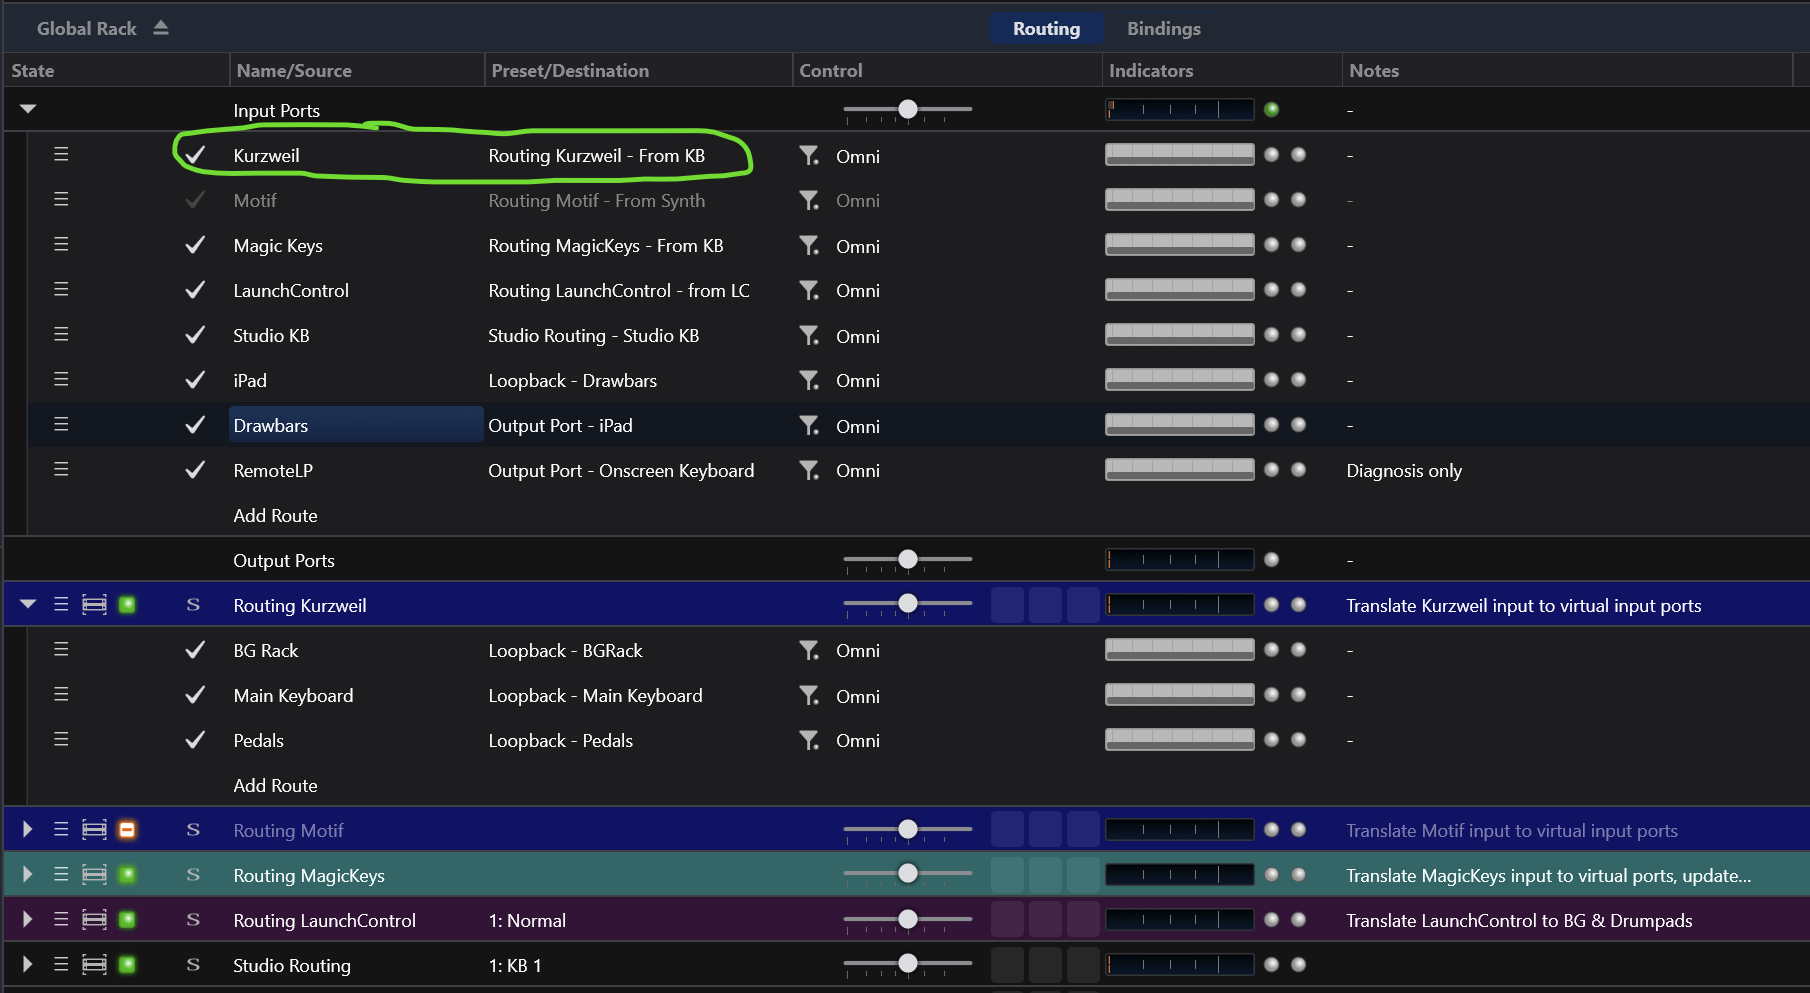
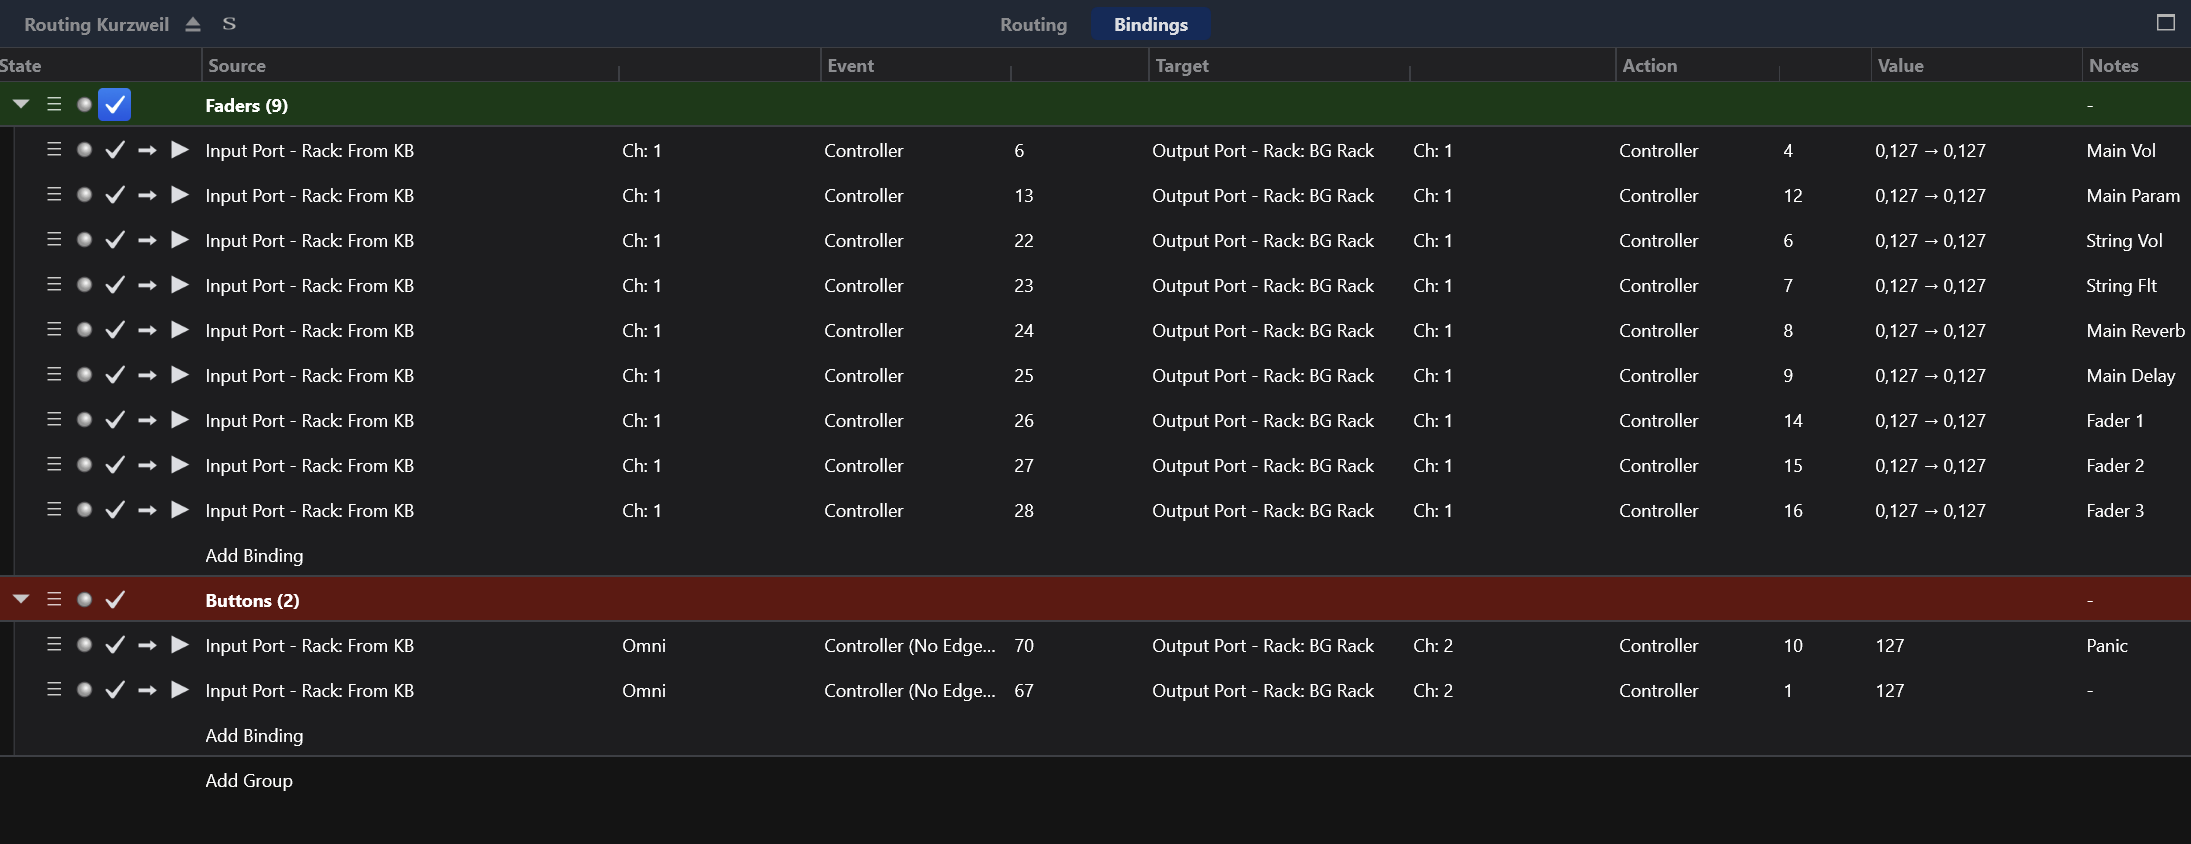
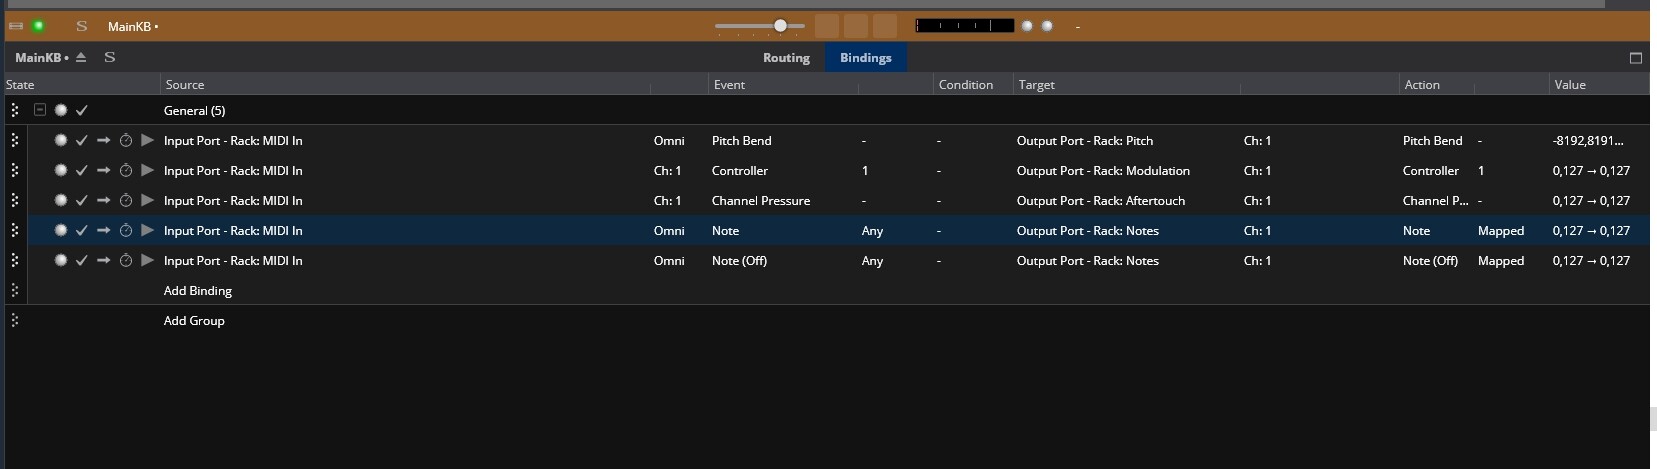
Now I have one rack per physical controller inside my background rack that has the job of converting the input from whatever a controller throws at it to these “standard” controls, so if on one keyboard a button I want to use for “next state” sends a Note command, I need a binding that converts that Note command to CC 1 on channel 1 and sends it to “Loopback - BG Rack”, so that my songs see the right command coming in.

These conversion racks in my background rack then take input from a specific port that my hardware is actually connected to, e.g. “Kurzweil 88” or “Studio Keyboard” and process its data, sending it back to the BG Rack input via Loopback.

Now when I buy a new controller, I just create a new conversion rack to take its input and “standardize” it to my expected commands - now all my songs and my racks can deal with these commands (since they’ve all been programmed to expect these standard commands).

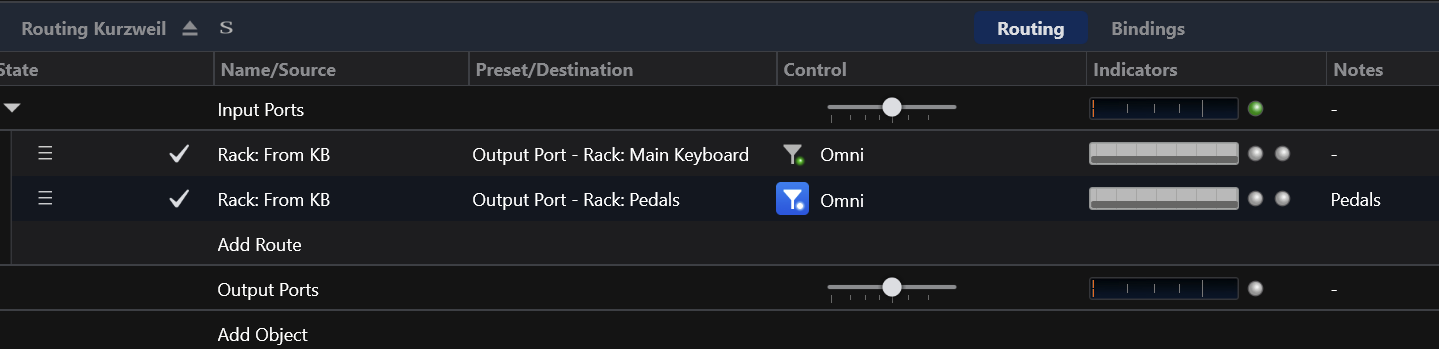
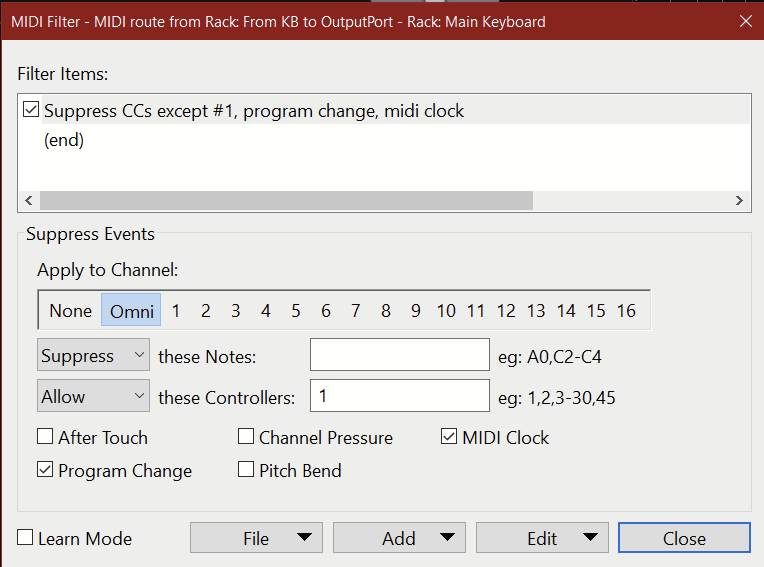
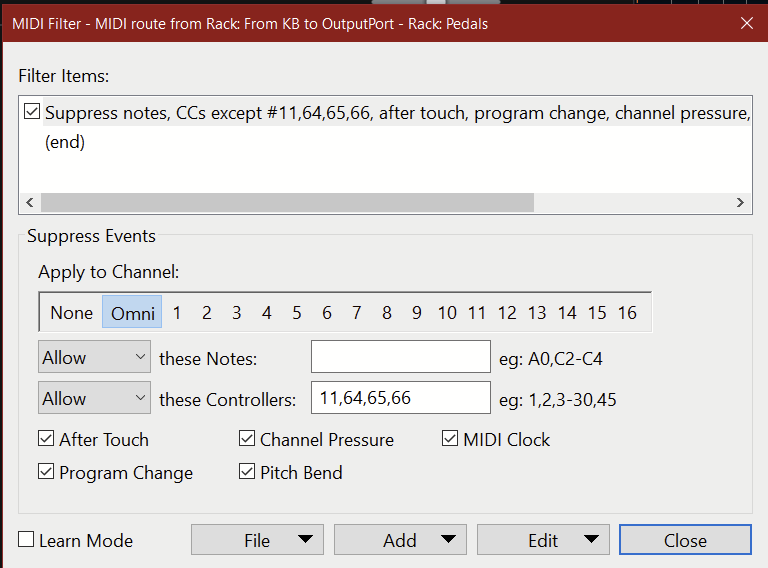
BTW: my conversion racks do even more than just controller conversion - they also handle the routing of notes, pedals, drum pads etc to other “virtual input ports”, but that’s going too far for today…

Since I connect my keyboards via classic MIDI cables, there is no way for Cantabile to know which keyboard is connected, but it takes me just a couple of seconds to open my background rack, activate the correct conversion rack and switch off the others - this way only the correct conversion rack sends commands to the BG Rack port.

All a bit convoluted, but extremely powerful - and once it’s set up, it’s actually very simple to integrate new machinery.

Since you might not want to go all the way with controller standardization, you could try a reduced version of this to simply make your Axiom keyboard imitate your Mojo:

  • create a new MIDI port to connect your Axiom to, keep the MIDI port for your Mojo - now you have two separate ports for your upper keyboard: “Axiom” and “Mojo”
  • create a conversion rack in your background rack that takes its input from the Axiom midi port, converts the controllers via bindings and sends them out to the “Loopback - Mojo” port
  • this will make them appear to your songs as if they had been sent from the Mojo - so no need to change anything in your songs. The songs don’t use the “Axiom” port at all - it is just needed to feed the conversion rack.

In this approach, your Mojo controller setup becomes the de-facto standard; any new hardware will need its controls to be converted via its own conversion rack to your “Mojo standard”…

The Loopback feature is pretty powerful once you figure it out.

Cheers,

Torsten

2 Likes

@Torsten always has the best answers, especially for routings. I had to be short cause I have a gig tonight, and it starts in about 3 minutes. Hope you get going David.

Wow Torsten - wonderful - thank youl!!
I have previously followed some of your suggestions and broken out Notes, pedals, pitch bend, etc. in abstract controller racks, but I didn’t create them in the background rack. I do have buttons for ‘First Song’, ‘Next State’, etc. in my background rack though.
I’m a little hesitant to use Loopback - won’t it introduce some latency into the midi chain?
I’m going to try some of these ideas out tomorrow.
Cheers!

Hi David,

I use Loopback extensively - haven’t noticed any additional latency. Maybe @brad can clarify?

Cheers,

Torsten

So if you really want to dive into that end of the pool, here are some more pointers on how I’ve organized my setup for maximum flexibility and portability. In previous incarnations, I tried to get all my various controller keyboards to behave similarly, i.e. get them to use the same CCs, but that became impractical with some hardware, so I thought I’d weed these dependencies out completely. Here’s an overview of what things look like in my setup:

In my setup, I have two kinds of MIDI ports in Cantabile: “abstract” ones that aren’t connected to any hardware and “hardware-related” ports that get their input from hardware. In between those, there are conversion racks in my background rack that take their input from the hardware and convert and forward it to my abstract ports.

You see that some Windows ports are assigned to more than one Cantabile input port - that’s because I use a 2-port MIDI interface (mio2) to connect my main and upper keyboard, so when I use my “MagicKeys”, these are connected to the second port, alternatively, I can use my Motif XF as an upper keyboard, connected to the same physical MIDI input (but using a different conversion rack in the background rack).

The “abstract” MIDI ports then get used inside my input racks - these essentially take the input and split it up to various outputs so routing gets easier. Some other racks, e.g. volume faders or effect racks use standard controls from the “BG rack” input directly to control levels. Since these racks are dedicated to one single purpose, and I have a special command in BG rack dedicated to that purpose, it’s easier for these racks to listen directly to that port than to have to create routes from the “Faders” rack explicitly, like I used to in previous versions of my setup. Nowadays, I just drop a “Main Volume” rack into my song, and it automatically reacts to the correct fader on my controller.

Some instrument racks, e.g. my String Layer rack or my Solo Organ also use the BG rack (string level, string filter) or the Drawbars port directly, since the assignment is permanent and clear, and no song-specific config is necessary. Again, less routing necessary at song level; just drop in the rack and route notes, controllers, pedals as needed.

Hope this clarifies things and gives you some inspiration for your setup!

Cheers,

Torsten

3 Likes

And here some insights into the “routing rack” side of things: here a view of my Background Rack:


You see that e.g. the Kurzweil “hardware MIDI port” is routed to the “Routing Kurzweil” rack etc. You can also see that my “Routing Motif” rack is currently turned off, because I have the “Magic Keys” active in my current setup. If I plugged my Motif into that port, I’d simply have to de-activate the Magic Keys routing rack and activate the Motif one - done!

You can also see the “Routing Kurzweil” rack sending its output to three “abstract” MIDI ports via Loopback.

Here’s the inside of the Kurzweil rack: routing-wise pretty simple; it just routes notes and selected CCs through to the respective ports:


The bindings page of the routing rack contains the conversion from the Kurzweil’s slider and button mapping to my standard controls:

Lastly, here is a section of my Background Rack bindings page:


This is where some of the standard commands from the BG rack port get actioned, e.g. to step to the next state or to send commands to LivePrompter to control scrolling, etc.

That’s mostly it!

Cheers,

Torsten

4 Likes

Really nice!! Me likey!

Will take a couple of months to wrap my mind around all this.

1 Like

There’s one audio cycle of latency on both audio and MIDI loopback ports. ie: audio or MIDI sent on this audio cycle will appear on the loopback port on the next.

Brad

2 Likes

Thanks for the clarification @brad, but can you explain what “one audio cycle” means in a real world context? If my buffer size is 512 resulting in buffer duration of 11.61 ms at 41.1 kHz. How will that change when using a loopback?
Thank you - David

Aaah, good to know!

That means I’ll rework my input racks to use the MIDI inputs directly without going through the loopback route; for faders, pots and buttons, the additional latency doesn’t really matter, but for keystrokes, it will definitely matter…

Hi @Torsten, Please keep me updated on how you go about doing this without the loopback.
Thanks - David

Pretty simple: I edited the MIDI ports “Main Keyboard” and “Second Keyboard”. Now they’re assigned directly to the MIDI ports coming from my controller keyboards. But I configured a filter on these ports so they only listen on channel 1 and only pass through notes, pressure, pitch bend and modulation.

At the same time, I killed the routes from my routing racks to “Loopback - Main Keyboard” and “Loopback - Second Keyboard” - don’t want double notes.

Now all time-critical messages (notes, bend, mod and aftertouch) flow directly from the MIDI port to the input racks without going through loopback; all the complicated stuff that needs conversion (faders, pots, buttons, pedals) goes through the conversion racks and loopback.

With my typical buffer settings of 128 samples, that’s roughly 3 ms carved out of the latency - definitely helps with the “snappiness” of the keyboard action…

Cheers,

Torsten

1 Like

Here’s the new routing diagram to illustrate the above:

2 Likes

What if notes are passed through a rack, is this also a clock cycle?

In that case, no additional latency. Basically the Cantabile’s MIDI processing for each cycle works in a forward only direction. Everything in the forward direction can be processed instantly. Anything that goes backwards (loopbacks) needs to be buffered for the next audio cycle.

Brad

3 Likes

Hi,
I try to abstract my keyboards in two racks MainKB and SecondKB. In those racks I created different outputs “Notes”, “Modulation”, “Aftertouch” and “Pitch Bend” following the setup @Torsten described.
In only use bindings, no midi filters.
Now I have a problem with the midi “notes” output. It sends out the notes but the velocity is mapped to 127. The midi monitor is telling me that the midi input is correct. (Midi notes with different velocities). I cannot figure out why the velocity is always 127 in the midi “notes” output.

thanks,
Johan

Don’t use bindings to route notes - you’ll lose the velocity information. That’s how Note bindings work currently.

You’ll need to use routes (with the setting ‘notes only’) for notes.

1 Like

See discussion Here.