Behringer FCB1010 improved ROM

Actually, there’s nothing left to change on the FCB1010 when you set it to I/O mode. It simply sends standardized CC messages (you can’t change those) on pressing the buttons and pedals. Any changes you want to make will need to be inside Cantabile (best use the background rack to make something useful out of the CCs the FCB sends - you’ll probably want to convert this to different CCs with values 127/0 - easier to use in Cantabile…

Same with the LEDs - you can send specific CC values out to the FCB1010 to turn LEDs on or off:

Yup - when in I/O mode, the up/down switches simply send CC values - they don’t change the configuration of the FCB.

I haven’t used my FCB in a while - I have set up my songs so that I simply use the sustain pedal to step through states, but I really found it helpful not to have to mess with control pedals that try to be too smart when I have a reeeeally powerful engine in my Cantabile setup.

Cheers,

Torsten

@Torsten, why would you use the background rack for the mappings instead of using the midi input ports (in Options)? I would like the mapping to be as early and local as possible, but I might have missed something, so very curious for the pros and cons of either decision.

Hey Torsten,

two things:

  1. the translation from the not-so-convenient output of the FCB to something that is easier to use with Cantabile bindings, along a CC range (e.g. 51-73, just to pick a random range). So I’d convert e.g. Pedal 5 output from CC106-5 and 107-5 to CC 55-127 and CC55-0. That way, I can use a simple Controller (button) binding with this input. This would be a simple reaJS script in my background rack, sending its output to a new virtual MIDI port (with no physical input connected) via loopback. Now I can use this new MIDI port in bindings instead of the FCB output.

  2. There are some functions that are independent of songs that I usually set up in my background rack, e.g. next/previous/first song state (you could also have individual buttons for song states 1-5 if you want that…), next/previous song in setlist, play/pause/stop first media player. These would be typically triggered by the same switches on a pedalboard, so I’d put these bindings into the background rack. The rest of the switches on the pedalboard can then be used in your songs for song-specific actions (e.g. playing a sample etc.)

I try to have consistency across my songs, so most of the controllers on my keyboards are mapped to standard functions (main volume, upper volume, pad layer volume, solo reverb, …), so they will work across the majority of my songs. Makes life a lot easier than having to try to remember “what does this fader to in this song???”. I have just a couple of sliders and buttons that have song-specific functions (maybe a synth filter control, or a button that fires off a sample) - these I bind within the song. The rest is taken care of in the background rack.

Cheers,

Torsten

1 Like

After I posted I realized that is the case - good point!

Yeah, that’s living the dream right there-- so much simpler than the FCBUno with its trillions of possible modes. Thanks for clarifying!

I share the attempt to go for consistency and simplicity, but that was the reason for me to push hardware-specific interpretations to the actual midi input port, i.e. setting up midi filters on the input port like this:


It removes the option of ReaJS and bindings, but I like the idea that the input I get in the background rack is already kind of “normalized”, so I get a useful input on that particular hardware port. The example I have picked is the transport buttons on the SL Mixface, that I use for a different purpose than transport, so I translate them to CC 102 - 109 with values 0 / 127.

So, I think what I wanted to ask before was if there were cons with this setup that I have missed. To me, the advantage is that I move the business logic to be part of the input port, thus providing an early layer to provide an abstraction between the background rack and the hardware. But I wasn’t sure if there were performance or other details to worry about. I am still struggling to find the right place to put various kinds of logic, Terry showed how he used to set filters on the output ports in racks, and that was very elegant, and confused me endlessly when I tried it and had to debug my setup.

1 Like

Hey Torsten

you will actually have a timing advantage of one audio buffer compared to my approach - using the loopback ports will add one buffer cycle to the processing time for the MIDI commands.

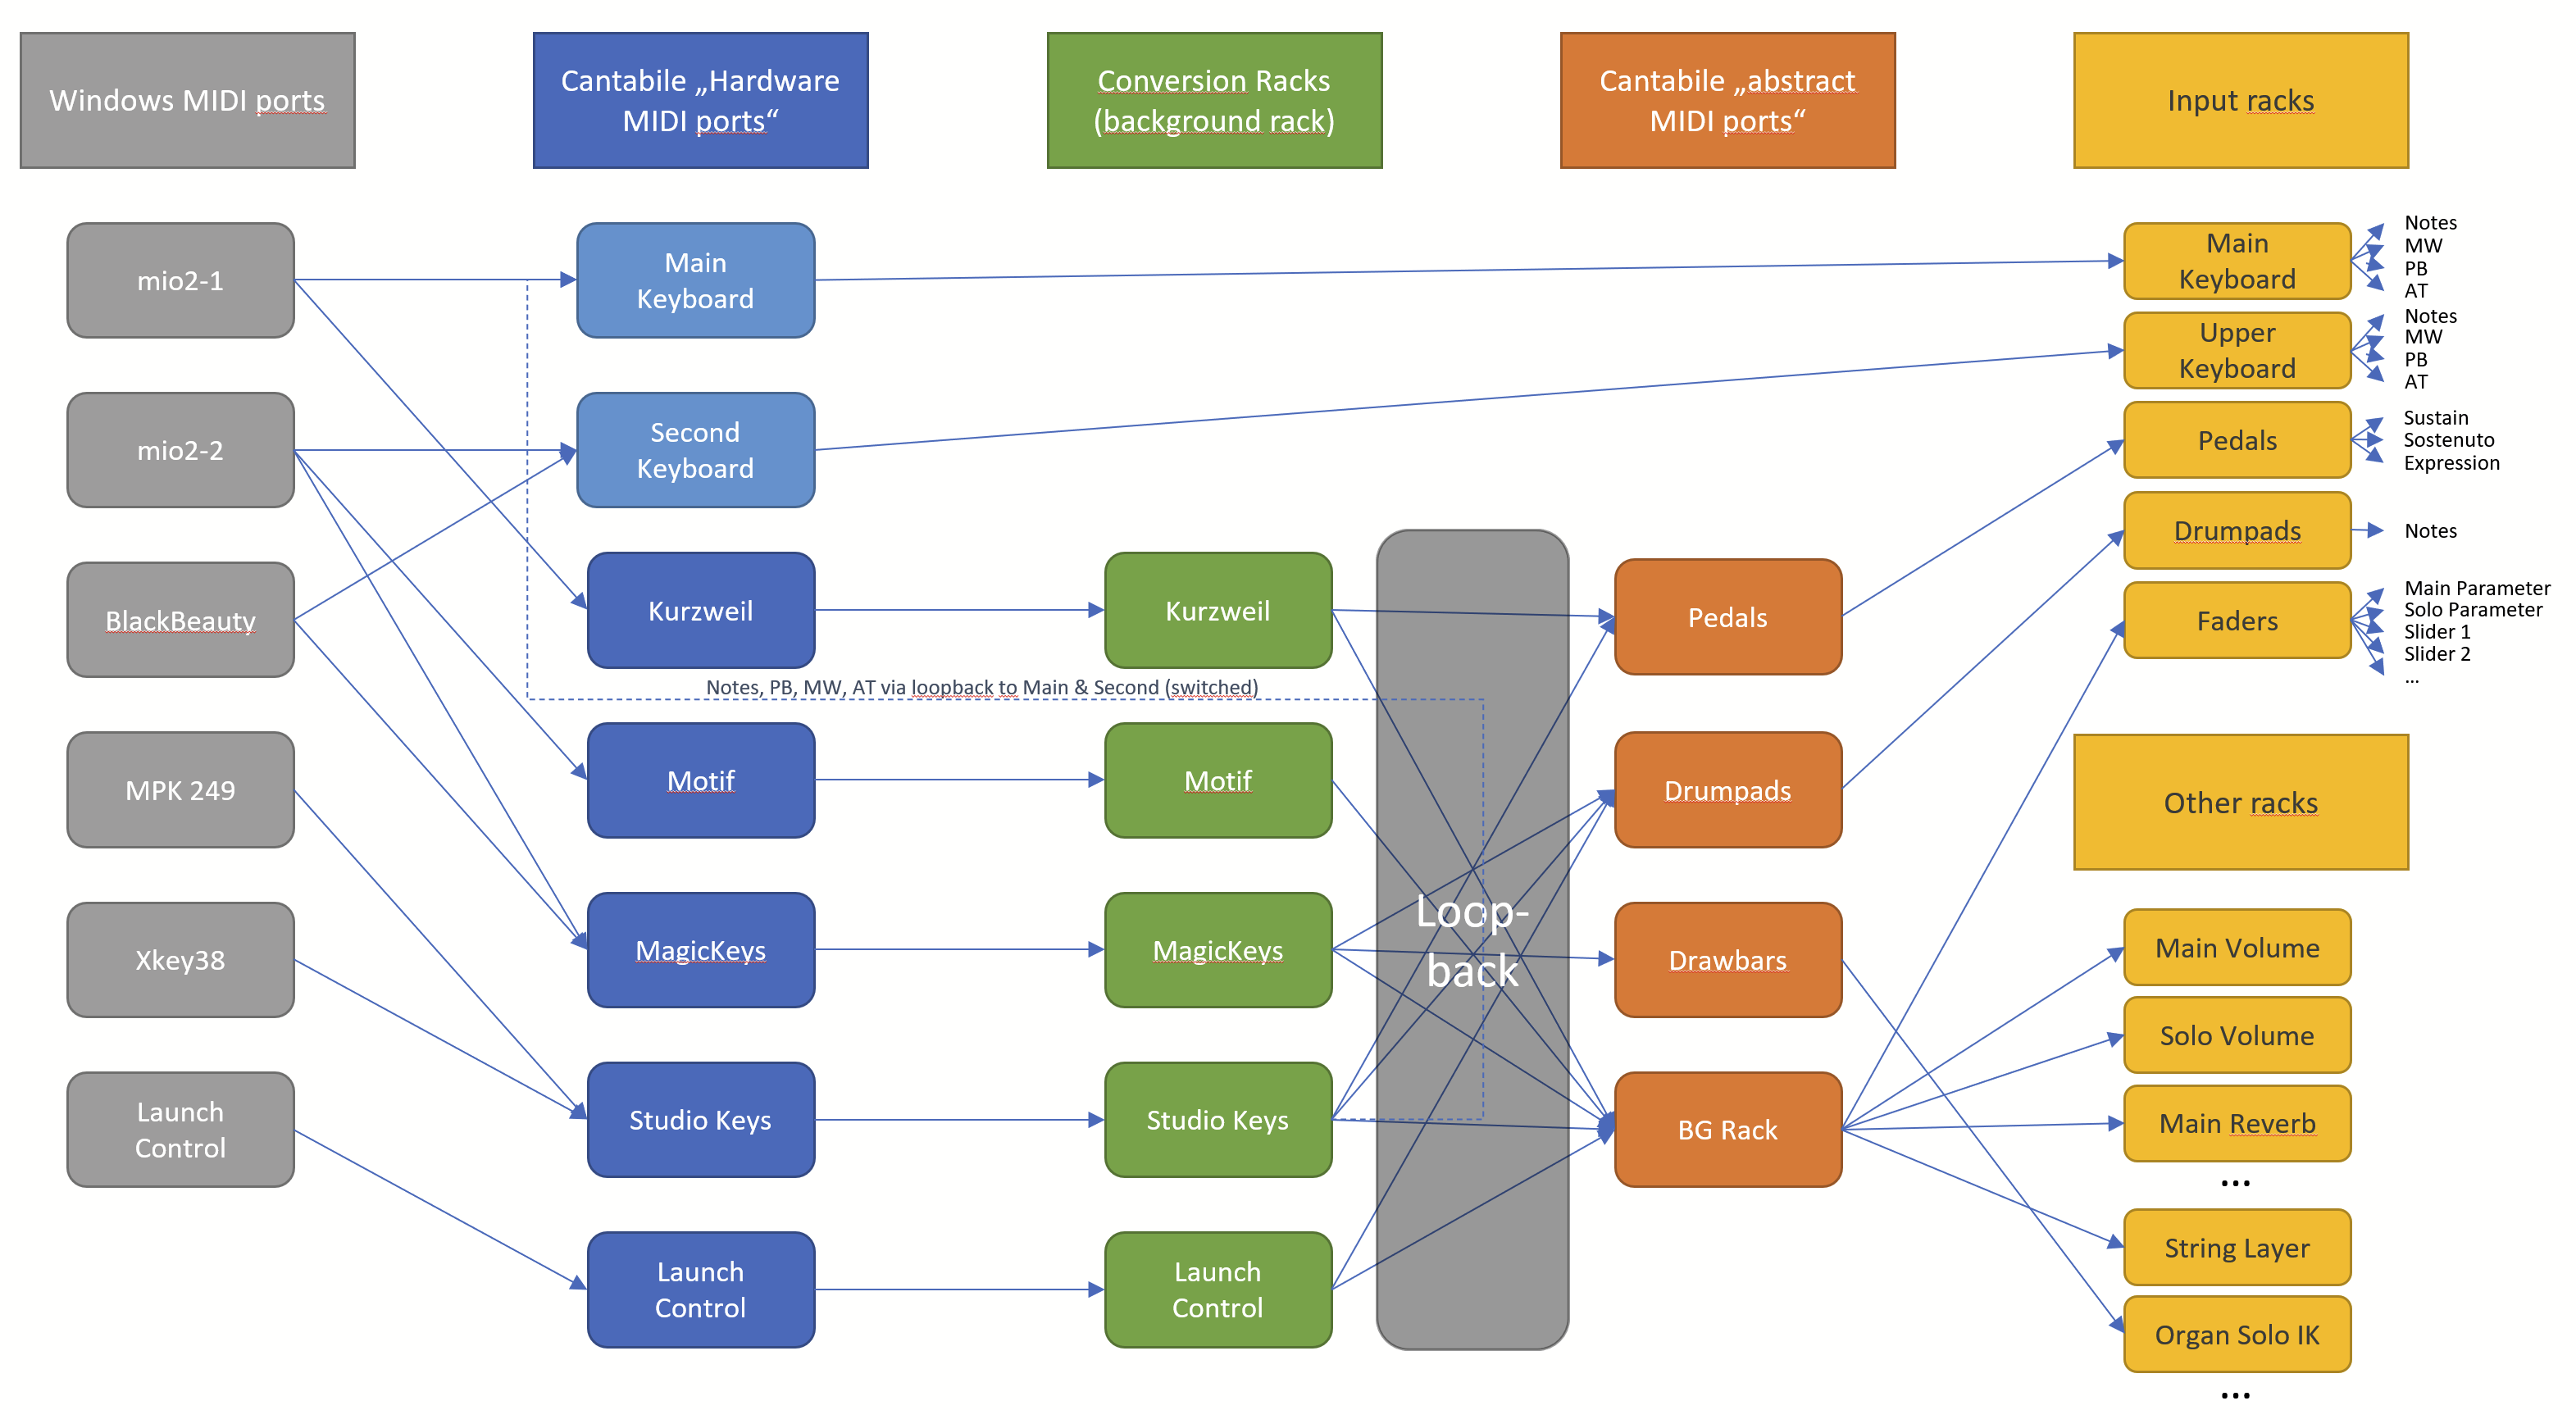
That is why I am using the input ports directly for time-critical MIDI data (notes, aftertouch, pitch and mod) where every cycle counts. Everything else is abstracted through the background rack.

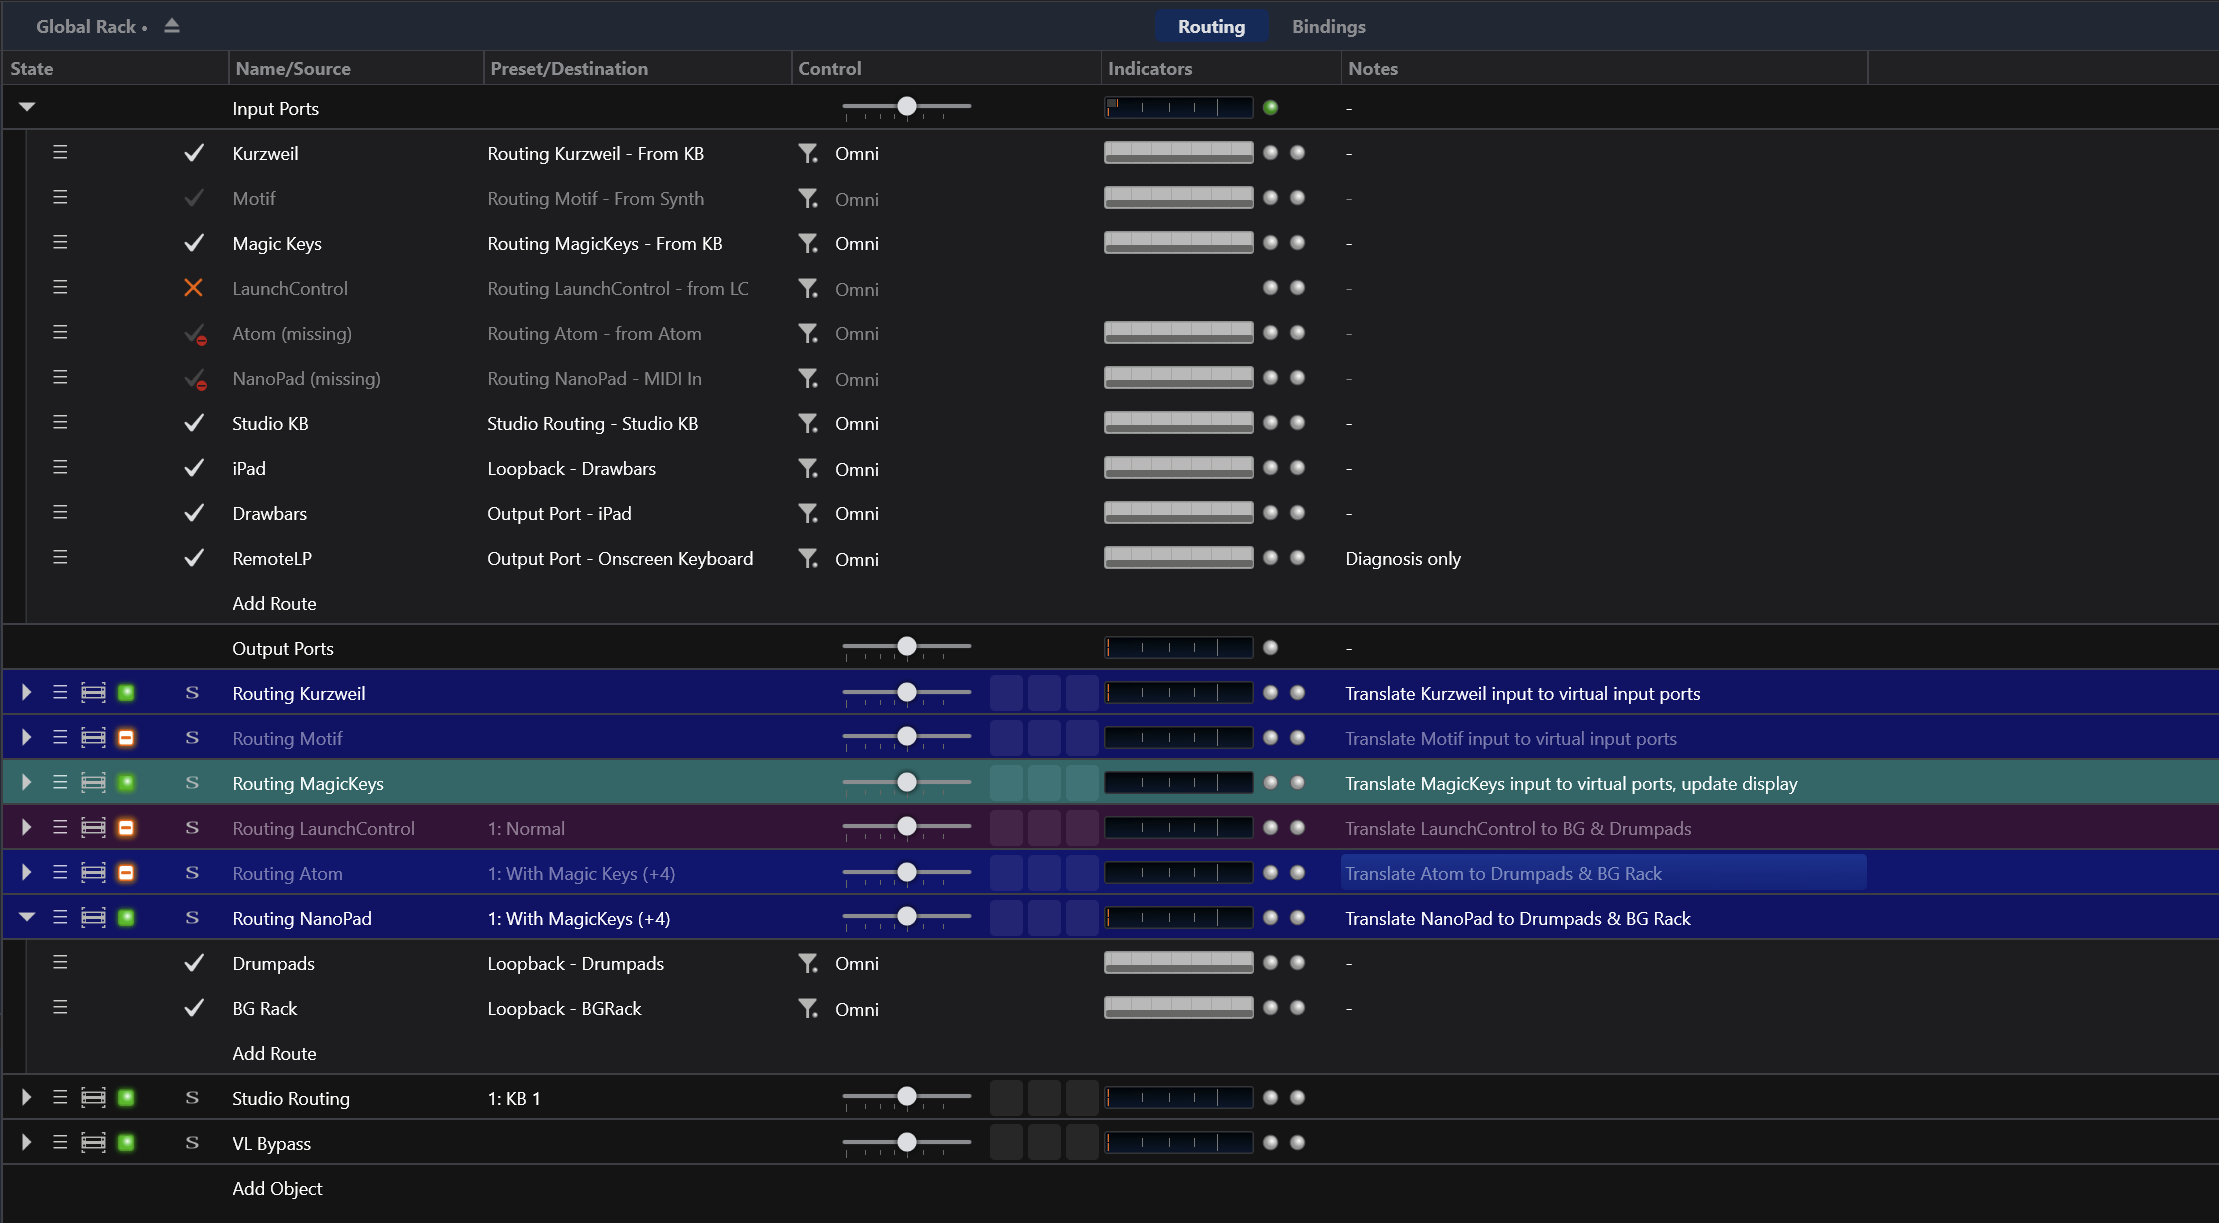
Reason for this is that I have various control keyboards and other controllers (fader/ rotary controllers, drum pads etc). If I wanted to assign them all into the same “logical” ports directly (“faders”, “drum pads”), I couldn’t do the conversion to standard controllers or notes on the inputs, since this conversion would apply to ALL physical inputs attached to that logical port. So I added one additional layer of conversion inside my background rack - one for each physical controller. These then take the input from my controllers and feed it via loopback to my standardized “abstract” ports, like “Pedals”, “Drumpads”, “Drawbars”, etc.

I have multiple such conversion racks in my background rack, and I only switch on the ones that correspond to the hardware I am currently using in a rehearsal or gig. So when I have my Motif as the upper keyboard, I activate the Motif rack, when using my custom-built “magic keys”, I turn off the Motif rack and activate the “Magic Keys” rack. Same with my drum pads - I have a Presonus Atom and a Korg NanoPad. These are laid out differently, so I use conversion racks to make them fit with my setup.

So in any song, I only use my abstracted standard ports “Pedals”, “Drumpads”, “BG Rack” for controllers; same in my background rack bindings.

Any new controller I bring into my setup will only need one more conversion rack to play nicely with the other kids.

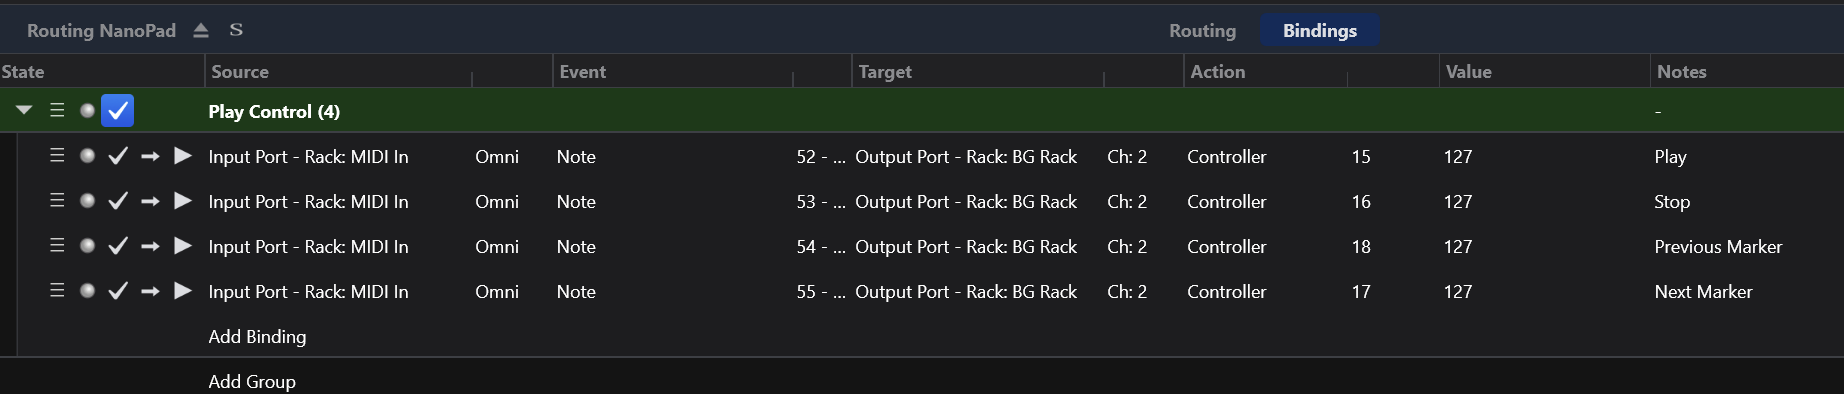
One example: with my new NanoPad, I decided to use one of its scenes as transport buttons for any backing track I have in my songs, so I built some bindings into the conversion rack that send my standardized commands for that to the “BG Rack” loopback port:

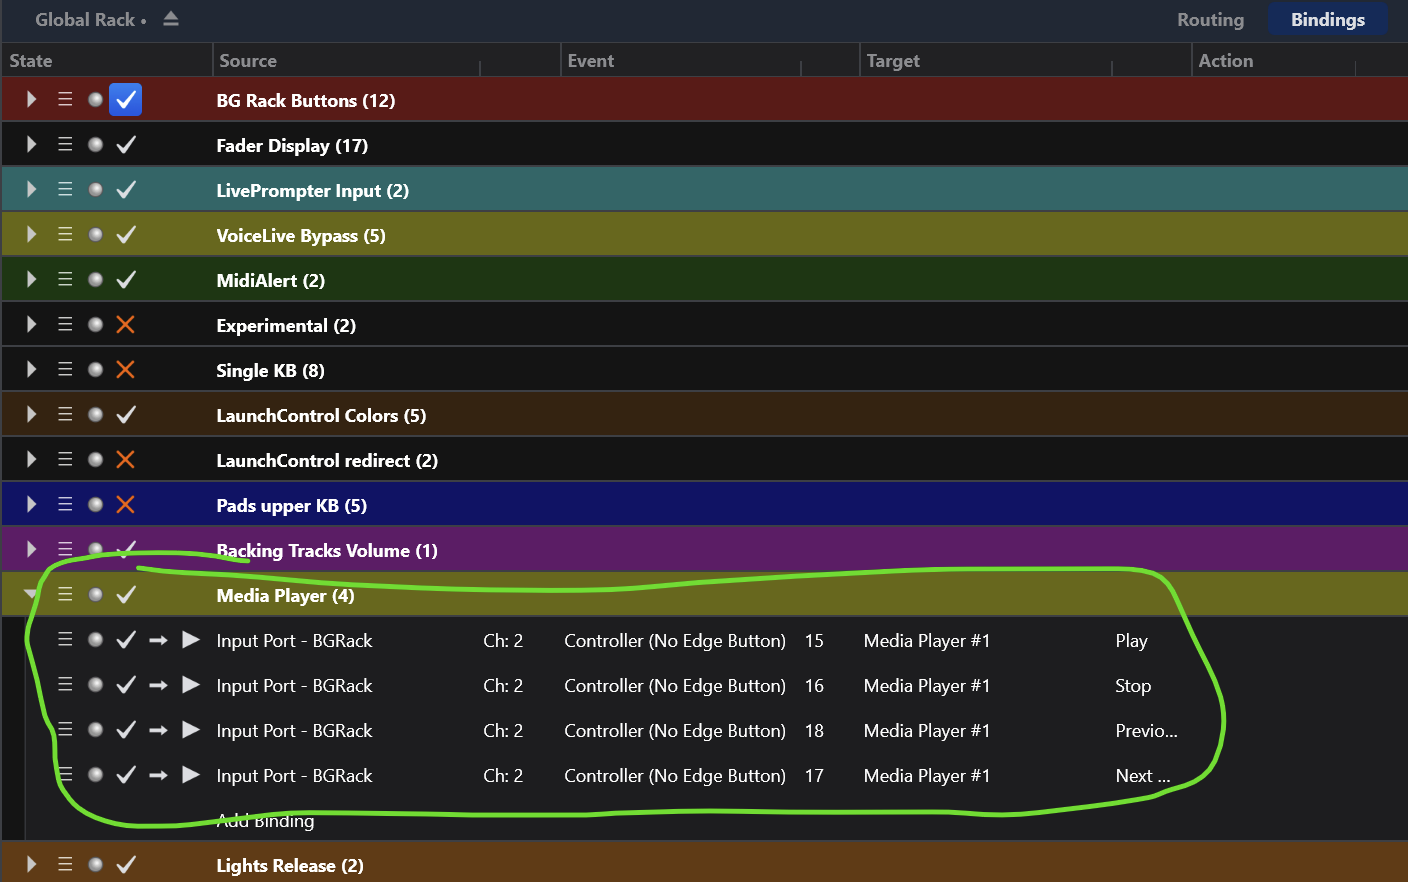
These standard commands then get picked up by some bindings in my background rack and steer a media player in the current song (if there is one):

This looks all a bit convoluted, but it is extremely powerful: Input from any attached MIDI device can be standardized and routed to multiple abstracted MIDI ports (which won’t work with your conversion directly on the input) - my “magic keys” (one physical input) routes to “Second Keyboard” for key presses, “Pedals” for pedal controls, “BG rack” for standardized controllers, “Drawbars” for drawbar controls, and “drumpads” for triggering drums and samples.

Makes my life with multiple hardware controllers really easy, so including my FCB1010 would just mean adding another routing rack to feed my existing abstract input ports.

Sure, this is not for everybody, but it’s great what you can do with Cantabile!

Cheers,

Torsten

1 Like

I can see the point when having different hardware setups that you switch between - I have a limited setup and use the same setup everywhere. Thanks for the thorough answer, there were some good points for future inspiration, though I strive to avoid making too many changes when the current setup actually works and I don’t have specific issues. But tempting …

2 Likes

I installed the EurekaProm and have been using the IO mode successfully to send keyswitch notes from the numbered pedals. I also got Bome Midi Translator to convert CC 103 1-127 to Pitchwheel 0-16383 with a straight conversion. The only problem is returning to pitchwheel 8192. I have three ideas:

  1. Design a physical detent for the pedal that the pedal can click into for centering.
  2. Some kind of script that jumps the Pitchwheel value to 8192 if I move from below or above to within 1000 of 8192. Then if I move up it follows the pedal up to 16383. The ideal pedal movements are sweeps always from center to full 16383 or center down to 0.
    3.The other approach is pedal all the up is 8192, all the way down is 16383 so the pedal can only sweep up from the center value of 8192 - that will be fine for pedal steel use. I think the Bome rules can do that.

Any other ideas on accomplishing this would be very appreciated. The goal is to keep both my hands free for the pedal steel notes

This can be done with ReaJS, but you may be able to use the midi filter Velocity/Controller Curve:

The curve setting will not hit 8192 dead center, though, so I think the script thing will be needed. I’d be happy to give it a shot at the script, if needed.

Hi Torsten,

I’m going to give the velocity/controller curve approach a try - thanks for the suggestion. Dead center isn’t that critical because I can always flick the actual pitchwheel if I need dead on.

Thanks for the offer to take a shot at the script. I’ve done some modifications of ReaJS scripts so I’m going to play with it and see how far I can get.

Doug

1 Like

I actually achieved my original FCB1010 goals using just Cantabile 3 but ended up buying Bome Midi Translator Pro anyway because Steve Caldwell on their forum provided me some interesting scripting ideas with Bome bmtp files to get me started. One of them is to program a single pedal touch to sweep the pitchwheel up from 8192 to 16384.

Shopping tip - I did a little shopping around and found that Thomann was selling it for $56 (as opposed to about $70 on Bome’s website) so my first Thomann purchase!

3 Likes